JD-MV1
Page 3
General installation guidelines
JD-MV1
-
It is recommended to install the unit in a hallway to limit the JD-MV1 exposure to
noxious gases.
-
In order to avoid condensation problems inside the JD-MV1, it is recommended to
install the module on an inside wall. If it is not possible, use spacers to have an air
gap between the wall and the controller.
-
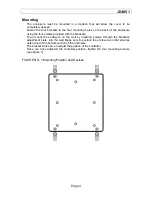
It is required to install the JD-MV1 right side up with the cable entry holes facing
down.
-
The enclosure is watertight, but do not spray water or submerge the JD-MV1 in
water. Cover it carefully with plastic when cleaning the room.
-
The JD-MV1 should be installed in easy-access location but away from damaging
elements (heat, cold, water, direct sunlight…).
-
Do not drill the face, the side, the top or the underside of the control.
-
Do not install the JD-MV1 near high-voltage equipment, power supply or transformer.
Electrical cables
-
All electrical cables must be installed according to local wiring codes.
-
All cable shields must be connected to the shield terminal on the cord to which the
cable is connected. The shield is needed to protect the JD-MV1 against any
electromagnetic interference generated by lightning or nearby operating machinery.
-
Never use the shield as a conductor.
-
Connect only one end of the shield to the JD-MV1.
-
Use separate conduits for the low voltage cables and the high voltage cables. There
must be at least 1 foot (30 cm) between low-voltage and high-voltage conduits.
-
If a low voltage cable has to cross over a high voltage cable, make this crossing at
90°.
-
All cable connections must be soldered or done with approved sealed connectors.
-
It is prohibited to use overhead cables outside the building.
Содержание JD-MV1
Страница 12: ...JD MV1 VER 1 2 April 5 2011 ...


