


JD-MV1
Page 5
Wiring Procedure
1. Open the JD-MV1 controller enclosure.
2. Verify the technical specifications to know which wire to use.
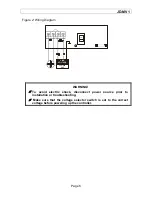
3. Connect the equipment to the 2 black terminal block identified as FAN as shown
in figure 2.
4. Connect the power source to the 2 black terminal block identified as LINE as
shown in figure 2.
5. Make sure that the voltage selector switch is set to the correct voltage before
powering up the JD-MV1 (refer to figure 3 for the location of the switch).
6. Power up the JD-MV1 controller. Verify that the controller operates correctly.
7.
Close the JD-MV1 enclosure. Don’t forget to put a security screw or a padlock.
Содержание JD-MV1
Страница 12: ...JD MV1 VER 1 2 April 5 2011 ...