2
DE
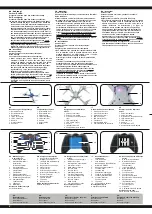
Bezeichnung der Komponenten
1. Rotorblätter vorne
2. Rotorblätter hinten
3. Rotorschutz
4. LEDs, vorne (blau)
5. LEDs, hinten (rot)
6. Kamera
7. Ein-/Ausschalter
8. Akkufach
GB
Component Description
1. Rotor blades, front
2. Rotor blades, rear
3. Protecting ring
4. LEDs, front (blue)
5. LEDs, rear (red)
6. Camera
7. On-Off Switch
8. Battery
FR
Désignations des différentes
pièces
1. Pales du rotor avant
2. Pales du rotor arrière
3. Protection contre les pales du
rotor
4. LED, avant (bleu)
5. LED, arrière (rouge)
6. Caméra
7. Interrupteur On/Off
8. Compartiment de la batterie
IT
Denominazione dei componenti
1. Pales du rotor avant
2. Pales du rotor arrière
3. Protezione dei rotori
4. LED, avant (blu)
5. LED, dietro (rosso)
6. Fotocamera
7. Interruttore ON/OFF
8. Compartimiento de la batería
ES
Descripción de las diferentes
partes
1. Palas rotor delante
2. Palas rotor atrás
3. Protección de las palas del rotor
4. LED, delante (azul)
5. LED, atrás (rojo)
6. Cámara
7. Interruptor On/OFF
8. Compartimiento de la batería
1
2
3
4
5
6
7
8
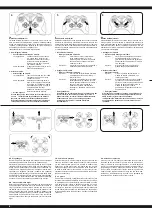
DE - Bezeichnung der
Komponenten
1. Gasknüppel /Gieren
2. Steuerhebel Nick/Roll
(links/rechts,
vorwärts/rückwärts)
3. Ein-/Ausschalter
4. Einsteiger/Profi modus
5. Videofunktion
6. Fotofunktion
7. Start/Landeassistent
8. Nicktrimmung (vor/zurück)
9. Rolltrimmung (links/rechts)
10. Kompassfunktion/
Flybackfunktion
11. Flipmodus
12. Batteriefach
Batterien in Sender einlegen
Auf Polarität achten
GB - Component Description
1. Speed control stick/Rudder
2. Nick/Roll control stick
(left/right, forward/backward)
3. Power switch
4. Beginner and expert mode
5. Video function
6. Photo function
7. Start / Landing assistant
8. Nick trim (forward/backward)
9. Roll trim (left/right)
10. Compass function/
Flyback function
11. Flip mode
12. Battery cover
Fitting the transmitter batteries
Observe the polarity.
FR - Désignations des différentes
pièces
1. Gaz-/manche d’anti-couple
2. Manche Roll-/Nick
(droite/gauche, avant/arrière)
3. Interrupteur On/Off
4. Mode début. et experts
5. Fonction vidéo
6. Fonction photo
7. Atterrissage assistant
8. Trim Nick (avant/arrière)
9. Trim Roll (droite/gauche)
10. Fonction boussole/
Fonction Flyback
11. Mode de Flip
12. Compartiment pour piles
Mise en place des piles
Respecter la polarité.
IT - Denominazione dei
componenti
1. Leva Gas/Coda
2. Leva Roll/Nick
(destra/sinistra, avanti/indietro)
3. Interruttore ON/OFF
4. Modo principianti e esperti
5. Funzione video
6. Funzione foto
7. Assistente di atterraggio
8. Trim Nick (avanti/indietro)
9. Trim Roll (destra/sinistra)
10. Funzione Bussola/
Fonction Flyback
11. Flip mode
12. Compartimento batteria
Montaggio delle pile
Rispettando la polarità.
ES - Descripción de las diferentes
partes
1. Gas / dirección palanqua
2. Roll-/Nick palanqua
(izquierda/derecha,
delante/atraz)
3. Interruptor ON/OFF
4. Modo principiantes y
profesionales
5. Función de vídeo
6. Función de foto
7. Asistente de aterrizaje
8. Equilibrio Nick (delante/atraz)
9. Equilibrio Roll
(izquierda/derecha)
10. Función brújula/
Función Flyback
11. Flip mode
12. Compartimento de la batería
Instalación de las pilas
Preste atención a la polaridad
4x AA
11
10
12
1
3
4
5
6
7
2
8
9
10
11
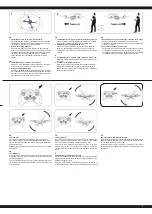
DE -
Achtung!
Vor dem Betrieb:
Erst das Modell und dann den Sender einschalten.
Bei Beendigung:
Erst das Modell und dann den Sender ausschalten.
● Betreiben Sie Ihr Modell niemals in Distanzen die außer-
halb Ihrer Sichtweite liegen. Sowohl die max. Sichtweite
als auch die max. Reichweite Ihres Modells hängen von
vielen Faktoren wie Witterung, Einsatzort und vorhan-
denen Störfrequenzen ab. Führen Sie deshalb vor jedem
Einsatz unter sicheren kontrollierbaren Bedingungen ei-
nen Reichweitentest durch und prüfen Sie auch wie sich
das Modell während des Betriebs bei einem Signalausfall
wie z.B. bei leeren Senderbatterien oder ausgeschaltetem
bzw. ausgefallenem Sender verhält. Quadrocopter mit
Altitude-Technologie sollten bei einem Funktions-
oder Reichweitentest nicht festgehalten werden da die
Höhenkontrolle so lange Vollgas gibt bis ein Höhenan-
stieg registriert wird. Statt dessen empfi ehlt es sich das
Modell von unten an einem Seil zu fi xieren das nicht auf
Spannung gebracht wird sondern locker gelassen wird.
GB - Attention!
Before operating:
Switch the model on fi rst then the transmitter.
When fi nished:
First switch off the model then the transmitter.
●
Never operate your model beyond sight. Both the
maximum visibility as well as the max. range of your
model will depend on many factors such as weather,
location and interfering frequencies. Before each use,
perform a range test under safe, controllable conditions,
and also check how the model is operating during a
signal failure e.g. in the case of empty transmitter
batteries or switched-off or failed transmitter.
Quadrocopters with Altitude technology should not be
held in your hand during a functional or range test, as
the
altitude control will give full throttle until a rise in altitude
is registered. Instead it is recommended to fi x the model
from below on a rope which is not put on tension, but is
left loose.
FR - Attention!
Avant l’utilisation:
Allumez en premier modèle puis seulement votre l’émetteur.
Après utilisation:
Arrêtez le modèle en premier puis votre radiocommande.
●
N’utilisez jamais le modèle à une distance hors de votre
visibilité. La visibilité maximale ainsi que la ortée
maximale dépendent de plusieurs facteurs tels que le
temps, le lieu d’utilisation et les présentes fréquences
perturbatrices. Effectuez pour ce faire avant utilisation un
test de portée dans des conditions contrôlées et vérifi ez
comment le modèle se comporte en cas de perte de
signal. Les drones équipés d’altimètre ne devraient pas
être tenus pendant le test. Ces derniers tendent à
accélérer jusqu’à ce qu’une monté soit enregistrée par le
drone
. Il est donc plutôt recommandé de fi xer le drone à
un fi l non tendu afi n de faire un test approprié.
IT - Attenzione!
Prima dell‘uso:
Accendete prima il modello e poi la trasmittente.
Dopo l‘uso:
Spegnere prima il modello e poi la trasmittente.
●
Non utilizzare il suo modello fuori della distanzia di vista.
Sia la visibilità come la portata massima del vostro
modello dipendono da molti fattori, come il tempo,
disturbo di frequenza e il luogo di utilizzo.
Prima di ogni utilizzo, eseguire un test di portata sotto
sicurezza,
condizioni controllabili e anche controllare come il
modello funziona in caso di mancanza si segnale ad
esempio nel caso di batterie vuote della trasmittente o la
trasmittente spenta o fallita. Quadrocopter con
tecnologia Altitude non devono essere tenuti in mano
durante un test funzionale o test di portata, perché il
controllo d´altezza da tutto gas
fi no
a quando viene
registrato un aumento d´altezza. Invece, si raccomanda
di fi ssare il modello dal basso su una corda che non viene
messa in tensione, ma lasciato sciolto.
ES - ¡Atención!
Antes del uso:
Encender primero el modelo, y después la emisora.
Después del uso:
Apagar primero el modelo, y después la emisora.
●
No utilizar su modelo fuera de la distancias de visibilidad.
Tanto la visibilidad como la capacidad máxima de su
modelo depende de muchos factores, tales como el
tiempo, frecuencia de interferencia y el lugar de
utilización. Antes de cada uso, realizar una prueba de
alcance bajo de seguridad, condiciones controlables y
compruebe tambien cómo funciona el modelo durante
una falla de señal por ejemplo en el caso de baterías
vacías de emisora, emisora apagada o fallada.
Quadrocopter con la tecnología Altitude no se deben
tener en la mano durante una prueba de alcance, porque
el control de altura va a dar todo el gas has que se registra
un aumento de altura. En lugar de ello, se recomienda
para fijar el modelo desde el bajo en una cuerda que no se
tiene que tensar, pero se deja suelto.
DE -
Batteriehinweis:
Nicht wiederaufl aden!
Nicht öffnen!
Nicht ins Feuer werfen!
GB -
Battery warning:
Do not recharge!
Do not open!
Do not dispose of in fi re!
FR -
Indications relatives aux piles:
Ne pas recharger!
Ne pas ouvrir!
Ne pas mettre dans le feu!
IT -
Avvertenza sulle batterie:
Non ricaricabili!
Non aprire!
Non gettare nel fuoco!
ES -
Advertencia sobre las baterías:
No recargar!
No abrir!
No arrojar al fuego!


