background image

Installation and Operation 

www.jacuzzi.com


Page 5

English


Signature™ Collection

Framing and Support

Observe all governing codes and ordinances.

1

  Proper installation is your responsibility. Have a qualified technician install this bath.

2

  Installation using a ground-fault circuit-interrupter (GFCI) is required. 

3

  It is the customer’s responsibility: 


• To contact a qualified electrical installer.


• To assure that electrical installation is adequate and in conformance with National Electrical Code (NEC). 

A Technical Specifications Manual has been included with your bathtub. The Technical Specifications Manual will 

contain pertinent information regarding your Jacuzzi Luxury Bath product. Locate the Technical Specifications Manual 

at this time.

NOTES


Finished alcove must have correct interior dimensions, as shown in the rough-in diagrams in the Technical 

Specifications Manual, to properly install unit. For three wall alcove installations, use an integral molded three-sided 

tiling flange bathtubs. Jacuzzi Luxury Bath does not recommend utilizing bathtubs without an integral tiling flange in an 

alcove installation where a shower head would be installed above the unit and utilized as a shower.

  In remodeling, if necessary, add studs at each end to provide a vertical nailing surface for the side nailing flanges of 


   bath fixture product.

  To avoid obstructions during installation make sure that supply lines, spout pipe and valve plumbing do not project  

   into alcove.

  Bathtubs require a 6" x 12" (150mm x 305mm) floor opening for the 1 ½" (38mm) drain, waste and overflow (DWO) 


   kit.

  Be sure floor opening location matches bathtub fixture drain location.

  Use of casting plaster/plaster of paris (foundation material) is recommended in all commercial structures (i.e. hotels,  

   motels, dormitories, health clubs, etc.).

  The unit must be supported from the bottom of the bathtub and not solely from the bathtub rim.

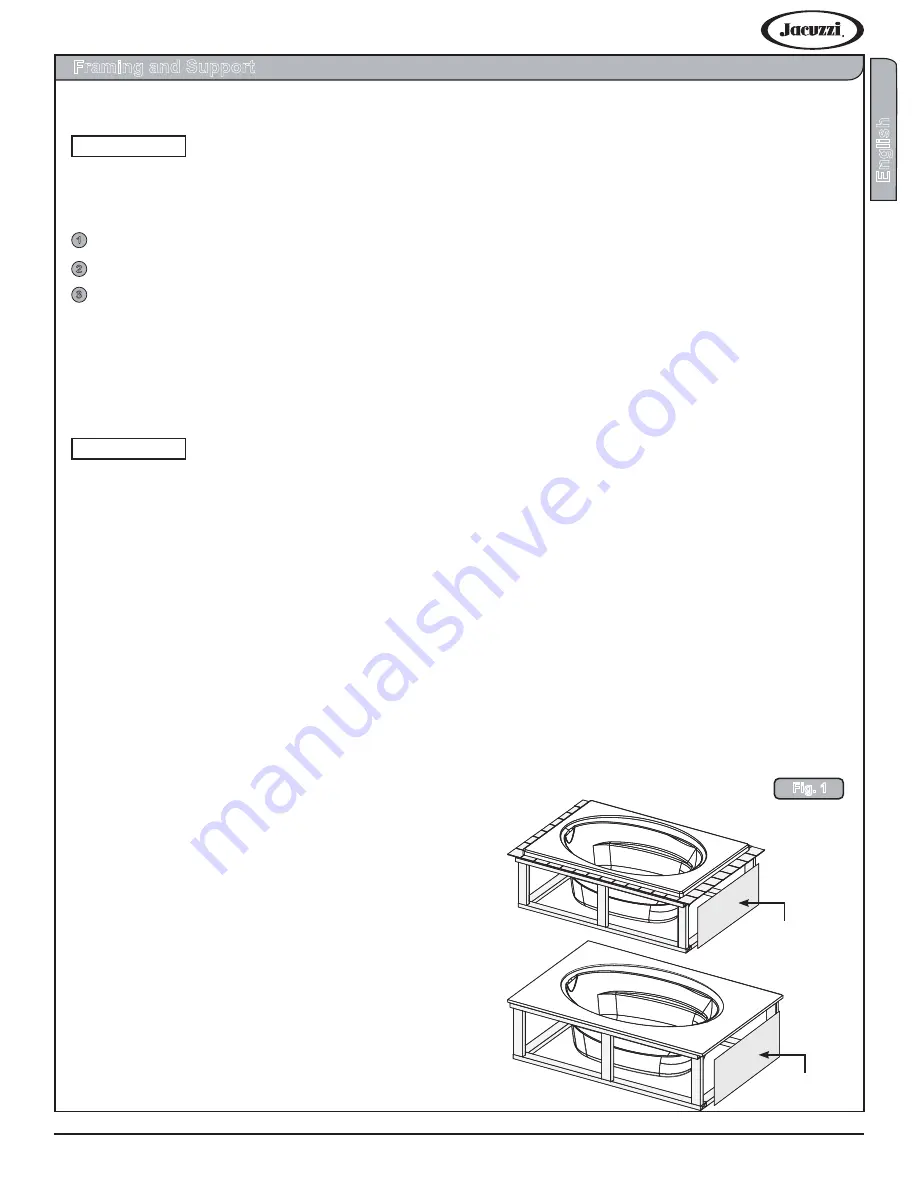
Fig. 1

READ ALL INSTALLATION INSTRUCTIONS COMPLETELY. IMPROPER INSTALLATION WILL VOID THE  

WARRANTY.

IMPORTANT


Make sure that walls and floors meet fire safety requirements of local building code and/or FHA/HUD Minimum 

Property Standards.

  Per UPC code, access must be provided to the  

   pump/motor for your specific model (Figure 1). It is the 


   responsibility of the installer, building contractor, or  

   owner to provide access for service. Jacuzzi is not  

   responsible for any costs relating to obtaining access for  

   repair. The owner shall bear such costs and, if  

   appropriate, must seek recovery from the installer.  

   Primary and secondary service access locations are  

   shown in the rough-in diagrams contained in the  

   Technical Specifications Manual. 

  Provide adequate ventilation for cooling and supply  

   sufficient air for the pump/motor. Do not insulate around 


   the equipment.

(Illustrations above shown with framing exposed for clarity.)

Access Locations

Access Location  

Example

Access Location  

Example

Содержание SIGNATURE COLLECTION

Страница 1: ...INSTALLATION AND OPERATION INSTRUCTIONS NE60000B 2 2016 Jacuzzi Luxury Bath 14525 Monte Vista Avenue Chino CA 91710 1 800 288 4002 www jacuzzi com SIGNATURE COLLECTION...

Страница 2: ...omeowner Homeowner Read this manual and keep for future reference Product Information NOTE Contents 2 Product Information 2 Important Safety Instructions 3 Inspection and Testing 4 Visual Inspection 4...

Страница 3: ...ore using DANGER RISK OF ELECTRIC SHOCK Do not permit electrical appliances such as a hair dryer lamp telephone radio or television within 60 1524mm of this hydromassage bathtub Connect only to a circ...

Страница 4: ...ect to the finish claimed after the bathtub is installed is excluded from the warranty Jacuzzi Luxury Bath s responsibility for shipping damage ceases upon delivery of the products in good order to th...

Страница 5: ...ct To avoid obstructions during installation make sure that supply lines spout pipe and valve plumbing do not project into alcove Bathtubs require a 6 x 12 150mm x 305mm floor opening for the 1 38mm d...

Страница 6: ...is necessary Proceed to the Installation Procedures section 3 If the subfloor is not level you must level the entire surface prior to installing the bathtub 4 Ensure that the floor is level and can s...

Страница 7: ...et level To check use a level on top of the ledges on both ends of tub and on top of threshold Figure 6 B 3 Wall Alcove Installation 1 Place the tub in the alcove with the front skirt firmly on the fl...

Страница 8: ...wood Frame Plywood Rim of Bathtub Ledger Board Frame Plywood Deck Counter Fig 8 Fig 9 CAUTION Do not use an adhesive or adhesive sealant to secure the counter to the bathtub If maintenance or remodeli...

Страница 9: ...tains can be removed with Fantastik or soapy water Minor scratches which do not penetrate the color finish can be removed by lightly sanding with 600 grit wet dry sandpaper You can restore the glossy...

Страница 10: ...an exclusive High Limit switch This safety circuit will not false trip from hot tap water It will only turn OFF the heater if the thermostat fails To reset press the button If the high limit trips fr...

Страница 11: ...g debris from the holes 3 Replace the suction cover immediately after cleaning Keep hair a minimum of 6 inches 152 mm away from the suction fitting at all times when the whirlpool system is operating...

Страница 12: ...rol panel is connected to control box Contact Jacuzzi Luxury Bath 800 288 4002 Let motor cool thermal protection will reset Check for proper ventilation check supply voltage Reset GFCI If it continues...

Страница 13: ...ntenance related questions please call our Service Support Department at 1 800 288 4002 Visit our web site at http www jacuzzi com for products services and an online copy of these Installation and Op...

Страница 14: ...purchase and mailed to Jacuzzi Luxury Bath in order for this warranty to become effective LIMITED WARRANTY ON THE JACUZZI LUXURY BATH SIGNATURE COLLECTION PRODUCT LINE You may also register your produ...

Страница 15: ...Installation and Operation www jacuzzi com Page 15 English Signature Collection Espa ol Jacuzzi Luxury Bath 14525 Monte Vista Avenue Chino California 91710...

Страница 16: ...n for purchase Styling Warranty Service Product Features Brand Name Price Hydrotherapy Home Resale________________________ Other______________________________ 4 Who finally decided which product you w...

Страница 17: ...i com Page 17 Signature Collection Fran ais Signature Collection INSTRUCTIONS D INSTALLATION ET FONCTIONNEMENT NE60000B 2 2016 Jacuzzi Luxury Bath 14525 Monte Vista Avenue Chino CA 91710 1 800 288 400...

Страница 18: ...uel au propri taire Propri taire lisez ce manuel et gardez le pour consultation future Renseignements sur le produit Installation et utilisation Contentu 18 Renseignements sur le produit 18 Avertissem...

Страница 19: ...cette mani re le disjoncteur est d fectueux Si le disjoncteur interrompt le pouvoir de la baignoire sans le bouton de test pouss un court circuit indiquant une possibilit d un choc lectrique Ne pas u...

Страница 20: ...ponsable des d fauts qui auraient pu tre d couverts r par s ou vit s en effectuant cette inspection et proc dure d essai 1 Placez la baignoire sur une surface de niveau pr s d une l alimentation lectr...

Страница 21: ...ALLATION COMPL TEMENT INSTALLATION ANNULE LA GARANTIE IMPORTANT Assurez vous que les murs et les planchers de r pondre aux exigences de s curit incendie du code du b timent local et ou FHA HUD normes...

Страница 22: ...a Proc dure d installation de l article 3 Si le plancher n est pas de niveau vous devez niveau toute la surface avant d installer la baignoire 4 Veiller ce que le sol est plat et peut supporter une ch...

Страница 23: ...s des rebords sur les deux extr mit s de la baignoire et au dessus du seuil Figure 6 B Installation dans une alc ve trois murs 1 Placer la baignoire dans la cabine avec la jupe avant fermement sur le...

Страница 24: ...e pour fixer le l encontre de la baignoire Si l entretien ou la r novation est n cessaire le compteur peut tre enlev L adh sif lier de mani re permanente le comptoir de la baignoire Soigneusement la p...

Страница 25: ...vous la ligne d eau indiqu e dans l illustration Figure 11 Ne mettez pas le syst me de la baignoire de massage en marche si les jets ne sont pas compl tement immerg s dans l eau Faire fonctionner le...

Страница 26: ...n L l ment chauffant se met en marche automatiquement d s que le fonctionnement de la baignoire de massage est actif Le fonctionnement de l l ment chauffant n est pas affich sur le panneau de commande...

Страница 27: ...heveux ou du corps Vis Montage d aspiration Capot d aspiration Fig 16 Si vous installez une jupe int gr e s il vous pla t se r f rer l installation jupe de guidage avant d aller plus loin Installation...

Страница 28: ...i Luxury Bath Contact 800 288 4002 Laisser refroidir le moteur la protection thermique se r initialise Assurez une ventilation suffisante tension d alimentation cocher R initialiser le GFCI Si elle co...

Страница 29: ...iquette se trouve sur le mur de la baignoire pr s du moteur du ventilateur TIQUETTE DE SP CIFICATIONS NUM RO DE S RIE MOD LE XXXXXXX NOM XXXXX COULEUR XXXXX DU FABRICANT XXXXX DE S RIE XXXXXX Logos de...

Страница 30: ...fications fournies par la Soci t Certains tats ne permettent pas de limitations sur la dur e d une garantie implicite ou l exclusion ou la limitation des dommages fortuits ou cons cutifs les limitatio...

Страница 31: ...Installation et utilisation www jacuzzi com Page 31 Signature Collection Fran ais Fran aise Fran aise Jacuzzi Luxury Bath 14525 Monte Vista Avenue Chino California 91710...

Страница 32: ...tait la principale raison de votre achat Style Service de garantie Caract ristiques du produit Nom de la marque Prix Hydroth rapie Revente de la r sidence Autre 4 Qui a finalement choisi le produit qu...

Страница 33: ...cuzzi com Page 33 Signature Collection Espa ol Signature Collection INSTALACI N Y OPERACI N DE INSTRUCCIONES NE60000B 2 2016 Jacuzzi Luxury Bath 14525 Monte Vista Avenue Chino CA 91710 1 800 288 4002...

Страница 34: ...tario lea este manual y cons rvelo para referencia futura Contenido Informaci n del producto Espa ol Instalaci n y funcionamiento Contenido 34 Informaci n del producto 34 Las declaraciones de adverten...

Страница 35: ...levisi n dentro de los 60 1524mm de esta ba era de hidromasaje Conecte solamente a un circuito protegido por un interruptor de circuito por falla a tierra GFCI Para permanente unidades conectadas Un t...

Страница 36: ...uzzi Luxury Bath no se hace responsable de ning n defecto que pudiera haberse descubierto reparado o evitado de haberse seguido este procedimiento de inspecci n y prueba 1 Coloque la ba era sobre una...

Страница 37: ...TALACI N INCORRECTA ANULAR LA GARANT A IMPORTANTE Aseg rese de que las paredes y los pisos cumplen con los requisitos de seguridad contra incendios de los c digos de construcci n locales y o la FHA HU...

Страница 38: ...de 3 Si el subsuelo no est nivelado se debe nivelar toda la superficie antes de instalar la ba era 4 Aseg rese de que el piso est nivelado y que puede soportar una carga de 50 libras por pie cuadrado...

Страница 39: ...se debe establecer el nivel Para comprobarlo el uso un nivel en la parte superior de los salientes en ambos extremos de la ba era y por encima del umbral Figura 6 B Instalaci n en el Hueco de 3 Pared...

Страница 40: ...Borde Ba era Ledger Junta Marco Plywood Terraza Contador Fig 8 Fig 9 PRECAUCI N No use un sellador de pegamento o adhesivo para fijar el en contra de la ba era Si el mantenimiento o remodelaci n es n...

Страница 41: ...l de agua descender por debajo de los chorros lo cual podr a provocar la aspersi n de agua fuera de la unidad Para evitarlo debe desconectar la unidad antes de salir de la ba era Rellene al menos 1 a...

Страница 42: ...4B El calentador se ENCIENDE autom ticamente cada vez que se activa el funcionamiento Whirlpool El funcionamiento del calentador no se muestra en el panel de control Hay una luz indicadora visible en...

Страница 43: ...la tapa protectora de succi n 2 Limpie la tapa protectora empujando los desechos de los orificios con una corriente de agua 3 Luego de la limpieza vuelva a colocar inmediatamente la tapa protectora de...

Страница 44: ...illo puede ser pellizcado o insertado incorrectamente undertightened Afloje los sindicatos visita y vuelva a colocar el anillo O Si el anillo ha sido pinchado fuera de forma reemplace dir jase a los n...

Страница 45: ...aciones el ctricas aparecen impresas en esta rea Made in the USA XXXX XXXXX N mero central n mero de serie Aqu encontrar el n mero de serie Si necesita obtener los datos de una empresa de servicio t c...

Страница 46: ...ea efectiva GARANT A LIMITADA DE JACUZZI LUXURY BATH DE PRODUCTOS DE SIGNATURE COLLECTION DEVOLUCI N DE REGISTRO DE GARANT A Para registrar su producto por favor visite nuestro sitio web Jacuzzi com h...

Страница 47: ...Instalaci n y funcionamiento www jacuzzi com Page 47 Signature Collection Espa ol Espa ol Jacuzzi Luxury Bath 14525 Monte Vista Avenue Chino California 91710...

Страница 48: ...ant a Caracter sticas del producto Marca Precio Hidroterapia Reventa de la casa___________________ Otro ______________________________ 4 Qui n tom la decisi n final de qu producto comprar Usted mismo...

Отзывы: