background image

dE

2  AuflAdEN ihrES hEAdSEtS

Um sowohl das Headset als auch die Ladeeinheit aufzuladen, verbinden Sie das 

Ladegerät mit einer Steckdose. Setzen Sie das Headset in die Ladeeinheit ein, und 

schließen Sie das Ladegerät an die Ladebuchse an. Wenn Sie unterwegs sind und das 

Headset nicht verwenden, können Sie es zum Aufladen in die Ladeeinheit einsetzen.

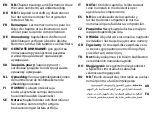
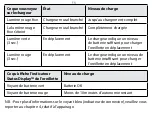
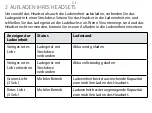
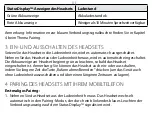
anzeigen der 

ladeeinheit

status

ladestand

Stetiges rotes 

Licht

Ladegerät mit 

Steckdose 

verbunden

Akku wird geladen

Stetiges rotes 

Licht erloschen

Ladegerät mit 

Steckdose 

verbunden

Akku vollständig geladen

Grünes Licht  

(3 Sek.)

Mobiler Betrieb

Ladeeinheit besitzt ausreichende Kapazität 

zum mobilen Laden des Headsets

Rotes Licht  

(3 Sek.)

Mobiler Betrieb

Ladeeinheit besitzt ungenügende Kapazität 

zum mobilen Laden des Headsets

Содержание STONE

Страница 1: ...rk 70 25 22 72 Deutschland 0800 1826756 Die Schweiz 00800 722 52272 Espa a 900 984572 France 0800 900325 Italia 800 786532 Luxembourg 00800 722 52272 Nederland 0800 0223039 Norge 800 61272 sterreich 0...

Страница 2: ...2 3 4 5 6 1 A B E F G H C D I 2 hrs ON Take headset out of charging unit OFF Put headset in charging unit...

Страница 3: ...ollisuuden lis miseksi SE Notera Kapitelrubriker och illustrationer har samma numrering f r att g ra bruksanvisningen l ttare att f lja IT NOTA I titoli dei capitoli e le illustrazioni sono numerati i...

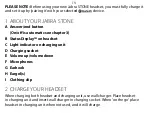
Страница 4: ...chapter 3 B StatusDisplayTM on headset C Light indicator on charging unit D Charging socket E Volume up volume down F Microphones G Earhook H Eargel s I Clothing clip 2 Charge your headset When charg...

Страница 5: ...sec On the go Charging unit indicates enough battery to charge headset on the go Red light 3 sec On the go Charging unit indicates not enough battery to charge headset on the go What you see on headse...

Страница 6: ...ime pairing 1 Take headset out of charging unit The headset is automatically in pairing mode which is indicated by flashing blue light from the connection indicator on the StatusDisplayTM 2 Activate o...

Страница 7: ...adset to answer a call End a call Tap the answer end button Adjust sound and volume Use the touch control and slide your finger up down for adjusting the volume 6 Wearing style Wear your Jabra Stone h...

Страница 8: ...Se kapitel 3 B StatusDisplayTM p headset C Lysindikator p oplader D Opladerstik E Lydstyrke op lydstyrke ned F Mikrofoner G rekrog H re gel I T jklemme 2 Oplad dit headset N r du oplader b de headset...

Страница 9: ...ek P farten Oplader angiver tilstr kkeligt batteri til at oplade headset p farten R dt lys 3 sek P farten Oplader angiver utilstr kkeligt batteri til at oplade headset p farten Det ser du p headsettet...

Страница 10: ...Tag headsettet ud af opladeren Headsettet er automatisk i parringstilstand hvilket angives af et blinkende bl t lys fra forbindelsesindikatoren p StatusDisplayetTM 2 Aktiver p din telefon 3 S g efter...

Страница 11: ...besvare et opkald Afslut et opkald Tryk let p knappen Besvar afslut Juster lyd og lydstyrke Brugdenber ringsf lsommeknap ogladdinfingerglideop nedforatjusterelydstyrken 6 B rem de B r dit Jabra Stone...

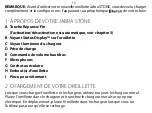
Страница 12: ...TM sur l oreillette C Voyant lumineux du chargeur D Prise de charge E Commande de volume haut bas F Microphones G Crochet auriculaire H Embout s d oreillette I Pince pour v tement 2 Chargement de votr...

Страница 13: ...nt pour charger l oreillette en d placement Lumi re rouge 3 sec En d placement Le chargeur indique un niveau de batterie insuffisant pour charger l oreillette en d placement Ce qu affiche l indicateur...

Страница 14: ...Retirez l oreillette du chargeur L oreillette passe automatiquement en mode d appairage comme en t moigne le voyant clignotant bleu de l indicateur de la connexion StatusDisplayTM 2 Activez sur votre...

Страница 15: ...r un appel Appuyez bri vement sur la touche R ponse Fin R gler le son et le volume Faites glisser votre doigt sur la touche de contr le tactile pour r gler le volume 6 Type de port Vous pouvez porter...

Страница 16: ...nd ein Pairing mit dem von Ihnen gew nschten Ger t durchf hren 1 Ihr Jabra Stone A Taste Rufannahme Beenden Ein und Ausschalten erfolgt automatisch siehe Kapitel 3 B StatusDisplayTM des Headsets C Leu...

Страница 17: ...wenden k nnen Sie es zum Aufladen in die Ladeeinheit einsetzen Anzeigen der Ladeeinheit Status Ladestand Stetiges rotes Licht Ladeger t mit Steckdose verbunden Akku wird geladen Stetiges rotes Licht e...

Страница 18: ...wird es automatisch eingeschaltet Die Akkuanzeige am Headset beginnt gr n zu leuchten sobald das Headset eingeschaltet ist Anmerkung Sie k nnen das Headset auch ein oder ausschalten indem Sie l ngere...

Страница 19: ...die Taste Rufannahme Beenden dr cken Schalten Sie das Headset wieder ein indem Sie erneut die Taste Rufannahme Beenden dr cken bis das StatusDisplayTM ein blinkendes blaues Licht zeigt 2 Aktivieren S...

Страница 20: ...tst rke einzustellen 6 Trageform Tragen Sie Ihr Jabra Stone Headset am rechten Ohr Befestigen Sie den Kleidungsclip zur bequemen Aufbewahrung an der Ladeeinheit Das Headset kann auch bei befestigtem K...

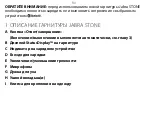
Страница 21: ...RU Jabra Stone 1 Jabra Stone 3 B StatusDisplayTM C D E F G H I...

Страница 22: ...RU 2 3 3...

Страница 23: ...RU StatusDisplayTM 10 4 3 4 1 StatusDisplayTM...

Страница 24: ...RU 2 3 Jabra Stone 4 OK 0000 3 1 StatusDisplayTM 2 3 Jabra Stone 4 OK 0000 3 5...

Страница 25: ...RU 6 Jabra Stone www jabra ru stone...

Страница 26: ...UA Jabra Stone 1 Jabra Stone A 3 B StatusDisplayTM C D E F G H I 2...

Страница 27: ...UA 3 3 StatusDisplayTM 10 4...

Страница 28: ...UA 3 4 1 StatusDisplayTM 2 3 Jabra Stone 4 PIN PIN 0000 4 3 1 StatusDisplayTM 2...

Страница 29: ...UA 3 Jabra Stone 4 PIN PIN 0000 4 3 5 6 Jabra Stone www jabra com stone...

Страница 30: ...ofdstuk 3 B StatusDisplayTM op headset C Indicatielampje op laadstation D Oplaadaansluiting E Volume omhoog volume omlaag F Microfoons G Oorhaak H Gelkussentje s I Kledingklem 2 De headset opladen Geb...

Страница 31: ...ven dat de batterij vol genoeg is om de headset onderweg op te laden Rood lampje 3 sec Onderweg Op laadstation wordt aangegeven dat de batterij niet vol genoeg is om de headset onderweg op te laden Wa...

Страница 32: ...uithetlaadstation Dekoppelingsmodusvandeheadsetwordtautomatisch geactiveerd ditwordtaangegevenmeteenknipperendblauwlampjeopdeStatusDisplayTM 2 Activeer op uw telefoon 3 Zoek naar apparaten en selectee...

Страница 33: ...oproep be indigen Tik op de toets Beantwoorden be indigen Geluid en volume aanpassen Gebruik de aanraaksensor en schuif uw vinger omhoog of omlaag om het volume aan te passen 6 Draagstijl Draag de Jab...

Страница 34: ...automaattisesti katso kappale 3 B Kuulokkeen StatusDisplayTM n ytt C Latausyksik n merkkivalo D Latausliit nt E nenvoimakkuuden lis minen ja v hent minen F Mikrofonit G Korvapidike H Eargel korvanapit...

Страница 35: ...keell ollessa Latausyksikk ilmaisee ett sen varaus riitt lataamaan kuulokkeen liikkeell ollessa Punainen valo 3 sek Liikkeell ollessa Latausyksikk ilmaisee ett sen varaus ei riit lataamaan kuuloketta...

Страница 36: ...stus 1 Irrota kuuloke latausyksik st Kuuloke on automaattisesti parinmuodostustilassa mik k y ilmi StatusDisplayTM n yt n vilkkuvasta sinisest yhteyden merkkivalosta 2 Ota matkapuhelimen yhteys k ytt...

Страница 37: ...uhelun lopettaminen Napsauta vastaus lopetuspainiketta niasetukset ja nenvoimakkuuden s t minen Voit s t nenvoimakkuutta liu uttamalla sormeasi yl s tai alas kosketuspaneelilla 6 K ytt tapa Pid Jabra...

Страница 38: ...tusDisplayTM p headset C Ljusindikator p b rbar laddningsenhet D Laddningsuttag E H j s nk ljudvolymen F Mikrofoner G ronkrok H ronkudde ronkuddar I Kl dkl mma 2 Ladda headsetet Anv nd v ggladdaren vi...

Страница 39: ...t finns tillr ckligt med batteri f r att ladda headsetet i urkopplat l ge R d indikator 3 sek P spr ng Laddningsenheten visar att det inte finns tillr ckligt med batteri f r att ladda headsetet i urko...

Страница 40: ...dningsenheten headsetet verg r automatiskt till hopparningsl ge vilket indikeras genom ett blinkande bl tt sken fr n anslutningsindikatorn p StatusDisplayTM 2 Aktivera p telefonen 3 S k efter enheter...

Страница 41: ...emot ett samtal Avsluta ett samtal Tryck p svara avslutaknappen Justera ljud och volym F r fingret upp t eller ned t p det ber ringsk nsliga reglaget f r att justera volymen 6 S tt att b ra headsetet...

Страница 42: ...TM sull auricolare C Indicatore luminoso sull unit di ricarica D Presa del caricabatteria E Regolazione volume F Microfoni G Gancio per l orecchio H EarGel I Clip per indumenti 2 Caricare l auricolare...

Страница 43: ...egnala un livello di carica sufficiente per ricaricare l auricolare in viaggio Luce rossa 3 secondi In viaggio L unit di ricarica segnala un livello di carica insufficiente per ricaricare l auricolare...

Страница 44: ...ppiamento 1 Estrarre l auricolare dall unit di ricarica L auricolare entra automaticamente in modalit di accoppiamento come indicato dalla luce blu lampeggiante dell indicatore di connessione sullo St...

Страница 45: ...orare il tasto risposta fine Regolare l audio e il volume Per regolare il volume utilizzare il comando a sfioramento e far scorrere il dito verso l alto o verso il basso 6 Tipo di indossaggio Indossar...

Страница 46: ...inoso en la unidad de carga D Enchufe de cargador E Subir bajar volumen F Micr fonos G Gancho H Eargel s I Clip para la ropa 2 Cargar el auricular Para cargar el auricular y la unidad de carga utilice...

Страница 47: ...e tiene suficiente bater a para cargar el auricular sobre la marcha Luz roja 3 segundos Sobre la marcha La unidad de carga indica que no tiene suficiente bater a para cargar el auricular sobre la marc...

Страница 48: ...e el auricular de la unidad de carga El auricular se pone autom ticamente en modo de sincronizaci n esto se indica mediante una luz azul parpadeante del indicador de conexi n del StatusDisplayTM 2 Act...

Страница 49: ...llamada Pulse brevemente el bot n responder finalizar Ajustar el sonido y el volumen Deslice el dedo hacia arriba y hacia abajo por el control t ctil para ajustar el volumen 6 Modo de colocaci n Col q...

Страница 50: ...ln indik tor na nab jec m za zen D Nab jec konektor E Zvy ovan sni ovan hlasitosti F Mikrofony G Z u n k H Gelov sluch tko sluch tka I Spona na od v 2 Nabijte svou n hlavn soupravu P i nab jeni jak n...

Страница 51: ...cest Nab jec za zen indikuje dostate n nabit akumul torov baterie n hlavn soupravy na cest erven sv tlo 3 sek Na cest Nab jec za zen indikuje nedostate n nabiti akumul torov baterie n hlavn soupravy...

Страница 52: ...oupravu z nab jec ho za zen n hlavn souprava je automaticky v re imu p rovan co je indikov no blik n m modr ho sv tla indik toru p ipojeni na indik toru stavu Status DisplayTM 2 Aktivujte v telefonu 3...

Страница 53: ...m tla tka pro p jem ukon en hovoru Nastaven zvuku a hlasitosti Pro nastaven hlasitosti pou ijte dotykov ovl dan a posouvejte prst nahoru nebo dol dle pot eby sn en nebo zv en hlasitosti 6 Zp sob no en...

Страница 54: ...TM na zestawie s uchawkowym C Wska nik na podstawie aduj cej D Gniazdo adowarki E Przycisk zwi kszania zmniejszania poziomu g o no ci F Mikrofony G Zaczep na ucho H elowa wk adka do ucha I Klips do ub...

Страница 55: ...e bateria jest wystarczaj co na adowana by adowa zestaw w ruchu Czerwone wiat o 3 sek W ruchu Podstawa aduj ca informuje e bateria nie jest wystarczaj co na adowana by adowa zestaw w ruchu Cowida naw...

Страница 56: ...automatycznie przechodzi w tryb parowania a wska nik po czenia na wy wietlaczu StatusDisplayTM miga niebieskim wiat em 2 Aktywuj funkcj w telefonie 3 Wyszukaj urz dzenia i wybierz Jabra Stone 4 Naci...

Страница 57: ...po czenia Dotknij przycisku odbierania ko czenia po czenia Regulacja d wi ku i poziomu g o no ci Dotknij i przesu palcem w g r lub d regulacj dotykow aby zwi kszy lub zmniejszy g o no 6 Spos b noszeni...

Страница 58: ...GR Jabra Stone 1 Jabra Stone A 3 B StatusDisplayTM H 2...

Страница 59: ...GR 3 3 StatusDisplayTM OK 10 4...

Страница 60: ...GR 3 4 1 StatusDisplayTM 2 3 Jabra Stone 4 OK PIN PIN 0000 4 3 1 StatusDisplayTM 2...

Страница 61: ...GR 3 Jabra Stone 4 OK PIN PIN 0000 4 3 5 6 Jabra Stone www jabra com stone...

Страница 62: ...arak yap l r Bkz b l m 3 B Kulakl k zerindeki StatusDisplayTM C arj nitesi zerindeki g sterge D arj yuvas E Ses a ma k sma F Mikrofonlar G Kulak kancas H Kulak jel ler i I Giysi klipsi 2 Kulakl n z ar...

Страница 63: ...nitesi kulakl hareket halindeyken arj etmek i in yeterli pil seviyesi oldu unu g sterir K rm z k 3 sn Hareket halindeyken arj nitesi kulakl hareket halindeyken arj etmek i in pil seviyesinin yeterli...

Страница 64: ...kl arj nitesinden al n Kulakl k otomatik olarak e le tirme moduna ge er Bunu StatusDisplayTM deki ba lant g stergesinin mavi yan p s nmesinden anlayabilirsiniz 2 Telefonunuzda u etkinle tirin 3 cihazl...

Страница 65: ...y sonland rma Cevaplama sonland rma d mesine dokunun Sesi ve ses seviyesini ayarlama Sesseviyesiniayarlamaki indokunmatikkontrol zerindeparma n z yukar a a kayd r n 6 Takma st l Jabra Stone kulakl sa...

Страница 66: ...ikus l sd 3 fejezet B StatusDisplayTM kijelz a headseten C Jelz f ny a t lt n D T lt foglalat E Hanger fel Hanger le F Mikrofonok G F lakaszt H F lp rna f lp rn k I Csipesz 2 T ltse fel a headsetet Ha...

Страница 67: ...t tts g ll rendelkez sre a headset felt lt s hez amikor ton van V r s f ny 3 s ton A t lt jelzi hogy nem ll rendelkez sre elegend t lt tts g a headset felt lt s hez amikor ton van Mi l that a headset...

Страница 68: ...lt b l A headset automatikusan p ros t s m dra v lt amit a StatusDisplayTM kijelz n l that villog k k kapcsolatjelz jelez 2 Aktiv lja a szolg ltat st a telefonon 3 Keressen eszk z ket majd jel lje ki...

Страница 69: ...a headseten H v s befejez se rintse meg a h v sfogad s befejez s gombot Hang s hanger be ll t sa rintse meg az rint rz kel t majd cs sztassa fel le az ujj t a fel let n a hanger be ll t s hoz 6 Visele...

Страница 70: ...yTM pe casc C Indicatorul luminos pe unitatea de nc rcare D Conectorul pentru nc rc tor E Butonul pentru cre terea reducerea volumului F Microfoane G Suportul pentru ureche H Accesoriu i Eargel I Clam...

Страница 71: ...ul c este suficient baterie pentru nc rcarea c tii atunci c nd c l tori i LED ro u 3 sec Mod de nc rcare On the go Unitatea de nc rcare indic faptul c nu este suficient baterie pentru nc rcarea c tii...

Страница 72: ...a de nc rcare Casca se afl automat n modul de cuplare aspect care este indicat de culoarea albastru intermitent a indicatorului de conexiune de pe StatusDisplayTM 2 Activa i func ia a telefonului dumn...

Страница 73: ...i un apel Ap sa i butonul de r spuns ncheiere apel Cum s regla i sunetul i volumul Utiliza i tastatura tactil i trece i degetul n sus jos pentru a regla volumul 6 Posibilit i de purtare Purta i casca...

Страница 74: ...AR...

Страница 75: ...AR...

Страница 76: ...AR...

Страница 77: ...AR...

Страница 78: ...FA...

Страница 79: ...FA...

Страница 80: ...FA...

Страница 81: ...FA...

Отзывы: