background image


USER    MANUAL 


Standard Definition Video Conference Camera 

Содержание IS-SC1802E

Страница 1: ...USER MANUAL Standard Definition Video Conference Camera ...

Страница 2: ......

Страница 3: ...ontact the retailer immediately if any parts are either missing or damaged 2 Make sure if the contents are all included as per the packing list 3 Do not attempt to use the device with missing or damaged parts Send the product back in its original packing if it is damaged Note The information contained in the document is subject to change without notice ...

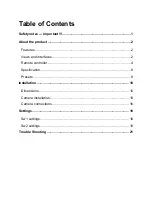
Страница 4: ... 1 About the product 2 Features 2 Views and interfaces 2 Remote controller 4 Specification 8 Presets 9 Installation 10 Dimensions 10 Camera installation 10 Camera connections 16 Settings 18 Sw1 settings 18 Sw2 settings 19 Trouble Shooting 21 ...

Страница 5: ... Never aim the lens of the camera at the sun or other extremely bright objects Otherwise it may cause damage Use soft cloth to clean the camera If the camera is very dirty wipe it off gently with a soft cloth moistened with a weak solution of water and a neutral kitchen detergent Wring all liquid from the cloth before wiping the camera then wipe off all remaining dirt with a soft dry cloth Use len...

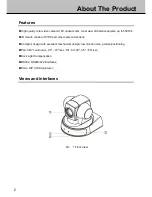
Страница 6: ...550TVL IR remote control of P T Z and other camera functions Compact design with excellent mechanical design low motion noise precise positioning Pan 360o continuous 0 5o 70o sec Tilt 30 90o 0 5o 50o sec Back Light Compensation RS232 RS485 422 interfaces Pelco D P VISCA protocol Views and interfaces Pic 1 Front View ...

Страница 7: ...o output 02 Sensor for remote controller 08 RS 232 interface 03 Power light indicator 09 SW2 Baud rate protocol image flip switch 04 Control light indicator 10 DC12V input 05 W1 camera address switch 11 RS 485 RS 422 interface 06 Video output Table 1 Interfaces ...

Страница 8: ...About The Product 4 Remote controller Key pad Pic 3 Remote Controller ...

Страница 9: ...s 10 Back Reserved 11 Power Power on off the camera 12 BLC control On Off Turn on off BLC 13 Zoom control Tele Wide Zoom in out the camera 14 Focus control Far Near Manual focus 15 Speed switch SPD Adjust the camera speed P T 16 Scan2 180 degree scan Do a scan of 180 degree pan 17 Call preset Call a preset 18 Cruise auto cruise Do auto cruise 19 Clear reset Clear preset s 20 Esc cancel Cancel an o...

Страница 10: ... via zooming buttons press Wide or Tele button to zoom out or zoom in Camera Reset Press Reset button to reset the camera Back Light Compensation Control When one portion of an image is bright while other portions are dark the video will become dark and it does not give satisfactory video quality You can improve the video quality by turn on the backlight compensation function Press BLC On to activ...

Страница 11: ... between presets is about 3 seconds Camera Scan The camera has three scan modes Frame scan Scan1 and Scan2 Frame Scan Set 2 preset positions as preset 30 and 31 then you can call preset 32 to activate the auto scan function between the 2 saved preset positions Scan 1 Scan with a pan of 300 degree from current position Scan 2 Scan with a pan of 180 degree from current position Remote Control for Mu...

Страница 12: ...White Balance Auto Manual Video Output 1 0 0 2Vp p 75 Ohm composited Mechanical Specifications Preset Number 64 Auto Cruise Yes Panning Range Pan 0o 360o continuous Tilt 30 90o Pan Tilt Speed Pan 0 5o 70o sec Tilt 0 5o 50o sec Address 0 255 Operation Video Output Interface RCA Control Interface RS485 422 RS232 Baud Rate RS485 422 1200bps 2400bps 4800bps 9600bps 19200bps Comm Protocol Pelco D Pelco...

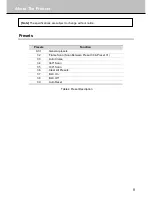
Страница 13: ...31 General presets 32 Frame Scan Scan Between Preset 30 Preset 31 33 Auto Cruise 34 360ºScan 35 180ºScan 36 Clear All Presets 37 BLC On 38 BLC Off 39 Auto Reset Table 4 Preset Description Note The specifications are subject to change without notice ...

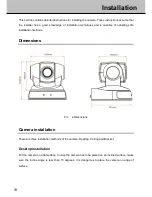
Страница 14: ...pable of adopting safe installation methods Dimensions Pic 4 Dimensions Camera installation There are three installation methods of the camera Desktop Ceiling and Bracket Desktop installation Put the camera on a flat surface In case the camera has to be placed on an inclined surface make sure the incline angle is less than 15 degrees It is dangerous to place the camera on edge of surface ...

Страница 15: ...erence Camera Ceiling installation Set the two switches of the camera correctly please refer to Section Settings for switch settings Please make sure the ceiling is robust enough to support the installation Pic 6 Ceiling Installation ...

Страница 16: ...location of the three mounting holes on the ceiling Pic 7 Dimensions Mounting Plate Use screws at the locations you marked above to fasten the mounting plate to the ceiling Pic 8 Mounting Plate Install the camera onto the base plate and tighten the camera with screws ...

Страница 17: ...oint the slots of the two plates correctly and slide the base plate till the slots are clipped right Use M3X8 screws to fix the two plates Pic 10 Install Base Plate Well connect the power cable video cable and control cable at the backplane of the camera ...

Страница 18: ...ure the installation place is robust enough to support the installation Pic 11 Bracket Installation Drill 4 holes on the installation place as per the mounting holes of the bracket Fix the bracket to the installation place Pic 12 Bracket Dimensions ...

Страница 19: ...15 Installation Fix the camera to the plate Lock the camera with the limit screw Pic 13 Fix Bracket ...

Страница 20: ...connection of RS 485 RS 422 control cable and RS232 control cable All cables are labeled clearly Before operating the camera please check the cable connection carefully Pic 14 Connections RS 232 Pin Definition Pin RS 232 Pin Definition 3 TXD 4 GND 5 RXD Rest Reserved ...

Страница 21: ...n Com Port Pin 1 NC 1 CD 2 NC 2 RXD 3 TXD 3 TXD 4 GND 4 DTR 5 RXD 5 GND 6 NC 6 DSR 7 NC 7 RTS 8 NC 8 CTS 9 NC 9 RI 37 NC Pin Pin Definition 422 Mode 485Mode default 1 T Red 485 Black 485 Red 2 R Green 3 T Black 4 R White Pin RS 485 Pin Definition 1 T 2 R 3 T 4 R ...

Страница 22: ... OFF OFF OFF 2 OFF ON OFF OFF OFF OFF OFF OFF 3 ON ON OFF OFF OFF OFF OFF OFF 4 OFF OFF ON OFF OFF OFF OFF OFF 5 ON OFF ON OFF OFF OFF OFF OFF 6 OFF ON ON OFF OFF OFF OFF OFF 7 ON ON ON OFF OFF OFF OFF OFF 8 OFF OFF OFF ON OFF OFF OFF OFF 9 ON OFF OFF ON OFF OFF OFF OFF 10 OFF ON OFF ON OFF OFF OFF OFF 11 ON ON OFF ON OFF OFF OFF OFF 12 OFF OFF ON ON OFF OFF OFF OFF 13 ON OFF ON ON OFF OFF OFF OFF...

Страница 23: ... Set camera s baud rate protocol and image flip SW2 SW Position 1 2 3 4 Protocol OFF OFF OFF OFF Reserved ON OFF OFF OFF PELCO P OFF ON OFF OFF PELCO D ON ON OFF OFF VISCA OFF OFF ON OFF Reserved ON OFF ON OFF Reserved OFF ON ON OFF Reserved SW Position 5 6 7 Baud Rate BPS 1200 OFF OFF OFF 2400 ON OFF OFF 4800 OFF ON OFF 9600 ON ON OFF 19200 OFF OFF ON Reserved ON OFF ON Reserved ON ON ON SW Posit...

Страница 24: ...e to set the camera s baud rate 9600 bps Pelco P protocol and image not flip Please refer to below table for instructions of the SW2 setting SW2 SW Pos 1 2 3 4 5 6 7 8 ON OFF OFF OFF ON ON OFF OFF Table 7 SW2 Setting Example ...

Страница 25: ...deo Check reconnect the cables Camera damaged Replace the camera Normal self test but out of control Wrong connection of RS485 cable Check and reconnect the cable Wrong camera ID set Check and reset the Switches Wong baud rate set Check and reset the Switches Vague image Bad connection of the video Check and reconnect the cables Inadequate power supply Replace the power supply Dome camera out of c...

Страница 26: ...Modification History Revision Date of Release Modified Contents Ver 1 0 Jan 1st 2008 Official release of first version Ver 2 0 Sep 6th 2012 Official release of second version ...

Страница 27: ......

Страница 28: ......

Отзывы: