background image

9

3.2

ParticleScan Features

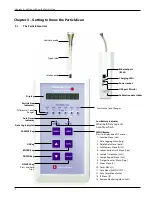
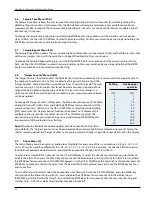
Isokinetic probe

The isokinetic probe with the Tygon tube piece allows uniform low turbulence sampling of ambient air.

It is also necessary for proportional sampling of particles of all sizes.

Intake nozzle

The intake nozzle is covered during shipping with a protective red plastic cap, which is designed to keep

small objects from entering into the sampling chamber. The cap must be removed prior to taking a sample to prevent
possible damage to the internal pump.

Display

When the device is off and not connected to the charger, the display will also be off. If the device is off and

connected to the charger, it will show [charging] or [charged]. When the unit is sampling, the particle concentration
measured will be displayed. The displayed concentration can be shown for one particle size range at a time (see Particle
Size Indicators). When the Menu key is pressed, the display will show the user settings.

Particle Size Indicators The particle size indicators show which particle size range is currently displayed. When the Alarm
is set and the set particle concentration threshold is exceeded, the appropriate particle size indicator will flash and a beep
will sound.

Cumulative Count Ranges

There are six cumulative size channels to select from: ≥0.3 / ≥0.5 / ≥0.7 / ≥1.0 / ≥2.0 / ≥5.0

microns. When a cumulative size channel is selected, the ParticleScan will count particles which are equal to and larger
than the selected size channel.

Differential Count Ranges

There are five differential size channels to select from: 0.3–0.5 / 0.5–0.7 / 0.7–1.0 / 1.0–2.0 /

2.0–5.0 microns. When a differential size channel is selected, the ParticleScan will count the particles whose size lies
between the selected two size channels.

Data Log Indicator

This indicator lights up when data logging has been turned on. Whenever a measurement is taken, it

will be logged to the ParticleScan’s internal memory.

Timer On Indicator

This indicator lights up when the auto timer is actively set. The Auto Timer is a feature that allows the

ParticleScan to take automatic measurements based on a timer schedule. The Auto Timer schedule is set via the
ParticleScan USB Utility Software or the web browser interface.

Low Battery Indicator

When the battery is running low, both the Data Log Indicator and the Timer On Indicator will

flash. The unit can operate for another 5–10 minutes from the time the Low Battery Indicator comes on.

ON/OFF Key

Press and hold for 2 seconds to turn the device on or off.

SAMPLE Key

Press once when the device is on to start a measurement. Press again to stop a measurement.

UP/DOWN Keys

Use during a measurement to select size channel displayed. It is also used to change a menu setting.

MENU Key

Press 1 to 14 times to display one of 14 user menus.

ENTER Key

Press and hold for 2 seconds when in a menu to make a menu item changeable. Press once in certain menus

to progress. Press and hold for 2 seconds to save changes in a menu.

Chapter 3 – Getting to Know the ParticleScan

Содержание ParticleScan CR

Страница 1: ...ParticleScan CR ParticleScan Pro User Manual To Buy Visit www sylvane com or call 800 934 9194 For Product Support Contact IQAir at 1 877 715 4247...

Страница 2: ...hange specifications contained in this document at any time and without prior notice Copyright The IQAir Group 2000 2008 All rights reserved IQAir is a registered trademark of The IQAir Group Particle...

Страница 3: ...t in exposure to invisible radiation Service The laser diode based sensor inside this instrument carries a warning label as shown below Warning Do not attempt to sample reactive gases such as hydrogen...

Страница 4: ...Taking Samples at Different Size Channels 10 Chapter 5 Adjusting Settings in the Menu 11 5 1 Location Menu Loc 11 5 2 Data Logging Menu Log 11 5 3 Delete Data Menu data 11 5 4 Full Memory Menu FULL 1...

Страница 5: ...t 20 7 4 4 Measurement Units 20 7 4 5 Count Type 20 7 4 6 ParticleScan Display On Off 20 7 5 Setting the Time Date 21 7 6 Using the Auto Timer 21 7 7 Scheduling Regular Measurements 22 7 8 Data Loggin...

Страница 6: ...ParticleScan CR This model is designed for cleanroom use featuring a 0 1 cfm sampling rate and a HEPA lter for the exhaust air The higher ow rate of the ParticleScan CR permits statistically signi ca...

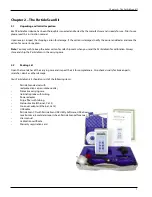
Страница 7: ...bration Always store and ship the ParticleScan in the carrying case 2 2 Packing List Open the two latches of the carrying case and inspect the kit for completeness Also check visually for broken parts...

Страница 8: ...u IP 14 Remote Monitoring Menu InEt 8 Tygon tube DOWN Key ENTER Key Chapter 3 Getting to Know the ParticleScan Intake nozzle Differential Count Ranges Cumulative Count Ranges UP Key ON OFF Key Press a...

Страница 9: ...ich are equal to and larger than the selected size channel Differential Count Ranges There are ve differential size channels to select from 0 3 0 5 0 5 0 7 0 7 1 0 1 0 2 0 2 0 5 0 microns When a diffe...

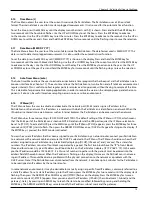
Страница 10: ...surement result is now frozen on the display 4 4 Taking Samples at Different Size Channels The ParticleScan features six size channels which allows the user to take cumulative counts for six different...

Страница 11: ...an memory and allows to erase the logged data The ParticleScan can log a maximum of 14 336 data points To view the number of data points logged to the ParticleScan internal memory press the MENU key u...

Страница 12: ...onds until the currently set time period starts to ash Use the UP or DOWN key to select the desired setting Con rm your selection by pressing and holding the ENTER key for two seconds until the select...

Страница 13: ...icleScan is identi ed on a network When the IP number is entered into a web browser such as Internet Explorer the ParticleScan can be accessed via the network The IP Menu has three main settings IP OF...

Страница 14: ...ticleScan can be recharged over 1000 times before the battery pack may need replacement To replace the battery contact Technical Support see page 28 6 2 Sensor Testing Cleaning After taking repeated r...

Страница 15: ...ticleScan to the network via a network hub or switch allows to access the ParticleScan from any com puter in the network that has a web browser e g Internet Explorer Safari etc and Java Runtime Enviro...

Страница 16: ...o IP OFF for the USB connection to work see Chapter 5 13 7 2 4 USB Driver Installation To allow data communication via a USB connection to a Windows com puter two drivers need to be installed This ins...

Страница 17: ...view and transfer data between the computer and the ParticleScan the ParticleScan USB Utility Software needs to be installed It is supplied on the ParticleScan CD Click on Next in the Setup Wizard win...

Страница 18: ...dow opens If you are properly connected to the ParticleScan the unit s name and serial number will appear in the USB description eld The ParticleScan Control window will appear The Connection Status s...

Страница 19: ...ing Menu InEt oFF Beta Function The ParticleScan device features a beta version of the new Remote Monitoring Menu see Chapter 5 14 The Remote Monitoring Menu allows the user to turn the ParticleScan i...

Страница 20: ...lows the user to have the ParticleScan take just one sample and hold the result once or take continuous samples cont until the sampling is stopped 7 4 4 Measurement Units Select one of the three measu...

Страница 21: ...ere the year month and day can be selected Press Select Close to close the Date window To save your selection to the ParticleScan press the Save button 21 Chapter 7 Computer Connectivity 7 6 Using the...

Страница 22: ...ired End time of the measure ment schedule If you select unlimited the meas urement schedule will stay in effect until disabled This can be done by deselecting the Timer Enabled but ton Alternatively...

Страница 23: ...elete the logged data click on the Delete Data button When the data is deleted the Log to Computer window will automatically be cleared To print logged data click on the Print button see Chapter 7 8 6...

Страница 24: ...s memory click on the Data Download button in the Control window Then press the Load Data button All the logged data will now be loaded from the ParticleScan to the window Depending on the amount of...

Страница 25: ...sired printer the desired media size and orientation Chapter 7 Computer Connectivity 7 8 7 Saving Logged Data to a CSV File To save logged data to a le for import into a spread sheet or other program...

Страница 26: ...ted in any common spreadsheet program To make things easy the ParticleScan CD contains an Excel Data Import Sheet that already contains convenient data import and formatting functions Double click on...

Страница 27: ...the data sheet The graph sheets give you a visual timeline for your logged data The Alarm sheet allows you to set alarm particle threshold levels The values need to be selected before data is importe...

Страница 28: ...may be stuck in the inlet nozzle and blocking the beam d Contaminated optics in sensor e Calibration overdue a Contaminated optics in sensor b Internal noise c Calibration overdue a Defective or worn...

Страница 29: ...m Sample time Count displayed as Display Laser source Audible alarm range Power Rechargeable batteries Dimensions weight Supplied accessories Warranty Data logging System requirements Chapter 9 Techn...

Страница 30: ...30 Notes...

Страница 31: ...080312_IQ_MA_PSPPSCR_US...

Отзывы: