background image

Resolution

22

Resolution

Resolution describes the amount of detail (information) an image holds. High resolutions relay more 
information (and therefore more detail), and also consume more computing power. Low resolutions 
communicate less detail but are also less demanding of computer resources. Resolution is measured in 
pixels, the smallest part of a picture element. Ziggi-HD is capable of several high-definition resolutions.

Changing Resolution 

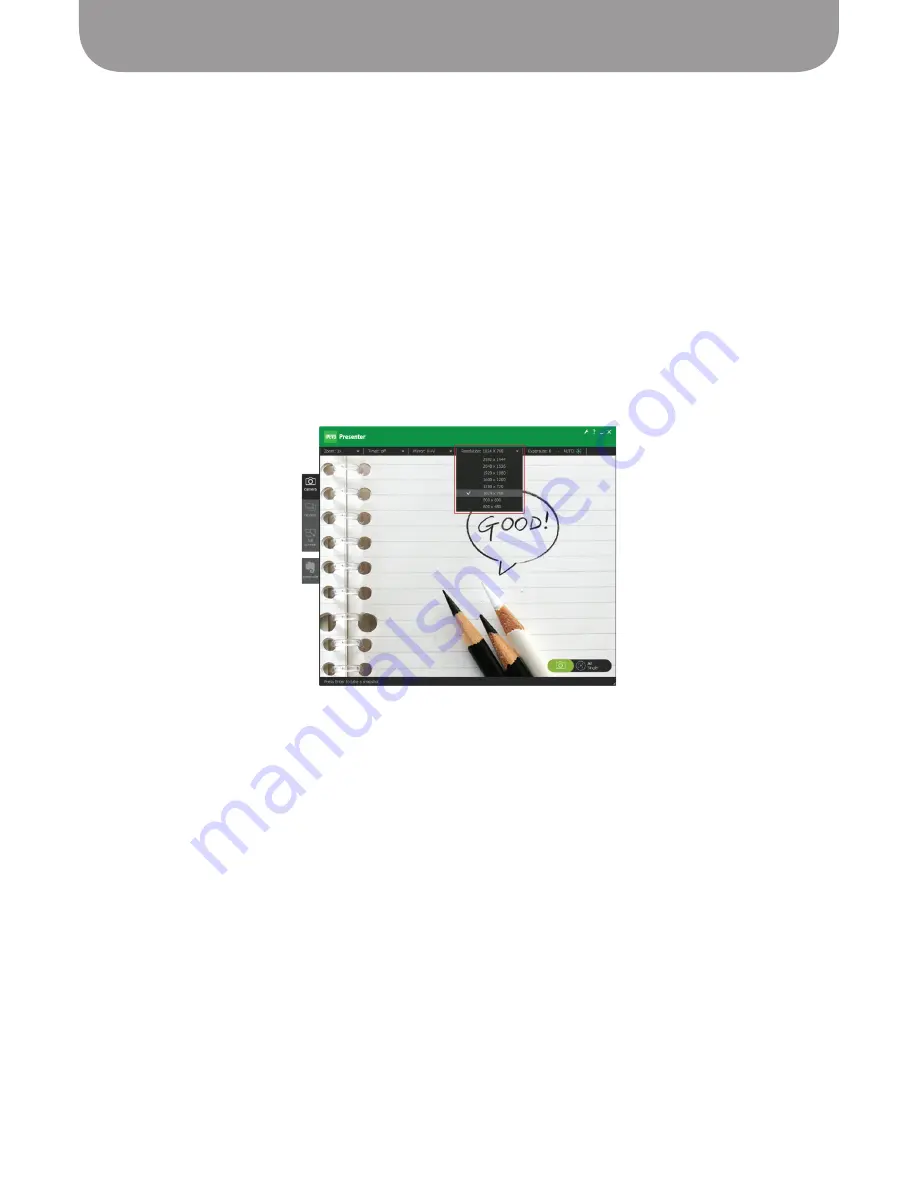
To change resolution, click on the Resolution tab in Camera mode. There are nine different resolutions 
to choose from, ranging from 2592 x 1944 pixels (the highest resolution) to 320 x 240 pixels (the lowest 
resolution). As 1280 x 720 resolution (and above) is commonly accepted to be “high-definition” (HD), 
the top five resolutions are HD resolutions, while the four lower resolutions are standard-definition (SD) 
resolutions.

Resolution and Frame Rate

Generally, as resolution increases, frame rate decreases. Frame rate is a measure of how many distinct 

images are captured in a single second to make up the full-motion video perceived. 

Because the top three resolutions contain an extraordinary amount of information, frame rate will 
significantly drop with these resolutions. You may experience a “stuttering,” “blurring,” or “strobing” 
of moving subjects, such as with a hands-on demonstration. As such, the top three resolutions are best 
reserved for static objects (such as a stationary piece of paper or LCD screen). 

If you find the amount of strobing to be unacceptable on your current resolution, consider lowering the 
resolution, which will increase frame rate and reduce or eliminate strobing.

Note: For the higher resolutions, Single Focus mode (rather than Continuous) is highly recommended.Note 

on Highest Resolutions: See Page 8 for minimum system requirements for the two highest resolutions.

Содержание Ziggi-HD

Страница 1: ...www ipevo com Ziggi HD USB Document Camera User Manual...

Страница 2: ...tware Introduction 11 Switching between software modes Basics of the Presenter Software 12 Camera mode Full Screen mode Basics of the Presenter Software cont d 13 Review mode Getting a Great Image Fiv...

Страница 3: ...ing Your Setup for Projection 27 Mirroring your desktop Advanced Settings 28 Instant Preview Changing sound effects Photo library location Photo name format Keep camera mode settings Advanced Settings...

Страница 4: ...ally crisp and brilliant image Additionally Ziggi HD features a powerful zoom up to 6x magnification as well as a Macro mode which allows for sharp focus on very close subjects up to 2 inches 5 cm awa...

Страница 5: ...our product packaging We like our products to do the talking not fancy packaging Your Ziggi HD has been shipped with a minimum of packaging materials particularly a minimum of plastic The plain craft...

Страница 6: ...cing Phone Customer service representatives are available to assist you Monday through Friday from 8 a m until 4 p m Pacific Standard Time PST Our telephone number is 1 408 490 3085 Live Chat Live Cha...

Страница 7: ...tly running do one of the following Windows Right click the Ziggi HD icon in the system taskbar and click About Macintosh Select About About Ziggi HD You can also view the version information from the...

Страница 8: ...of an image Installation PC Insert the CD ROM into your computer s drive Follow the prompts to complete the installation of the Presenter software A Green and White Ziggi HD icon will appear in your t...

Страница 9: ...Collapse the stand for compact portability B Base The weighted base provides a sturdy foundation for placing the camera in any position C USB Cord Inserted into any standard USB port the cord powers t...

Страница 10: ...le focus mode press this button for sharp focus of your subject It takes a few seconds for Ziggi HD to determine and set proper focus I LED The LED gives you an easy way to know whether Ziggi HD is op...

Страница 11: ...ted as thumbnail images in a row at the bottom of the screen See Page 13 for more on taking snapshots Full Screen mode In this mode the image fills up the entire computer screen Full screen is particu...

Страница 12: ...settings of these functions C Snapshot Button Click the green camera icon to take a snapshot See Page 23 for more on taking snapshots D Focus Button Click the rectangular crosshairs icon to focus the...

Страница 13: ...he location on your computer where your snapshots are stored D Image Information Provides information about the image including file name date taken resolution taken at and file size in kilobytes E Th...

Страница 14: ...osure Exposure is a measure of how much light is allowed to affect the image Normally you are seeking a medium exposure in which all the important details in the image can be viewed Too little light w...

Страница 15: ...Alter any or all of the stand s three points of articulation in order to optimally position the camera Change the position of the subject When capturing a document you will likely position it on the t...

Страница 16: ...u can click and drag the smaller box to selectively zoom to different portions within the original field of vision Note Focusing while zoomed in will focus according to the center of the original full...

Страница 17: ...is in landscape or portrait You will need to control the orientation of your subject relative to the computer screen so that the text is presented in a readable fashion Camera Lens Orientation The top...

Страница 18: ...to frequently change its position you might consider moving the stand to one side of the subject and changing orientation through the swivel head accordingly so that the stand does not get in your wa...

Страница 19: ...oint scale with 1 being the lowest darkest exposure value and 15 being the highest brightest exposure value 8 is the default value If your image is too dark consider increasing the EXP Or if your imag...

Страница 20: ...ting of 10 will always be brighter than auto exposure with an EXP setting of 8 for one example Actual brightness darkness Auto exposure will react to changes in actual brightness darkness With auto ex...

Страница 21: ...d in a hands on demonstration setting the Ziggi HD in Continuous mode will ensure your image is always in sharp focus Single S mode In Single mode Ziggi HD will stay at a single focal length and will...

Страница 22: ...olutions are standard definition SD resolutions Resolution and Frame Rate Generally as resolution increases frame rate decreases Frame rate is a measure of how many distinct images are captured in a s...

Страница 23: ...n screen in an Instant Preview After another brief period of black the video capture function will resume For changing or disabling Instant Preview and for disabling the shutter sound effect see Page...

Страница 24: ...unt or log in to your existing account Enter username and password information Alternately you can click on the green Evernote elephant icon button which will open your browser and take you to the Eve...

Страница 25: ...ed picture s from your Attached Files grouping Note that the delete button will not permanently delete the snapshots from your hard drive 3 Review your snapshots Selected snapshots appear in the thumb...

Страница 26: ...de press the Esc key or click the Esc button in the upper right hand section of the screen Capture Adjust Project Evernote 5 Upload to Evernote A message in the lower right will inform you how many fi...

Страница 27: ...listed as an alternate display option 4 Select the projector then click the option to Extend my Windows desktop onto this monitor Windows Vista Windows Vista will often automatically detect the projec...

Страница 28: ...s or Off Sound Effect on By default there are beep sounds associated with focusing Ziggi HD and shutter sounds associated with taking snapshots To disable either or both of these sounds uncheck the bo...

Страница 29: ...to 180 affects reproduction of color information Sharpness 0 to 15 controls perceived sharpness blurriness The Default button changes the above customizations to their default values System tab About...

Страница 30: ...ion for these applications for specific instructions When using Ziggi HD for video conferencing ensure the Autofocus switch is set to Continuous mode This ensures constant sharp focus Microphone Ziggi...

Страница 31: ...ect To reduce or eliminate this glare Ziggi HD comes with an Anti Glare Shield Mounting the Anti Glare Shield To mount the Anti Glare Shield align the grooves on the underside of the shield with the s...

Страница 32: ...are is active Macintosh Click the Close button at the top left hand corner of the window or press Command W Closing the software does not exit it entirely To exit the Presenter application Windows Rig...

Страница 33: ...er movement See Page 22 Can I record video with Ziggi HD Ziggi HD does not have the capability to record video There are several third party applications that may be used in conjunction with Ziggi HD...

Страница 34: ...including interference that may cause undesired operation Acknowledgments Windows and Skype are registered trademarks of Microsoft Corporation registered in the US and other countries Mac and Macintos...

Отзывы: