35
Chapter 3: Operation
Canceling a Marker Plot
1.
Press the
Start/Stop
key to place the printer in
STOP
mode (red
light). The FlexJet will finish printing the current scan and pause.
2.
To stop the computer from sending plot files to the printer,
click the
Abort
button in
FlexPlot
.
3.
Use the keypad
Arrow
keys to position the carriage for the start of
a new plot file as described earlier.
4.
Press the
Set Origin
key to ready the printer for the next plot file.
Removing Markers from the
Take-up Shaft
1.
Press
Start/Stop
until the
OK
light changes to red (
STOP
mode).
2.
Wait for the plotting to halt, then open the safety cover.
3.
Remove the front dancer bar. Place it in the small notches in the
brackets in the front cover hinges for storage.
4.
Cut the paper with the supplied cutting tool, using the groove
in the front of the platen as a guide.
5.
Use one of the following methods to remove completed markers:
Method 1: Unroll with the take-up shaft in place
a.
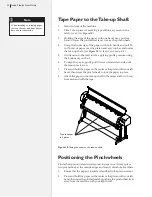
With the power off, rotate the take-up shaft by hand until
the rectangular opening in the flanged coupling is perpen
-
dicular to the opening in the support block (
see
Figure 17
).
b.
Remove the shaft from the support blocks.
c.
When unwound, the plotted image faces up, permitting
markers to be unrolled onto the cutting table with the
take-up shaft in place.
Method 2: Manual unroll with the
Unroll
key
a.
Press the
Unroll
key to unroll full markers in short steps.
b.
Cut the marker free from the take-up shaft. Reattach the
paper to the take-up shaft with masking tape following the
steps outlined under the section
Reattach Paper to the Take-
up Shaft
later in this chapter before continuing printing.
Method 3: Automatic Unroll with the
Unroll
Key
a.
Press and hold the
Unroll
key for 3 seconds; The take-up
shaft will automatically unroll.
b.
Cancel automatic unroll at any time by pressing
Start/Stop
.
Method 4: Remove the shaft and unroll away from the machine
a.
Cut the marker free, wind it manually or automatically with
the take-up motor, and remove the take-up shaft from the
support blocks.
Except when the feed roll is
changed, it is best to leave the
pinchwheels down when removing
completed markers from the take-
up roll. Leaving the pinchwheels
down will help keep the paper
aligned with the feed roll and
reduce the time between printing
operations.
Note
i
The take-up shaft is very
heavy when many plots
have been rolled up. It is
recommended that two or more
people remove a full take-up roll
from the machine.
Caution
An alternate method to ease
removal of markers is to slide
a 3-in cardboard core over the
take-up shaft then tape paper to
it. The cardboard core will rotate
slowly at first—and may not raise
the front dancer bar—but will still
roll up completed markers. Simply
slide the core off the take up shaft
when plotting is complete.
Hint
Содержание FlexJet
Страница 1: ...User Guide Ioline FlexJet ...
Страница 3: ...User Guide Ioline FlexJet ...
Страница 8: ......
Страница 20: ...20 Ioline FlexJet User Guide This page intentionally left blank ...
Страница 50: ...50 Ioline FlexJet User Guide Figure 34 Factory calibration values on the sticker inside the Service Station ...
Страница 64: ...64 Ioline FlexJet User Guide This page intentionally left blank ...

