background image

22

INSTALLATION AND ASSEMBLY

22

iV-Light ventilation unit | Installation instructions

NOTICE: Interruption of the thermal  

insulation composite system. 

Damage to the building structure!

•  During installation, replace the wall 

structure as far as the wall sleeve and if 

necessary guide the housing  

(flush-mounted inner covers) towards it.

•  Observe the necessary barrier levels.


Foam-seal the gap between the wall sleeve and 

masonry all the way around with non-pressing  

2K polyurethane foam.

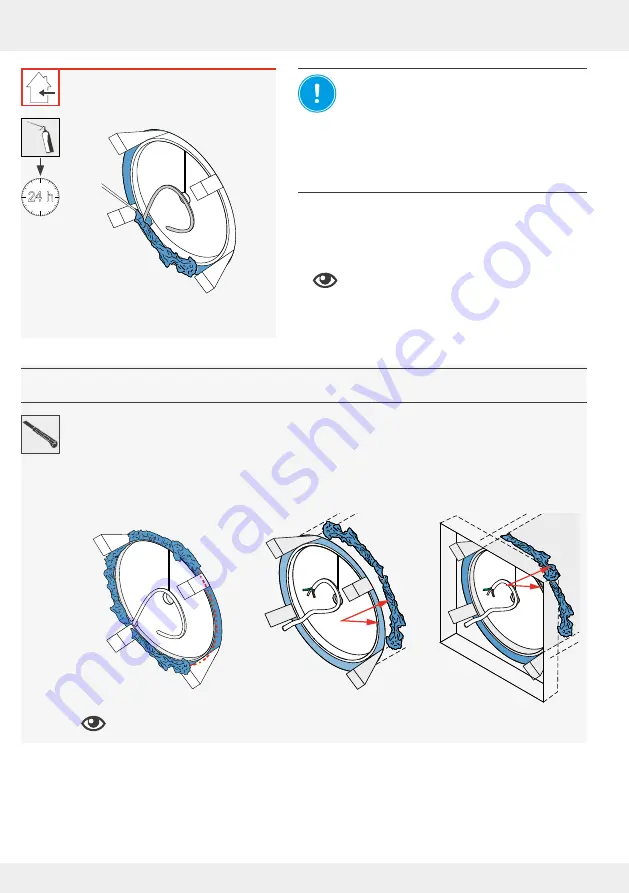
NOTICE:

 Connect / Undercover inner cov-

ers: Leave a 30 mm gap behind the interior 

wall edge of the wall sleeve, otherwise the 

housing can no longer be inserted.

Depending on the 

inner cover 

to be used, cut off the excess, hardened mounting foam and 


protruding mounting wedges as follows:

Take care 

not

 to damage the connecting cable on the interior wall.


The wall sleeve is installed.

Flair:


 Flush with the interior wall, 


Flush with the exterior wall

Connect AP:


30 mm behind the interior  

   wall edge of the wall sleeve 

   (gap) 


Flush with the exterior wall

Connect UP/ Undercover:


30 mm behind the interior  

   wall edge of the wall sleeve 

   (gap) 


Flush with the exterior wall

30 mm

30 mm

30 mm

24 h

!

!

Содержание 1001-0200

Страница 1: ...www inventer de Installation instructions iV Light ...

Страница 2: ...y still occur therefore no guarantee of compliance can be provided This documentation describes the functionality of the standard scope For reasons of clarity the documentation does not purport to cover all details on all types of the product and cannot cover every conceivable scenario for installation and assembly The illustrations in this document may differ slightly from the design of the produ...

Страница 3: ...k the scope of supply 16 4 2 Create wall opening 17 4 3 Laying the cables to the wall opening of the ventilation unit 18 4 4 Installing the wall sleeve 20 4 5 Installing the ventilation unit s external terminal 23 4 6 Inserting the thermal accumulator insert 25 4 7 Electrical connection of the reversible fan 26 4 8 Check function and complete fan installation 28 4 9 Installing the inner cover 29 5...

Страница 4: ...ates the severity of the potential hazard unless the preventive measures are taken DANGER means Imminent danger of serious injury or death WARNING means Possible danger of serious injury or death CAUTION means Direct danger of minor significant injury NOTICE means Direct or possible risk of property damage due to an adverse event state If you see these signs ensure you observe the described measur...

Страница 5: ...junction with components that are recommended authorised and described by inVENTer GmbH in this documentation Changes or modifications to the equipment system are not permitted Your ventilation system is exclusively designed for use in ambient temperatures between 20 and 50 C Trouble free and safe operation of the equipment system depends on proper transportation proper storage and installation as...

Страница 6: ...e around the exterior closures Consult your planner about this NOTICE When installing components in exterior walls with insulation use insulation wallplugs to ensure that the components are securely fastened Insulation wallplugs are not included in the scope of supply they are available as an option NOTICE Only use permanently elastic sealing compound suitable for outdoor use to seal the joints at...

Страница 7: ...be set up operated and cleaned in conjunction with this docu mentation and the documentation for the controllers Installation electrical connection and commissioning of the equipment system may only be performed by qualified personnel Qualified personnel within the meaning of the safety notices in this documentation are persons who are authorised to install put it into operation and identify equip...

Страница 8: ...t flow through the thermal accumulator The unique geometry of the Xenion reversible fan effectively reduces sound transmission The standard length of the wall sleeve is 495 mm For thicker walls a wall sleeve with a length of 745 mm can be ordered Both versions can be shortened on site The ventilation unit is controlled via one of the following inVENTer system controllers1 sMove inVENTer Connect2 M...

Страница 9: ...s 2 x pre installed 1 R D160 wall sleeve 2 Recess for controller connecting cable 3 Thermal accumulator with insulation 4 Thermal accumulator handle 5 Standard guiding vane wide 6 Xenion reversible fan 7 Slim guiding vane narrow 8 Guiding vane knob 9 BUS plug connection 10 Inner cover base plate incl ISO Coarse 60 dust filter 4 Inner cover panel 11 Connecting element 1 The description of the compo...

Страница 10: ... weather related pressure fluctuations Thus the sensitivity of the air flow to pressure fluctuations corresponds to class S3 according to EN 13141 8 max 30 air flow deviation at 20 Pa In order to ensure the full functioning of the ventilation unit throughout the entire year a temperature sensor is integrated into the Xenion reversible fan This measures the temperature of the air flow at the fan If...

Страница 11: ...use function OFF standard only Heat recovery Unidirectional ventilation Dehumidification integrated moisture temperature sensor Pause function OFF Heat recovery Unidirectional ventilation Dehumidification and other demand ventilation Pause function global and zonal Boost function global and zonal OFF Fan speed infinitely adjustable 4 levels predefined 4 power levels freely selectable 4 power level...

Страница 12: ...r spray is possible Observe the specifications of VDE 0100 when choosing the installation location Minimum distances of the wall opening for the ventilation unit Minimum distances to components building elements on the internal and external wall NOTICE Malfunction due to incorrect positioning of the ventilation unit Note insulation thickness and possibly shutters Do not install near radiators Obse...

Страница 13: ...xternal termination Standard ventilation unit variant Light weather protection grille Figure 2 Dimensioned drawing of the iV Light wall opening interior view 1 Minimum distance to adjacent components on the interior wall 3 Recommendation Attach the hood at lintel height 2 Ensure a minimum distance to adjoining components on the exterior wall 4 Note insulation thickness and any roller shutters 1 Wa...

Страница 14: ...ng of the iV Light ventilation unit Figure 3 Sectional drawing of the iV Light ventilation unit 1 Inner cover base plate 2 Connecting element 3 Filter holder 4 Inner cover panel 5 R D160 wall sleeve 6 End stop tape 1 External termination Weather protection grille 7 Thermal accumulator 8 inVENTron Xenion reversible fan embedded in double guiding vane A Interior plaster interior structure B Masonry ...

Страница 15: ... cover 1 Inner cover base plate 2 Connecting element 3 Locking hook 4 Inner cover panel 5 Filter holder 6 Interior wall fixing hole optional 7 Connecting element fixing 4 x Ø4 8 184 210 184 210 160 Ø160 32 40 3 5 Dimensional drawings of components Light weather protection grille Figure 4 Dimensional drawing of the Light weather protection grille A A 134 A A 30 100 2 x Ø4 8 Ø 200 200 2 3 1 1 3 1 2 ...

Страница 16: ...pe of supply of the external terminations variants wall sleeves for integrating the Connect controller platform and the interior closure variants please refer to the separately available installation instructions for the respective system component Figure 6 iV Light ventilation unit standard components 1 External termination Weather protection grille 1 a Sealing tape 1 b End stop tape 2 Wall sleev...

Страница 17: ...te the wall opening through core drilling Drill with core drill attachment or milling drill Ø 180 mm additionally if flush mounted inner cover is installed chisel Requirements The masonry must be dry and in a load bearing condition No load bearing elements in the position of the drill hole NOTICE Accumulation of condensate in the wall sleeve leads to damage to the brick work and exterior wall Crea...

Страница 18: ...one inVENTer Connect Connect inner cover Connect inner cover operating voltage Installation cable 230 V AC e g NYM J 3x1 5 mm House distribution ventilation sub distribution Unit communication only if the system compo nents communicate by cable otherwise radio RS485 data cable e g Type J Y ST Y 2x2x0 8 mm Easy Connect e16 operating unit Once the wall opening has been created the cables necessary f...

Страница 19: ...asy Connect e16 System communication by cable RS485 data cable Cross section 0 25 0 5 mm Length max 500 m Cable NYM J wire cross section 1 5 mm Ventilation unit n Control unit Connect inner cover Ventilation unit 1 Control unit Connect inner cover House distributor Operating unit Easy Connect e16 230 V AC One after the other Star shaped Cable type LiYY 3 wire wire cross section 0 75 mm2 length see...

Страница 20: ... 180 mm is finished The cables to the wall opening of the ventilation unit have been laid X Y D A B C Determine the exact wall thickness X D Exterior rendering incl other superstructures if applicable C Insulation if necessary incl air gap B Masonry incl relining if necessary A Interior plaster Y Protrusion of the wall sleeve in the outer area depending on the installation situation exterior rende...

Страница 21: ...Accumulation ofcondensation water in thewall sleeve Damage to exterior wall and masonry and the building structure Attach the wall sleeve with a slope of 1 to 2 to the exterior wall Attach the wall sleeve inside and outside with the mounting wedges so that there is a slope of 1 2 to the exterior wall Check the angle of the wall sleeve using a spirit level NOTICE Contamination of the wall sleeve by...

Страница 22: ...am NOTICE Connect Undercover inner cov ers Leave a 30 mm gap behind the interior wall edge of the wall sleeve otherwise the housing can no longer be inserted Depending on the inner cover to be used cut off the excess hardened mounting foam and protruding mounting wedges as follows Take care not to damage the connecting cable on the interior wall Ö The wall sleeve is installed Flair Flush with the ...

Страница 23: ...her protection grille before installing the external terminal Attach end stop tape on the exterior wall side in the top half of the wall sleeve Before installation carry out a biocidal pre treatment water repellent pre treatment of the sur face around the external termination consult your planner regarding this Spirit level cordless screwdriver permanently elastic external sealant sealing tape scr...

Страница 24: ...ws NOTICE Damage to masonry exterior wall caused by incorrectly aligned condensate drip The condensate drip must point towards the floor Align the fixing screws with a spirit level Screw the weather protection grille onto the pre installed fixing screws 1 Ö The fixing claws hook into the wall sleeve Ö The weather protection grille is installed Seal the joint between the panel and the exterior wall...

Страница 25: ...nal terminal is fitted Remove the styrofoam disc from the wall sleeve Insert the thermal accumulator from the interior into the wall sleeve The handle points towards the interior The connecting cables protrude into the interior From the interior slide the thermal accumulator towards the external terminal as far as the end stop tape Insert the inVENTron from the interior into the wall sleeve so tha...

Страница 26: ...tripping tool screwdriver blade wire end ferrules 3 x 0 75 mm Requirements The reversible fan is inserted into the wall sleeve Shorten the controller connecting cable 3 wire to your determined wall thickness minus 200 mm Remove the cable sheath from the controller connecting cable NOTICE Using the wrong wire end ferrules to connect the cables in the plug in connector will lead to a short circuit i...

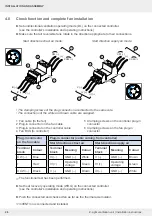
Страница 27: ...eversible fan starts in extract air mode the other in supply air mode This start direction is determined by the different connection sequence of the three fan BUS cables in the plug in connector Secure the three fan BUS cables controller connecting cables in the plug in connector Exhaust air mode White cable III in the left pole Green cable IV in the middle pole Brown cable V in the right pole Sup...

Страница 28: ...nector on the controller cable 4 Fan BUS to controller 5 Clamping screws on the controller plug in connector 6 Clamping screws on the fan plug in connector Plug in connector on the fan cable Plug in connector cable coming from controller Start direction extract air Start direction supply air Terminal block Colour Terminal block Meaning Colour Terminal block Meaning Colour CW Blue III GND White V G...

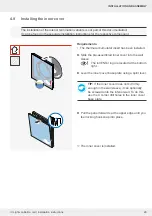
Страница 29: ...using a spirit level TIP If the inner cover does not sit firmly enough in the wall sleeve it can optionally be screwed onto the interior wall To do this use the 4 corner drill holes in the inner cover base plate Ö The inner cover is installed 4 9 Installing the inner cover The installation of the interior termination variants is not part of this documentation It can be found in the separate instal...

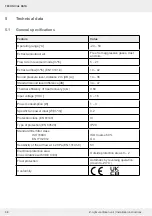
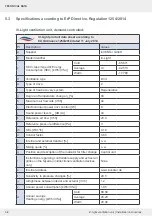
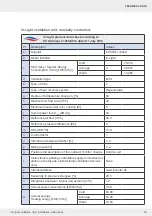
Страница 30: ... 2 m dB A 14 36 Standard sound level difference dB 34 47 Thermal efficiency of heat recovery η w 0 84 Input voltage V DC 6 16 Power consumption W 1 3 Specific fan power input W m h 0 2 Protection class EN 61140 III Type of protection EN 60529 IP20 Standard filter filter class ISO 16890 EN 779 2012 ISO Coarse 60 G4 Sensitivity of the air flow at 20 Pa EN 13141 8 S3 Electrical protection area in acc...

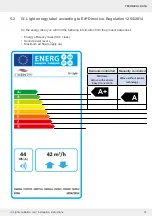
Страница 31: ...irective Regulation 1254 2014 On the energy label you will find the following information from the product data sheet Energy efficiency class SEC class Sound power level Lwa Maximum air flow supply air Demand controlled Manually controlled MZ Home sMove with sensors Easy Connect e16 sMove without sensor technology A A ...

Страница 32: ...mperature change ƞt 84 h Maximum air flow rate m h 42 i Electrical input power incl control W 6 j Sound power level Lwa dB A 44 k Reference air flow m h 29 4 l Reference pressure difference Pa 0 m SEL W m h 0 18 n Control factor 0 65 o Internal and external transfer n a p Mixing quota n a q Position and description of the indicator for filter change Control unit r Instructions regarding controllab...

Страница 33: ...m air flow rate m h 42 i Electrical input power incl control W 6 j Sound power level Lwa dB A 44 k Reference air flow m h 29 4 l Reference pressure difference Pa 0 m SEL W m h 0 18 n Control factor 1 o Internal and external transfer n a p Mixing quota n a q Position and description of the indicator for filter change Control unit r Instructions regarding controllable supply and extract air grilles ...

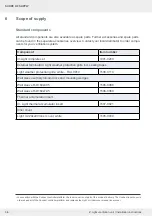
Страница 34: ...mination Light weather protection grille incl sealing tapes Light weather protection grille white RAL 9010 1508 0110 Wall sleeve with styrofoam discs and mounting wedges Wall sleeve R D160x495 1506 0068 Wall sleeve R D160x745 1506 0069 Thermal accumulator insert iV Light thermal accumulator insert 1507 0021 Inner cover Light V 220x220 inner cover white 1505 0039 1 In connection with the Connect co...

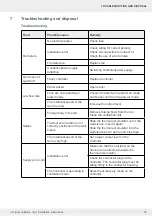
Страница 35: ...an in supply air mode The rotational speed of the fan is too low Increase the output level Noises Foreign body in the fan Remove foreign body from the fan Clean the ventilation unit Thermal accumulator is not correctly positioned in the wall sleeve Slide the thermal accumulator out of the wall sleeve Insert it again Slide the thermal accumulator into the wall sleeve as far as the end stop tape The...

Страница 36: ...bout the warranty is available at www inventer de garantie 9 Service Claims Check the delivery for completeness and transport damage upon receipt using the delivery note Report missing items immediately and at the latest within 14 days to your supplier distributor or factory representative Warranty and guarantee claims In the case of a warranty or guarantee claim contact your local distributor or ...

Страница 37: ...37 WARRANTY AND GUARANTEE 37 iV Light ventilation unit Installation instructions NOTES ...

Страница 38: ...38 WARRANTY AND GUARANTEE 38 iV Light ventilation unit Installation instructions NOTES ...

Страница 39: ...39 WARRANTY AND GUARANTEE 39 iV Light ventilation unit Installation instructions NOTES ...

Страница 40: ...Item number 5001 0042 Version 1 0 07 2021 Subject to modifications We accept no liability for printing errors inVENTer GmbH Ortsstraße 4a D 07751 Löberschütz Germany www inventer eu ...

Отзывы: