Installing F
ully A
ssembled Kits
For C
ommer
cial A
pplic
ations
•
Prior t
o ser
vicing an
y v
ehicle
, please turn the k
ey swit
ch t
o
the OFF position.
•
Do not ser
vic
e an
y v
ehicle while char
ger cable is plugged
in
to the v
ehicle or while it is mo
ving
.
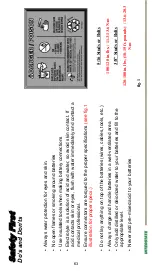
•
Do not use an
y metal t
ools or ha
ve an
ything metal on y
our
body while w
ork
ing o
ver the ba
tt
eries
.
•
W
ear pr
oper saf
et
y pr
ot
ec
tion such as saf
et
y glasses
, fac
e
shield and rubber glo
ves when installing or w
ork
ing
with ba
tt
eries
.
•
If acid c
omes in
to c
on
tac
t with y
our sk
in or e
yes
, flush with
w
at
er and call a ph
ysician immedia
tely
.
•
Read instruc
tions in en
tir
et
y bef
or
e beg
inning the installa
tion
1.
Lif
t golf car sea
t or ac
cess panel and r
emo
ve e
xisting
ven
t caps tha
t ar
e on ba
tt
er
ies
. Check the elec
tr
olyt
e
lev
el t
o ensur
e the minimum lev
el c
ov
ers the t
op of the
pla
tes
. I
f nec
essar
y, add just enough w
at
er t
o c
ov
er the
pla
tes
.
2.
Remo
ve the fully assembled sy
st
em fr
om its bag
and la
y it o
ver the ba
tt
er
y.
The sy
st
ems ar
e c
onfigur
ed
to w
or
k with the specific ba
tt
er
ies in y
our golf car or
vehicle
.
3.
Follo
w dr
awings sho
wn f
or the specific la
yout
needed
, snapping the v
alv
es in
to each c
ell
, going
all the w
ay acr
oss one r
ow bef
or
e star
ting on the ne
xt
ro
w
. M
ake sur
e floa
ts clear an
y obstruc
tion
in v
en
t w
ell
.
4.
Onc
e the sy
st
em is installed
, fully char
ge the
ba
tt
er
ies
. I
mmedia
tely f
ollo
wing full char
ge
, w
at
er
the ba
tt
er
ies
.
Remo
ve v
en
t caps
Fully A
ssembled K
it
GEZ48-KITBC
GY
M
-KIT
C29BC
This is a t
ypic
al batt
er
y
vent op
ening
M
AX
LE
VEL
This is a sp
ecial batt
er
y
vent op
ening
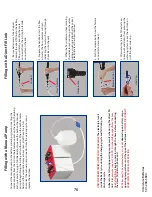
1.
Be sur
e ba
tt
er
ies ar
e fully char
ged
.
Plac
e the g
ra
vit
y f
eed tank a
t least 3’
(.91
m)
abo
ve the t
op of the ba
tt
er
ies
. T
his will
ensur
e sufficien
t w
at
er flo
w
.
2.
Connec
t the 2.5 gallon (9.46 L) g
ra
vit
y
feed tank t
o the ba
tt
er
y filling sy
st
em b
y
inser
ting the male c
onnec
tor fr
om the k
it
in
to the f
emale c
onnec
tor on the g
ra
vit
y
feed tank
. U
sing the g
ra
vit
y f
eed tank
takes longer t
o fill than using the dir
ec
t
fill link
.
3.
W
hen the flo
w indica
tor st
ops spinning
,
the indica
tor ey
es c
ome up on the v
alv
es
giving a visual indica
tion tha
t the c
or
rec
t
elec
tr
olyt
e lev
el has been r
eached
.
4.
Push the r
elease butt
on on the f
emale
connec
tor t
o disc
onnec
t.
5.
A
ft
er w
at
er
ing
, r
e-a
ttach the dust cap
to keep dir
t and debr
is fr
om en
ter
ing the
w
at
er
ing sy
st
em. L
ea
ve the dust cap on
un
til the ne
xt w
at
er
ing
.
Release Butt
on
D
ust C
ap
Connec
t
Filling with a 2.5 G
allon (9.46 L) G
ra
vit
y F
eed
Tank
Indica
tor
Eye
Fl
ow
Indica
tor
75
Содержание eNVy neighborhood vehicle
Страница 1: ...OWNER S MANUAL 1 ...
Страница 56: ...Accessories For a complete line of genuine eNVy accessories visit www baddawgaccessories com 56 ...
Страница 58: ...Service Record Number Date Hour Meter Reading Dealer Stamp 1 2 3 4 5 6 7 8 58 ...
Страница 61: ...Golf Cart Battery Install Maintenance 61 ...
Страница 71: ...OCV Open Circuit Voltage vs SOC State of Charge 71 ...
Страница 92: ...92 ...
Страница 94: ...94 ...
Страница 96: ...96 ...
Страница 128: ...Summit Series II User s Manual Represented By 43068 B 128 ...

