background image

25

Single to Dual Upgrade

Single to dual processor upgrade kits include a CPU with attached heat sink, a voltage regulator
module (VRM), and a metal clip.

To upgrade a single processor system:

1.  Open the base unit and remove the necessary parts as described in Chapter 1.

NOTE

If full-length ISA option boards are installed, they must be removed to access the CPU sockets.

2.  Find the empty processor socket (adjacent to the existing CPU) on the system board.  Raise the

lever on the empty socket to open the socket.

3.  Install the new CPU into the socket.  The CPU socket is keyed to ensure proper insertion.

4.  Lower the lever to lock the CPU in the socket.

5.  Attach the metal clip over the new CPU.  Examine how the clip on the first CPU is installed to

see how it should fit on the new CPU.  Ensure each end of the clip fully engages the socket tabs.

6.  Attach the VRM into the empty VRM socket.  Ensure the release tabs in the VRM socket fully

engage the VRM.

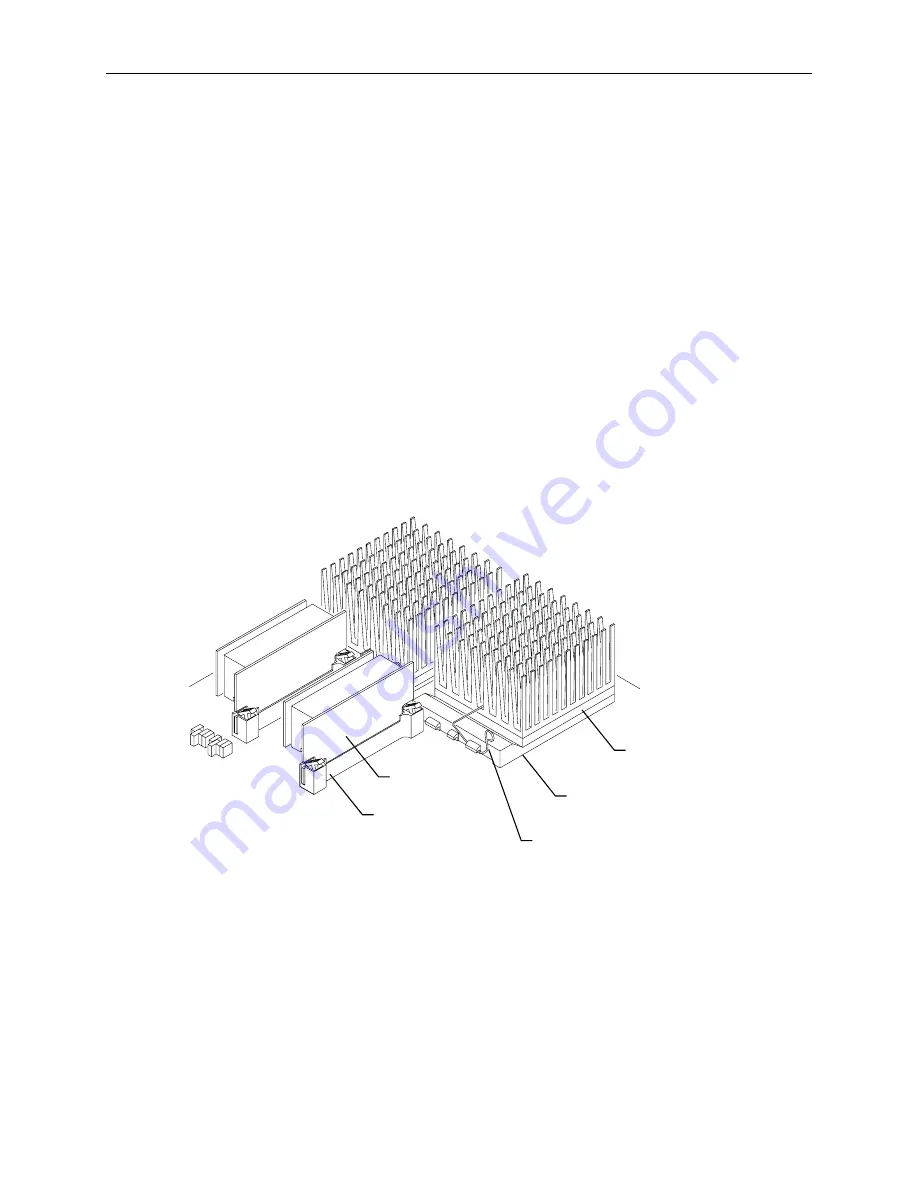
The following figure shows the completed upgrade with the new CPU and VRM installed.

  Metal Clip

  CPU

  Socket

  VRM

  Socket

7.  Replace any full-length ISA option boards and close the base unit.

Dual to Quad Upgrade

Dual to quad upgrade kits contain a processor module with two pre-installed processors and voltage
regulator modules (VRMs), and screws.

Содержание DHAF02430

Страница 1: ...Rack Mount Workstation Server System Reference November 1997 DHAF02430...

Страница 2: ...7 Intergraph Corporation including this documentation and any software and its file formats and audio visual displays described herein all rights reserved may only be used pursuant to the applicable s...

Страница 3: ...ill be required to correct the interference at his own expense This digital apparatus does not exceed the Class A limits for radio noise emissions from digital apparatus set out in the Radio Interfere...

Страница 4: ......

Страница 5: ...P6 Bus Termination Card 15 Processor Module for MSMT353 and MSMT359 15 Processor Module for MSMT378 15 System Board 16 Fans 17 Power Supply Fan 17 System Fans 18 Internal Bay Fan 18 Vertical Bay Fan 1...

Страница 6: ...MT359 50 DMA Channels 50 Input Output Addresses 50 Memory Address Map 50 PCI to ISA Bus Interrupt Mapping 51 PCI Bus Configuration Space 51 ISA Bus 52 6 System Board MSMT378 53 Connectors 53 Jumpers 5...

Страница 7: ...B 76 CDSK123 CDSK164 CDSK165 CDSK166 CDSK167 4 GB 77 Floppy Disk Drive CDSK146 77 Combo Drive MESAM86 78 EIDE CD ROM Drive CDSK177 79 10 Power Supply and Fans 81 Power Supply MPWS145 81 DC Output Spec...

Страница 8: ...viii...

Страница 9: ...d directories You can type filenames and directory names in the dialog boxes or the command line in lowercase unless directed otherwise CTRL D Press a key while simultaneously pressing another key for...

Страница 10: ...x...

Страница 11: ...e Tools You will need the following tools to service the system u Antistatic wrist strap u Quarter inch nutdriver u No 1 and No 2 Phillips screwdrivers u Three sixteenth inch nutdriver u Five sixteent...

Страница 12: ...e lower screw on each side of system front that secures handle to the base unit 3 Remove the six screws that secure face plate to the base unit 4 Pull the face plate toward you to remove it Note how t...

Страница 13: ...ent can occur if documented procedures are not followed CAUTION Use an antistatic wrist strap for all servicing procedures to avoid the possibility of electrostatic discharge The following shows the l...

Страница 14: ...ve 1 Disconnect the power cable and floppy cable from the drive as shown in the following figure Note the position of the red stripe on the floppy cable 2 Remove the two screws securing the drive brac...

Страница 15: ...ive as shown in the following figure 4 Attach the new drive to the bracket and attach it to the power supply Connect the power cable and floppy cable Ensure the red stripe on the floppy cable is orien...

Страница 16: ...for details To replace the CD ROM drive 1 Disconnect the power cable data cable and audio cable from the CD ROM drive as shown in the following figure Note the position of the stripe on the data cable...

Страница 17: ...D as the old drive On a new EIDE drive set the mode select header to master Refer to Chapter 9 Peripherals for details 5 Attach the new drive to the horizontal bay and attach it to the base unit Conne...

Страница 18: ...k drive or module replacement instructions To replace drives in the vertical bay 1 Remove the disk drive fan by removing the screw at the top of the vertical bay and disconnecting the fan power cable...

Страница 19: ...he screws securing the disk drive at the top of the vertical bay as shown in the following figure 4 Pull out the black disk drive tray through the front of the system The disk drive is attached to the...

Страница 20: ...the new disk drive to the same SCSI ID as on the old disk drive 7 Attach the new disk drive to the tray and slide it into the vertical bay 8 Secure the drive to the bay 9 Connect the SCSI cable and p...

Страница 21: ...system 5 Remove the screws that secure the disk drive to the internal bay Two screws are on top as shown and two are on the bottom 6 Remove the disk drive from the bay 7 Set the SCSI ID on the new dis...

Страница 22: ...he power supply The AC power cable is routed from the line filter 4 Remove the floppy drive and the horizontal drive bay Refer to the respective procedures earlier in this chapter 5 Disconnect the spe...

Страница 23: ...scribed in Chapter 1 2 Remove all installed option boards If ISA boards are installed remove the internal disk drive bay and then remove the ISA cards Refer to Internal Bay Disk Drives earlier in this...

Страница 24: ...damaged as a result Press firmly so the card connector slides evenly into the slot 11 Install the riser card brace and install the two screws securing the card to the brace 12 Place the PCI card guid...

Страница 25: ...pre installed voltage regulator modules VRMs and processors To replace the processor module 1 Open the base unit 2 Remove the installed PCI cards The processor module is attached to the system board...

Страница 26: ...ink support assembly until the bar snaps into place 7 Reinstall the ISA cards System Board Replacement system boards contain pre installed voltage regulator modules and processors However you must swa...

Страница 27: ...o jacks with the jackscrews 18 Slide the telescoping section into the base unit Ensure that all tabs engage correctly 19 Install the five screws that secure the telescoping section to the base unit 20...

Страница 28: ...drive fan power cable 3 Remove the four screws securing the fan to the internal disk drive bay at the rear of the unit Note the airflow direction of the fan 4 Install the new fan and connect the fan...

Страница 29: ...thium CMOS Clock Battery On the MSMT353 or MSMT359 system board the battery is located to the right of the riser card near the back On the MSMT378 system board the battery is located near the memory m...

Страница 30: ...erfere with access to the battery Battery 2 Carefully remove the discharged battery by grasping it firmly and lifting upward 3 Install the new battery in the same orientation as the discharged battery...

Страница 31: ...e a helper 2 Open the cover 3 Disconnect the power cable from the top of the line filter 4 Remove the right rail from the base unit 5 Remove the four screws securing the line filter to the base unit 6...

Страница 32: ...or 6 Install the new keyswitch with the arrow pointing up place the keyswitch cable into the cable clip and connect the cable at the inline connector 7 Connect the LED cables and secure the bracket to...

Страница 33: ...r use with Intergraph computers at extremes of temperature and system load to ensure reliable performance System memory modules available from other vendors may not function properly or reliably in yo...

Страница 34: ...cket J58 Install the remaining SIMMs in the next empty socket until socket J51 is the last socket populated For system board MSMT378 install the first SIMM in the first available socket 5 Position the...

Страница 35: ...et The CPU socket is keyed to ensure proper insertion 4 Lower the lever to lock the CPU in the socket 5 Attach the metal clip over the new CPU Examine how the clip on the first CPU is installed to see...

Страница 36: ...apter 6 System Board MSMT378 for more information 3 Align the new processor module over the S1 slot and firmly press it down into the slot 4 If necessary replace the top section of the heat sink suppo...

Страница 37: ...and need not be removed 4 Remove the voltage jumper from J19 and place it on jumper J39 Refer to the following figure Also refer to Chapter 6 System Board MSMT378 for details on jumper settings 5 Ins...

Страница 38: ...on to the system during startup Therefore you must run the SCU to define the board to the system before installing the ISA board This reserves system resources for the board and prevents conflicts wit...

Страница 39: ...file can be loaded to the system so that the BIOS reads this file to assign resources during startup If you install ISA boards that are shipped with a configuration diskette follow this procedure NOTE...

Страница 40: ...he SCU 4 From the SCU Main Menu select Step 2 then press F6 The ISA Board Definition Menu displays as shown in the following figure Video Board Multifunction Board Mass Storage Device Board Name Manuf...

Страница 41: ...drive is installed in the lower horizontal bay The two internal drive bays are empty The disk drive uses SCSI ID 0 the SCSI CD ROM drive in the TDZ 612 RAX drive uses ID 4 and the EIDE CD ROM in the...

Страница 42: ...four screws two on top and two on bottom Refer to Disk Drives in the Internal Bay in Chapter 2 for an illustration 7 Place the internal bay into the base unit and slide it toward the rear until it eng...

Страница 43: ...SI cable to the drive 11 Replace the disk drive fan 12 Close the base unit and restart the system 13 If necessary install the appropriate device driver and configure the device according to the vendor...

Страница 44: ...lace the drive into the tray and secure it with two screws on each side Screws Two each side 9 Slide the tray into the drive bay and secure it with two screws on each side 10 Place the drive bay into...

Страница 45: ...st device u SCSI cable between each device Connecting the Drive To add an external SCSI drive 1 Connect the SCSI cable to the SCSI port on the base unit and to the device 2 Set the drives SCSI ID to a...

Страница 46: ...eir SCSI ID number to no 6 Set the Maximum Sync Transfer Rate values for the drives to the desired settings If changing these settings to extend cable lengths or add more devices set Fast SCSI 2 drive...

Страница 47: ...AC In External Ports Power switch Floppy Data PCMCIA Data Combo drive only Audio SCSI Speaker MSMT353 System Fans Processor Module or P6 Bus Termination Card MSMT353 or MSMT359 only Riser Card MSMT46...

Страница 48: ...Feature Summary The following table summarizes the SCSI memory and processor features of the system boards Refer to Chapter 5 for details on MSMT353 or MSMT359 and Chapter 6 for MSMT378 Board SCSI Me...

Страница 49: ...cation revision 2 0 Sound Controller Creative Labs Vibra 16C MPC 2 0 compliant Crystal CS4236B PC97 compliant Ethernet Controller Intel 82557 10 100BaseTX PCI Intel 82557 10 100BaseTX PCI SCSI Control...

Страница 50: ...MHz CPU Quad ready 512 KB cache P Dual P6 200 MHz CPU Quad ready 512 KB cache Q Quad P6 200 MHz CPU Quad ready 512 KB cache V Dual PII 266 MHz CPU 3 Graphics 0 No graphics 5 G95 2 MB WRAM Q Z13 R Z25...

Страница 51: ...is A Windows NT Workstation Solaris 9 Revision Variable Specifications Base Unit Dimension HxWxD Base Unit Weight Maintenance Clearance 8 75 x 16 65 x 25 25 inches 22 2 cm x 42 3 cm x 64 1 cm without...

Страница 52: ...ollowing hardware refer to the documentation delivered with that hardware for additional information u Monitors u Concentrator u Removable disk drives u Uninterruptible power supply u RealiZm graphics...

Страница 53: ...oards which use Pentium Pro processors Refer to Board Combinations in Chapter 4 for information on which system boards are used in the various workstations and servers Connectors The following figure...

Страница 54: ...quency Jumpers J25 VGA Mode Jumper CPU Frequency The 180 MHz CPU uses a 60 MHz P6 bus with jumpers installed to obtain the 3x multiplier The 200 MHz CPU uses a 66 67 MHz P6 bus with jumpers installed...

Страница 55: ...he graphics accelerator If the jumper is not installed default the VGA mode is enabled If the jumper is installed the VGA mode is disabled You must remove the PCI option boards and the processor modul...

Страница 56: ...ombo drive MESAM86 is installed in the system in place of the floppy disk drive CDSK102 From Cable To J32 ISA Bus PCMCIA MCBL084A MESAM86 Combo drive J6 J33 ISA Bus PCMCIA MCBL084A MESAM86 Combo drive...

Страница 57: ...D0 J43 MCBLZ176A SCSI Pin Signal Pin Signal Pin Signal 26 CD0 33 CD7 46 MSG 27 CD1 34 CD Parity 47 SCT 28 CD2 38 TPWR 48 CMD 29 CD3 41 ATTN 49 REQ 30 CD4 43 BSY 50 I O 31 CD5 44 ACK Remaining Ground 3...

Страница 58: ...9 IOCHRDY 23 SA 21 36 SA 15 10 Ground 24 SA 22 37 BALE 11 SD 14 25 SA 1 38 IOR 12 SD 15 26 Ground 39 D7BUFDIR 13 SD 11 27 SA 3 40 PWR_DWN 14 SD 10 J33 MCBL084A PCMCIA ISA Bus Pin Signal Pin Signal Pin...

Страница 59: ...r Audio Outputs Stereo Line Out MIDI Joystick MIDI In MIDI Out up to 4 fire buttons ADPCM Audio Compression 4 1 3 1 and 2 1 Sampling Rate Range 5 KHz 44 1 KHz in 228 selectable steps Selectable Microp...

Страница 60: ...of the reserved I O or MSMT359 addresses Address Device 0278 027F Parallel Port LPT2 02E8 02EF Serial Port COM4 02F8 02FF Serial Port COM2 0378 037F Parallel Port LPT1 03B0 03BF Monochrome Display Pr...

Страница 61: ...s enable Low or disable High the routing of the PIRQ to an ISA interrupt The lowest four bits 3 0 of each PIRQ register determines to which ISA interrupt the PIRQ will be routed as defined below Bits...

Страница 62: ...ignments are defined below IRQ Name IRQ Name 0 System Timer 0 8 Real Time Clock 1 Keyboard Full 9 Spare 2 Cascade input for IRQ8 IRQ15 10 Vibra 16C Controller 3 COM2 COM4 11 Spare 4 COM1 COM3 12 Mouse...

Страница 63: ...rd Combinations in Chapter 4 for details on board types used in the various workstations and servers Connectors The following figure shows the internal connector locations MIDI J17 Audio J22 Riser Car...

Страница 64: ...board uses jumpers to set the CPU frequency and clock voltage J39 J19 J34 J33 J23 J24 J49 J50 J47 J48 CPU Frequency Socket for CPU 1 CPU 0 SCSI Host Bus Frequency Clock Voltage Host Bus Frequency J33...

Страница 65: ...stroy the processor The following table shows voltage jumper settings IN denotes the jumper is installed on both pins Jumper 200 MHz 3 3v 266 MHz 2 5v 300 MHz 2 5v J19 IN OUT OUT J39 OUT IN IN BIOS Pa...

Страница 66: ...n 1 12 MIDI out 3 X axis joystick 1 8 5V 13 Y axis joystick 2 4 Ground 9 5V 14 Fire button 3 5 Ground 10 Fire button 2 15 MIDI in J22 MCBLZ630 for SCSI drive or MCBL122A for EIDE drive Audio Pin Signa...

Страница 67: ...MCBLZ660 Fan power Pin Signal Color 1 12V Red 2 Ground Black J72 MCBLZ610 Power On LED Pin Signal Wire Color 1 Pwrgood Red 2 Ground Black J73 MCBLZ620 Disk Activity LED Pin Signal Wire Color 1 DiskAc...

Страница 68: ...O 16 Samples FM Synthesizer Crystal internal FM synthesis External Audio Inputs Microphone Monaural Stereo Line In Internal Audio Inputs Stereo FM Synthesis Stereo Wave Data Stereo CD Monaural PC Spea...

Страница 69: ...the reserved I O addresses Address Device 0278 027F Parallel Port LPT2 02E8 02EF Serial Port COM4 02F8 02FF Serial Port COM2 0378 037F Parallel Port LPT1 03B0 03BF Monochrome Display Printer Adapter 0...

Страница 70: ...PIRQ3 PIRQ0 PIRQ1 PIRQ2 PIRQ3 INTD PIRQ3 PIRQ0 PIRQ1 PIRQ2 PIRQ3 PIRQ0 ISA Bus The ISA slots on the MSMT463 riser card accommodate ISA based option boards and a 16 bit wide expansion bus The ISA bus i...

Страница 71: ...the MSMT353 or MSMT359 and MSMT378 system boards The pinouts are the same for both systems except where noted The following figure shows the external ports on the back of the base unit MIDI Ethernet...

Страница 72: ...ound 5 Y axis joystick 2 13 Y axis joystick 1 6 Fire button 3 14 Fire button 1 7 MIDI in 15 5V 8 Parallel 25 14 13 1 Signal Pin Signal Pin Strobe 1 ACK Acknowledge 10 Data 0 2 Busy 11 Data 1 3 PE Pape...

Страница 73: ...nd Data 6 32 Command 48 Command Data 7 33 Request 49 Command Data Parity 34 Input Output 50 Terminator Power 38 NOTE Pins 12 13 14 37 and 39 are not connected all other pins not listed are connected t...

Страница 74: ...erved 4 Reserved 5 RD Receive Data 6 Reserved 7 Reserved 8 Mouse and Keyboard 5 3 1 6 4 2 Mouse Signal Pin Keyboard Signal Pin MDATA Mouse Data 1 KDATA Keyboard Data 1 Reserved 2 Reserved 2 Ground 3 G...

Страница 75: ...al G95 I3D Z13 Z25 Signal Pin R Red R Red 1 G Green G Green 2 B Blue B Blue 3 Ground MID2 Monitor ID2 4 Ground Ground 5 Ground Ground 6 Ground Ground 7 Ground Ground 8 No Connect Supply 5V No Connect...

Страница 76: ...2 B Blue B Blue 3 Ground MID2 Monitor ID2 4 Ground Cable Sense 5 Ground Ground 6 Ground Ground 7 Ground Ground 8 No Connect No Connect 9 Ground Ground 10 Ground MID0 Monitor ID0 11 Ground MID1 Monitor...

Страница 77: ...ound 5 MID1 Monitor ID1 12 Ground 6 HSYNC Horizontal Sync 13 Ground 7 VSYNC Vertical Sync 14 MID3 Monitor ID3 15 VGA In for MSMT378 system board 1 5 10 6 11 15 I3D Z13 Z25 V25 Signal Pin I3D Z13 Z25 V...

Страница 78: ...68...

Страница 79: ...secondary are supported by an Intergraph programmable part on the riser card Some PCI option boards must be installed in a primary PCI slot as stated in the documentation delivered with the option bo...

Страница 80: ...e power supply cable P1 connects to the power connector Graphics Option Card Slot Assignments Graphics cards are installed in specific PCI slots on the riser card The following chart specifies the slo...

Страница 81: ...5 card Z25 card Z25 card Z25 card Slot 4 VGA card VGA card VGA card VGA card Slot 5 Geometry accelerator Geometry accelerator V25 V25 Dual Screen V25 G V25 G Dual Screen Slot 1 V25 card V25 card Slot...

Страница 82: ...72...

Страница 83: ...ft Vertical System disk drive 0 2 Right Vertical Add on disk drive 1 3 Left Internal Add on disk drive 2 4 Right Internal Add on disk drive 3 5 Lower Horizontal CD ROM drive 4 6 Upper Horizontal Other...

Страница 84: ...drive u Terminator resistors are installed in the terminator sockets only when active termination is required By default these sockets are empty since termination is provided by the SCSI cable u The...

Страница 85: ...he P2 through P7 power supply cables from the power supply Refer to Chapter 10 Power Supply and Fans for the cable pinout CDSK111 1 GB The following figure shows the jumper connector J8 on the back of...

Страница 86: ...ector oooooooo oooooooo J6 J2 TP CDSK098 4 GB The following figure shows the jumper connector J5 and SCSI terminator sockets on the Conner 4 GB disk drive Connectors 0E1 through 0E3 are also available...

Страница 87: ...TE ID1 ID2 ID4 SCSI Connector Pin 1 Power Connector oooooooo oooooooo J6 J2 Floppy Disk Drive CDSK146 The following figure shows the cable connectors on the back of the floppy disk drive Floppy Connec...

Страница 88: ...nector J6 uses MCBL084A and connects to J32 on the MSMT353 system board Refer to the table J32 MCBL084A PCMCIA ISA Bus in Chapter 5 for the cable pinout u The floppy connector uses cable MCBLZ380 and...

Страница 89: ...rom the power supply Refer to Chapter 10 Power Supply and Fans for the cable pinout u The audio connector uses MCBL122A and connects to J22 on the system board Refer to Chapter 6 for the cable pinout...

Страница 90: ...80...

Страница 91: ...mum 1 0 6 0 0 0 ADC Noise and Ripple PARD DC to 30 MHz 50 50 100 250 100 mVp p Max Initial Setting Tolerance 2 5 3 3 5 10 10 Max Regulation Line Load 2 5 3 3 5 10 10 Max Overshoot Turn on off 5 5 10 1...

Страница 92: ...ROM drive 4 P7 Tape drive Other drive 5 P8 Not used P9 Floppy disk or combo drive P10 System key switch MCBL166A P1 Pinout Pin Signal Wire Color Pin Signal Wire Color 1 3 3V Orange 13 5V Red 2 3 3V O...

Страница 93: ...19 mm fan MCBLZ52 mounted on the rear left of the power supply housing The power cable connects to MCBLZ530 which connects to J68 on the MSMT353 or MSMT359 system board On systems with the MSMT378 sys...

Страница 94: ...r connects to MCBL284A and to J64 on the MSMT378 system board Internal Bay Disk Drive Fan MCBLY690 The disk drive fan is MCBLY690 an 80 mm fan mounted to the internal drive bay A hole on the back of t...

Страница 95: ...DSK178 74 Closing the base unit 2 Combo drive MESAM86 78 converter cable MCBLZ230 pinout 78 Connectors MSMT353 or MSMT359 system board 43 MSMT378 system board 53 Conventions document ix CPU frequency...

Страница 96: ...ng 18 Internal drive locations 73 Internal SCSI controller riser card 69 Internal SCSI drives adding 31 Interrupt lines MSMT353 or MSMT359 52 MSMT378 60 Interrupt mapping MSMT378 60 ISA bus MSMT353 or...

Страница 97: ...to Pentium II processor upgrade MSMT378 26 Peripheral conttroller 39 Peripheral drives replacing 4 Peripherals 73 Pinouts Ethernet 10 100 Base TX port 64 GA in port for MSTM378 system board 67 keyboar...

Страница 98: ...functional diagram 37 hardware overview 37 information ix maintenance tools required 1 model number 40 opening the base unit 1 removing the face plate 2 servicing 3 specifications 37 upgrading 23 Syst...

Отзывы: