background image

Step 2:

  Initial Setup

En-12

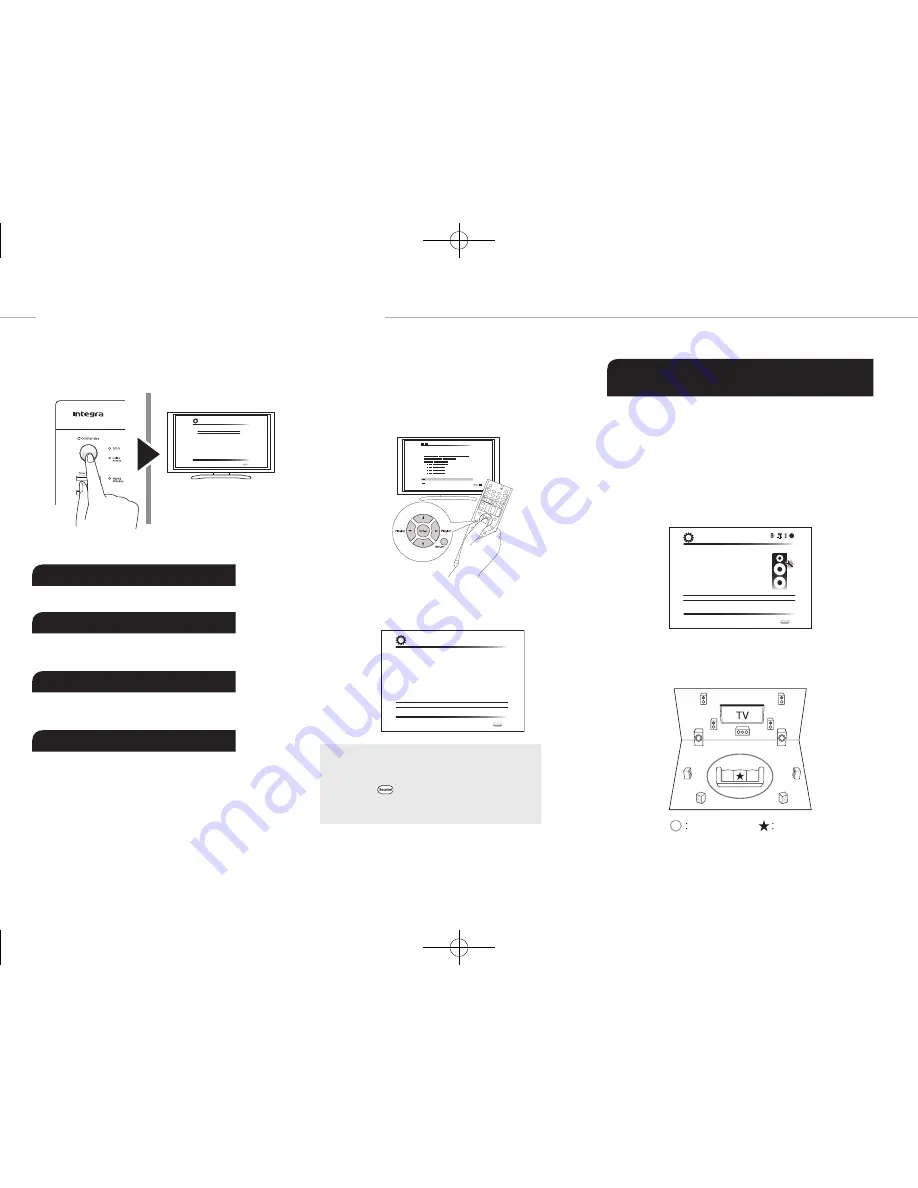
"Initial Setup" automatically starts on the TV when you first 

turn the unit on.

Language Select

English

Deutsch

Français

Español

Italiano

Nederlands

Svenska

Initial Setup

Exit

SETUP

Settings proceed in the following order:

1 AccuEQ Room Calibration


Automatic calibration for optimum speaker settings

2 Source Connection


Checking that each input source is connected correctly


HDMI link function settings

3 Remote Mode Setup


Settings required to operate other AV Components with 

the Remote Controller

4 Network Connection


Checking network connections


Wi-Fi settings

¼

Firmware update notification

: If the unit is connected via LAN and there 

is firmware update available, the "Firmware Update Available" message will 

appear. To execute updating, select "Update Now" with the cursor buttons of 

the remote controller and press Enter.  

When "Completed!" appears, press 

z

On/Standby on the main unit to turn 

the unit into standby mode. Then updating will be completed. (The unit 

automatically turns itself into standby mode after about 3 minutes even if 
you do not press 

z

On/Standby, and updating will be complete.)

Before Start

Setup is performed as a series of responses to questions 

asked by the unit. Select the item with the cursors of the 

remote controller and press Enter to confirm your selection. 

To return to the previous screen, press Return.


Switch the input on the TV to that assigned to the unit.

Select the language first. Next, a summary of the initial 

settings is displayed. Select "Yes" in this screen and press 

Enter on the remote controller.

Welcome to initial setup.
Have you connected all the speakers and devices?
Before starting, please connect speakers and sources.
Now, would you like to start initial setup?
1st Step : AccuEQ Room Calibration
2nd Step : Source Connection
3rd Step : Remote Mode Setup
4th Step : Network Connection

Yes
No

Initial Setup

Exit

SETUP

Re-doing initial setup: 

If you terminate the 

procedure on the way or change the setting made in 

the initial setup and want to call up the setup wizard 

again, press 

Receiver and then Setup on the 

remote controller, select "8. Miscellaneous" - "Initial 

Setup", and press Enter.

AccuEQ Room Calibration

The test tone coming from each speaker will be measured 

to enable setting of the number of speakers, volume 

level, each speaker's optimum crossover frequencies, 

and distance from the primary listening position, and also 

enable correction of distortion caused by the room acoustic 

environment.


You cannot return to the previous screen during speaker 

setup, even if you press Return.

1�  Place the speaker setup microphone�

AccuEQ Room Calibration

This step you can automatically calibrate

your room to get correct surround sound.

Would you like to calibrate your room now

or later?

Do it Now
Do it Later

Initial Setup

Exit

SETUP

When the screen above is displayed, before starting the 

procedure, place the supplied speaker setup microphone 

at the measurement position 

 by referring to the following 

figure.

Listening area

Measurement position 

with microphone

¼

Correct measurement will not be possible if the microphone is held 

by hand. Measurement is not possible if headphones are being used.

DTR-30.7_BAS_En_SN29401993_150414.indd   12

2015/05/14   16:32:51

Содержание DTR-30.7

Страница 1: ...ions for frequently used operations The Advanced Manual is published on the web for ecological reasons and has more detailed information and advanced settings Advanced Manual found here http integrawo...

Страница 2: ...n Channel Supports USB storage playback Supports variety of network functions such as Internet Radio DLNA AirPlay etc Supports Wi Fi and Bluetooth Equipped with a PHONO jack enabling connection with a...

Страница 3: ...g settings I Cursor buttons Tuningjl button Presetd c button and Enter button Move the cursor and confirms the selection When listening to AM FM broadcasting tune in to the station with Tuningjl or se...

Страница 4: ...necessary to use the control functions 7 to 9 Contact the specialized stores for more information F HDMI IN OUT jacks Digital video signals and audio signals are transmitted between the unit and the...

Страница 5: ...ying NET or USB 4 Lights according to the type of input digital audio signals and the listening mode 5 Stays lit when Music Optimizer is enabled 6 Lights in the following conditions AUTO Tuning mode i...

Страница 6: ...ffects on a height plane This unit can perform optimal sound field processing for the type of height speakers actually installed and registered in Initial Setup Height speaker types Installing speaker...

Страница 7: ...op Front 5 Top Middle 6 Top Rear 7 Dolby Enabled Speaker Front 8 Dolby Enabled Speaker Surround Connection pattern F r o n t C e n t e r S u r r o u n d Back or Height Required Optional Connection of...

Страница 8: ...justing dial turn it to the maximum frequency If your subwoofer does not have built in power amplifier you can connect a power amplifier between the unit and the subwoofer The speaker setting is 7 1 c...

Страница 9: ...ctor buttons For how to make settings see the Advanced Manual To connect the TV and the unit connect the HDMI OUT MAIN jack of the unit and the HDMI IN jack of the TV using a HDMI cable With this conn...

Страница 10: ...responding to the jacks connected at 2 and 3 For example when video input connection is to the 2 BD DVD jack the audio input connection should also be to the 4 BD DVD jacks It is possible to change as...

Страница 11: ...thernet port See 4 Network Connection of Step 2 Initial Setup for Wi Fi settings Internet radio Router NAS Headphones connection Connect stereo headphones with a standard plug 1 4 inch or 6 3 mm to th...

Страница 12: ...his screen and press Enter on the remote controller Welcome to initial setup Have you connected all the speakers and devices Before starting please connect speakers and sources Now would you like to s...

Страница 13: ...displayed Press t u on the remote controller to check the settings Press Enter with Save selected To have the settings reflected for all the speakers select On All Channels in the next screen and pre...

Страница 14: ...S device and establish a Wi Fi connection with ease If you selected Scan Networks 2 Select the SSID of the access point to be connected with the cursor buttons and press Enter When the SSID of the acc...

Страница 15: ...we use it please review Onkyo s Privacy Policy at http www onkyo com privacy I have read Onkyo s Privacy Policy and agree to its terms Yes No ONKYO PRIVACY STATEMENT When connection is successful Suc...

Страница 16: ...ontrol code to a button you can switch the remote control mode to operate other equipment by pressing that button 3 Receiver button Switches the remote controller to the mode for operating this unit 4...

Страница 17: ...es Important This unit needs to be connected to the network through the same router as the iOS terminal or PC Playing music files from an iPhone iPod touch or iPad Update the OS version on your iOS de...

Страница 18: ...e main unit 5 AM FM Radio The Basic Manual explains the method using automatic tuning For manual tuning see the Advanced Manual 1 Press Tuner on the main unit several times to select either AM or FM 2...

Страница 19: ...1 ch source is being played in the main room Connect the PRE LINE OUT ZONE2 jacks of the unit and the line in jacks of the pre main amplifier in a separate room with an RCA cable Main room Zone 2 Sett...

Страница 20: ...or Balance on the main unit display Display the desired setting on the display and adjust it with or To turn off the function After pressing Zone2 on the remote controller press zReceiver Alternative...

Страница 21: ...can increase the dialog portion of the audio in 1 dB steps up to 6 dB so that you can make dialog easier to hear over background noise This setting is unavailable for content other than DTS X This set...

Страница 22: ...be sure to connect it to one of the HDMI IN1 to IN3 jacks of the unit Video and audio are out of synch Video may be delayed relative to audio depending on the settings and connections with your TV Adj...

Страница 23: ...Supported Codecs SBC Transmission range A2DP 20 Hz 20 000 Hz Sampling frequency 44 1 kHz The actual range will vary depending on factors such as obstacles between devices magnetic fields around a mic...

Страница 24: ...Hz 2560 1080p 24 25 30 Hz 50 60 Hz 4K 3840 2160p 24 25 30 Hz RGB YCbCr4 4 4 YCbCr4 2 2 8 10 12 16 bit 50 60 Hz RGB YCbCr4 4 4 8 bit YCbCr4 2 2 12 bit YCbCr4 2 0 8 10 12 16 bit 4K SMPTE 4096 2160p 24...

Страница 25: ...e 1999 5 ES Undertegnede Onkyo Corporation erkl rer herved at f lgende udstyr DTR 30 7 overholder de v sentlige krav og vrige relevante krav i direktiv 1999 5 EF Hiermit erkl rt Onkyo Corporation dass...

Страница 26: ...technology licensed from Fraunhofer IIS and Thomson AccuEQ Music Optimizer RIHD and WRAT are trademarks of Onkyo Corporation All other trademarks are the property of their respective owners DISCLAIMER...

Страница 27: ...any it with the complete corresponding machine readable source code which must be distributed under the terms of Sections 1 and 2 above on a medium customarily used for software interchange If distrib...

Страница 28: ...you do not accept this License Therefore by modifying or distributing the Program or any work based on the Program you indicate your acceptance of this License to do so and all its terms and conditio...

Страница 29: ...m Lane Glenn Randers Pehrson Willem van Schaik libpng versions 0 89 June 1996 through 0 96 May 1997 are Copyright c 1996 1997 Andreas Dilger Distributed according to the same disclaimer and license as...

Страница 30: ...e for any purpose including commercial applications and to alter it and redistribute it freely subject to the following restrictions The origin of this software must not be misrepresented you must not...

Страница 31: ...HE AUTHOR OR THE PUBLISHER BE LIABLE TO YOU ON ANY LEGAL THEORY FOR ANY SPECIAL INCIDENTAL CONSEQUENTIAL PUNITIVE OR EXEMPLARY DAMAGES ARISING OUT OF THIS LICENSE OR THE USE OF THE WORK OR OTHERWISE E...

Страница 32: ...com cn Integra Division of Kitahama Chuo Bldg 2 2 22 Kitahama Chuo ku OSAKA 541 0041 JAPAN Tel 072 831 8023 Fax 072 831 8163 http www integraworldwide com Supplied Accessories Indoor FM antenna 1 AM...

Отзывы: