background image

27

EN

BASIC PLAYBACK

Compatible Cards:

- SD Memory Card (8MB - 2GB)
- SDHC Memory Card (4GB - 8GB)
- miniSD Card (8MB - 2GB)
- microSD Card (8MB - 2GB)

• For miniSD Card and microSD Card, the adapter will

be required.

Note

• The “Media Select” screen will disappear under the 

conditions listed below:

- when 

[Return]

 is pressed.

- when the setup menu is called up.

• Do not remove the card during its playback.

• This unit supports SD Memory Card with 

FAT12 / FAT16  file system, and SDHC Memory Card
with FAT32 file system.

• Do not delete the folders or files in the SD Memory 

Card with your computer. This unit might not read  
SD cards formatted on a computer.

• This unit recognizes up to 8 characters (including “~1”)

of file name in the SD Memory Card. Characters after 
8th will not be displayed.

• If a folder or file name includes one of the following

unrecognizable characters, the folder or file name 
may not be displayed correctly.

- Unrecognizable characters :    . , “ = + [ ] ;

\ : | ¥

\ : | ¥

• For an SD Memory Card, extension other than listed 

below cannot be recognized.

- MP3:  “.mp3”
- WMA: “.wma”
- JPEG:  “.jpg”

“.jpeg“ is not available for SD Memory Card.

4

 Use 

[

K

L

] to select “SD Card”, then 

press [Enter].

Quick

Disc

SD Card

Network

Mode Select

• This will set the unit to “SD Card” mode. To 

play back the contents in any discs, exit “SD 
Card” mode by selecting “Disc”.

5

 Press 

[Setup] to exit.

Even if you turn the unit to the standby mode in
“SD Card” mode, it will be in “Disc” mode the
next time you turn it on.

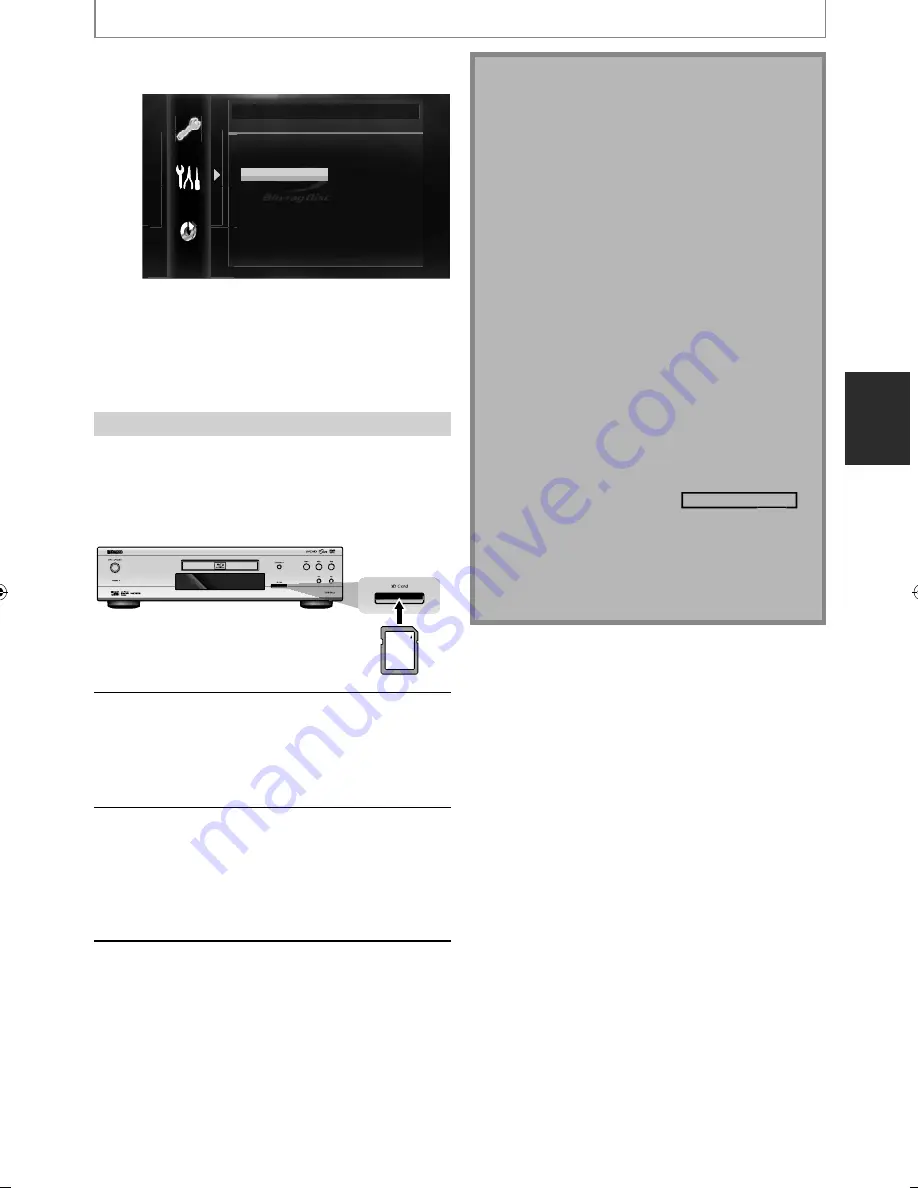
Reading an SD Memory Card

1


Insert an SD Memory Card, with the 
label side facing up, into the SD Card 
slot until it clicks.

If no disc is in operation, “Media Select” screen 
will appear on the TV screen.

SD Memory Card

2

 Use 

[

K

L

] to select “SD Card”, then 

press [Enter].

• Media filter screen will appear.
• When the SD Memory Card contains only one 

type of file, skip to step 4.

3


Select the type of the file you want to 
play back in the media filter screen. 
Then press [Enter] to display the file list.

• Playback of AVCHD files will start right after 

you choose “Video”. (The file list is not available 
for AVCHD files.)

4

 Use 

[

K

L

] to select a desired track, 

folder or file, then press [Enter]. Use 
[

s

 /

B

] to go back and forward

between the hierarchies.

• If you press 

[Enter]

 on the desired file, 

playback will start.

To remove the SD Memory Card:

In stop mode, gently push in the SD Memory 
Card, then pull it out slowly.

E5SF1UD̲DBS30.2̲EN̲v1.indd   27

E5SF1UD̲DBS30.2̲EN̲v1.indd   27

2010/06/04   11:14:04

2010/06/04   11:14:04

Содержание 1VMN29753

Страница 1: ...DBS 30 2...

Страница 2: ...uctions Adjust only those controls that are covered by the operating instructions as an improper adjustment of other controls may result in damage and will often require extensive work by a qualified...

Страница 3: ...This unit s top and rear panels may get warm after prolonged use This is normal If you do not use this unit for a long time it may not work properly the next time you turn it on so be sure to use it...

Страница 4: ...ATION EXPOSURE The label on the right is applied on the rear panel 1 This unit is a CLASS 1 LASER PRODUCT and employs a laser inside the cabinet 2 To prevent the laser from being exposed do not remove...

Страница 5: ...d Instruction Manual Instruction Manual Netflix Box insert Netflix Box insert Note about Recycling This unit s packaging materials are recyclable and can be reused Please dispose of any materials in a...

Страница 6: ...HDMI the HDMI Logo and High Definition Multimedia Interface are trademarks or registered trademarks of HDMI Licensing LLC in the United States and other countries Manufactured under license from Dolby...

Страница 7: ...Step Playback 30 Repeat Playback k 30 A B Repeat 31 PIP Picture in Picture BONUSVIEW Setting 31 Program Playback 31 Random Playback k 32 Rapid Playback 33 Camera Angle 33 Enjoying BD Live Discs with I...

Страница 8: ...enu that can be called up and be operated on the TV screen without interrupting playback You can call up the pop up menu by pressing Pop Up Menu Menu Contents in the pop up menu vary depending on the...

Страница 9: ...RW R and SD card with AVCHD files MP3 Description refers to BD RE R DVD RW R CD RW R and SD card with MP3 files Description refers to BD RE R DVD RW R CD RW R and SD card with Windows Media Audio fil...

Страница 10: ...AV receiver amplifier Dolby Digital DTS decoder or other device with a digital audio optical coaxial input jack with a digital audio optical coaxial cable 3 VIDEO OUTPUT COMPONENT jacks Use to connec...

Страница 11: ...ss to set the HDMI output mode 15 Open Close A button Press to open or close the disc tray 16 PIP button During BD playback Press to display the setting for picture in picture only applicable to BD vi...

Страница 12: ...s that apply in your country or area Do not recharge short circuit heat burn or disassemble batteries Using a Remote Control Keep in mind the following when using the remote control Make sure that the...

Страница 13: ...ber elapsed time repeat mode etc Playback status icon Mode Disc SD Memory Card Stop mode Pause mode Fast forward mode Slow forward mode Appears while repeat function is set Appears when DLNA home medi...

Страница 14: ...t required for this connection High Speed HDMI cable also known as HDMI category 2 cable is recommended for better compatibility Use an HDMI cable with the HDMI logo a certified HDMI cable for this co...

Страница 15: ...h 1080p24 frame input V If the disc contains 1080p24 frame material 60 frame or 50 frame image will be output unless 1080p24 is selected For AVCHD 24 frame film material will be output as 60 frame eve...

Страница 16: ...h PCM 2ch PCM LPCM Multi PCM Multi PCM Downmix 2ch PCM DLNA Music MP3 WMA LPCM 2ch PCM 2ch PCM 2ch PCM Netflix WMA 2ch PCM 2ch PCM 2ch PCM CinemaNow AAC AAC 2ch PCM 2ch PCM Blockbuster AAC AAC 2ch PCM...

Страница 17: ...AV receiver amplifier digital audio optical cable or digital audio coaxial input jack digital audio optical input jack Supplied cables used in this connection are as follows RCA audio cable L R x 1 Pl...

Страница 18: ...ownmix 2ch PCM 5 LPCM Downmix 2ch PCM Downmix 2ch PCM Downmix 2ch PCM Downmix 2ch PCM DVD video Dolby Digital Dolby Digital Downmix 2ch PCM DTS DTS Downmix 2ch PCM LPCM 2ch PCM 2ch PCM Audio CD PCM 2c...

Страница 19: ...about software update refer to Network Update on page 55 For more information about DLNA refer to Playing Video Music Photo Files from DLNA Certified Home Media Servers on page 28 For more information...

Страница 20: ...ts that are Out of Range You can use the following multi room kits to control this unit when it s out of range of the remote controller Multiroom kits such as those made by Niles and Xantech Controlli...

Страница 21: ...D Card 8MB 2GB microSD Card 8MB 2GB DLNA BDMV V V V V video mode V V audio CD V V MP3 WMA V V V V V V V V V V V V JPEG V V V V V V V V V V V V MPEG1 MPEG2 V V AVCHD V V V V Picture in picture commenta...

Страница 22: ...eo labeled for a specific region can only be played back in the unit with the same region code Structure of Disc SD Memory Card Contents The contents of BD DVD are generally divided into titles Titles...

Страница 23: ...mory Card playback Decoding format information Dolby Digital 1 1 Decoding format Track File information SD 1 14 0 00 51 B 1 3 4 2 G 1 Current track file number Total number of track file 2 Elapsed tim...

Страница 24: ...se the disc tray It may take a while to load the disc 6 Playback may start automatically If not press Play B Some discs may show a title or a disc menu In this case refer to Operations Using Title Men...

Страница 25: ...k an Audio CD or a Disc with MP3 WMA JPEG Files Before you begin make sure the correct media mode is selected Set Mode Select to Disc CD MP3 1 Insert an audio CD or a disc with MP3 WMA JPEG files Medi...

Страница 26: ...With regard to the multi border DVD RW R additionally recorded sections may not be recognized For the SD Memory Card playback refer to Reading the SD Memory Card on page 26 If a disc contains AVCHD fi...

Страница 27: ...e for SD Memory Card 4 Use K L to select SD Card then press Enter Quick Disc SD Card Network Mode Select This will set the unit to SD Card mode To play back the contents in any discs exit SD Card mode...

Страница 28: ...control the playback use following buttons Button Action Skip j i Skip to the previous next file during playback or in pause mode Pause F Pause the playback Play B Return to the normal playback Stop C...

Страница 29: ...EG1 Layer3 Mono 32 160kbps Stereo 64 320kbps MP3 MPEG2 Layer3 Mono 8 80kbps Stereo 16 160kbps MP3 MPEG2 5 Layer3 Mono 8 80kbps Stereo 8 160kbps WMA 8 48kHz Stereo 5 320kbps Image file JPEG Exif Ver 2...

Страница 30: ...tep Playback BD V DVD V AVCHD 1 In pause mode press Pause F repeatedly Every time you press Pause F playback will advance one step at a time 2 Press Play B to return to normal playback Note Only step...

Страница 31: ...r when BD Audio Mode is set to HD Audio Output Refer to SwitchingAudioSoundtrack onpage35and Setting the BD Audio Mode on page 36 Program Playback CD MP3 You can play back the disc in your desired ord...

Страница 32: ...layback order of tracks files 1 In stop mode press Mode twice The random screen will appear 1 13 29 CD_DA 1 0 36 1 14 0 45 0 50 0 53 0 20 0 54 2 3 4 5 6 7 16 1 6 2 3 4 5 l a t o T m o d n a R Page Dow...

Страница 33: ...subtitles BD Java applications etc While downloading special video data may be played back How to Activate the BD Live Function 1 Insert the disc with BD Live function 2 Insert an SD card with enough...

Страница 34: ...er title track or time search will start Press Clear to erase an incorrect input Note During program and random playback search functions are not available except the search using Skip H G Time search...

Страница 35: ...e disc you are playing back Switching Audio Soundtrack When playing back video material recorded with 2 or more soundtracks these are often in different audio languages or audio formats you can switch...

Страница 36: ...n Mix Audio Output mode with HDMI Audio Out setting set to Audio Mute and Digital Out setting set to Bitstream DTS DTS HD and LPCM will be output as Dolby Digital for BD audio Refer to pages 15 18 You...

Страница 37: ...oftware update refer to Software Update on page 55 You can deactivate the connection to Netflix by setting the Netflix Deactivate to Yes Refer to page 56 The screen image of Netflix may change after u...

Страница 38: ...To get started please visit www cinemanow com activate Use the numbers on your remote control e g CinemaNow 4 EntertheactivationcodedisplayedonyourPC using s B and the Number buttons then select Acti...

Страница 39: ...e search screen you can search for movies TV Episodes by entering search words 1 Follow step 1 in Renting or Purchasing Movies TV Episodes on page 39 2 Use K L to select Search All or Search then pres...

Страница 40: ...lect then press Enter 3 Use K L to select your desired setting items Quick Mode Select Disc HDMIAudio Out HDMI Multi Normal HDMI Video Resolution Auto Component Output 480i Player Menu English 4 Follo...

Страница 41: ...The setting items which are not available with current situation of this unit will be displayed in gray and you cannot select them 5 Follow the procedure below depending on the setting items A If B do...

Страница 42: ...Slovak k Bulgarian Other Disc Menu Sets the language for disc menu or pop up menu English French Spanish German Italian Swedish Dutch Russian Chinese Japanese Korean Danish Finnish Norwegian Icelandic...

Страница 43: ...lay back the discs recorded in wide screen format with 4 3 TV in the letter box mode with black strips at the top and bottom 16 9 Squeeze When playing back 4 3 images the picture is displayed in the c...

Страница 44: ...ures may be blurred at the auto setting in Still Mode setting due to their data characteristics Quick menu consists of the setting menus frequently used and they are accompanied with If the picture is...

Страница 45: ...ith a downmixed to 2ch LPCM Audio Mute Mutes the HDMI audio signal and set the signal format from AUDIO OUTPUT DIGITAL OPTICAL COAXIAL jacks Refer to Digital out setting on page 46 for setting options...

Страница 46: ...s This setting is not effective when the HDMI audio signal is output Speaker setting This unit allows you to enjoy multi channel surround sound such as 7 1 channel 5 1 channel surround Front left and...

Страница 47: ...ound You cannot change the setting of Subwoofer If connected device is not compatible with subwoofer Subwoofer will be displayed in gray Small Center Large Small Subwoofer On Surround Large Small Surr...

Страница 48: ...er to reset Delay Time setting to the default Settings with are the default For Speaker Size setting the settings of each speaker size may be adjusted automatically corresponding to each setting e g I...

Страница 49: ...Level then press Enter 2 Use K L to select your desired option then press Enter All To release the limitation Age Setting To set the age limitation After selecting Age Setting use the Number buttons...

Страница 50: ...HDMI CEC Sets whether to utilize HDMI CEC function On Off Mode Select Selects the media to playback Setting will be back to Disc when you turn the unit to the standby mode Disc Select this when you pl...

Страница 51: ...mware version by connecting this unit to the Internet Settings with are the default HDMI CEC allows integrated system control over HDMI and is part of the HDMI standard In addition to Integra Onkyo AV...

Страница 52: ...n Test is not available when Disable is selected in Network Connection Enable Easy Network settings are set to the following settings initially In most cases you can connect to the Internet without ma...

Страница 53: ...the number of other devices e g PC connected via LAN cable and assign the same number 3 d After you enter all correctly press Enter Confirmation message will appear Select Yes to complete the setting...

Страница 54: ...cted ports may be blocked and not be able to use depending on your network environment Connection Speed p You can set connection speed as your preference The default setting is Auto 1 Follow steps 1 t...

Страница 55: ...Please wait until 100 appears on the front panel display 7 After the disc update finishes this unit will restart and eject the disc Note Please do not unplug the AC power cord while executing the Disc...

Страница 56: ...tents such as BD ROM game scores from this player Erase Saved BD ROM Data SD Card Available only when an SD Memory Card is inserted Clears the supplemental data for the BD ROM playback such as subtitl...

Страница 57: ...ume Check that the speakers are connected correctly Check the HDMI connections Check the settings in Audio menu Picture freezes momentarily during playback Check the disc for fingerprints scratches an...

Страница 58: ...ix member Cannot add movies or TV episodes to the instant Queue Visit netflix com on your PC Adding movies or TV episodes on this unit is not available Even though the speed of the Internet connection...

Страница 59: ...n the conventional 8 bits and can reproduce colors close to natural ones without color streak Digital Audio g An indirect representation of sound by numbers During recording the sound is measured at d...

Страница 60: ...tal Audio Proxy Server y Proxy server is a server which acts as an intermediary between a workstation user and the Internet to ensure security Region Code g Regions associate discs and players with pa...

Страница 61: ...a 5860 Lithuanian 5866 Language Code Macedonian 5957 Malagasy 5953 Malay 5965 Malayalam 5958 Maltese 5966 Maori 5955 Marathi 5964 Moldavian 5961 Mongolian 5960 Nauru 6047 Nepali 6051 Norwegian NOR 606...

Страница 62: ...Hz 48 kHz Audio CD 4 Hz 20 kHz 44 1 kHz Signal to Noise Ratio 100 dB Audio Dynamic Range 98 dB THD Total Harmonic Distortion 0 005 1 kHz Terminals Rear Audio output Analog RCA jack x 2 L R 2Vrms outpu...

Страница 63: ...WARRANTIES OF MERCHANTABILITY OR FITNESS FOR A PARTICULAR PURPOSE ACCURACY VALIDITY TIMELINESS LEGALITY SUITABILITY OR QUALITY OF ANY CONTENT OR SERVICE MADE AVAILABLE THROUGH THIS PRODUCT IN NO EVEN...

Страница 64: ...9200 Fax 201 785 2650 http www integrahometheater com Integra Division of ONKYO CORPORATION Sales Product Planning Div 2 1 Nisshin cho Neyagawa shi OSAKA 572 8540 JAPAN Tel 072 831 8023 Fax 072 831 8...

Отзывы: