background image

CONFIGURATION

Digital Video Recorder

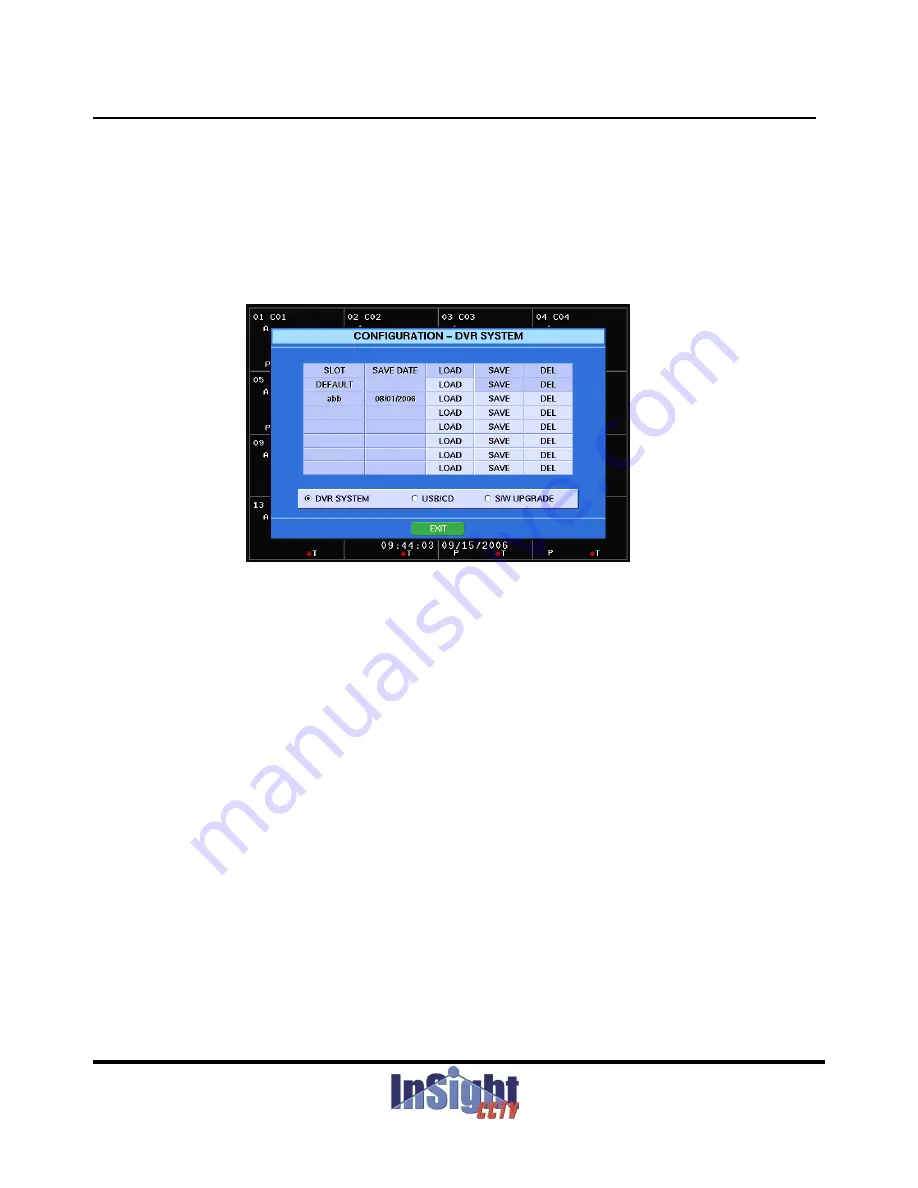
CONFIGURATION – DVR SYSTEM

You can save configurations in the DVR system or CD and load from DVR system or CD. Highlight the 
CONFIG in the main menu and press the enter button. The following screen will appear. 

Figure 46 – CONFIGURATION.     

SAVING CONFIGRUATION: 

Select an empty box below SLOT and press the enter button. The virtual keyboard will appear and you can 
type the title. And, press the SAVE button. Then, the current configuration will be saved and the Save Date 
will be displayed. 

DELETING CONFIGURATION: 

Select one of saved configuration files and press the DEL button to delete it. 

LOADING CONFIGURATION:

Select one of saved configuration files and press the LOAD button and you can select the configuration for 
Camera, Record, System and Network individually. Press the enter button after selecting the configuration 
that you want to load

that you want to load.  

NOTE: The DEFAULT is the factory default and your DVR will be initialized to the factory default 
when loading the DEFAULT. 

59

ST Series

Содержание EDVR

Страница 1: ...InSight Standalone Digital Video Recorder EDVR User s Manual 1 ST Series InSight CCTV Service Line 800 606 6514 ...

Страница 2: ...InSight EDVR User s Manual 2 ST Series ...

Страница 3: ...ERENCE WHEN THE EQUIPMENT IS OPERATED IN A COMMERCIAL ENVIRONMENT THIS EQUIPMENT GENERATES USES AND CAN RADIATE RADIO FREQUENCY ENERGEY AND IF NOT INSTALLED AND USED IN ACCORDANCE WITH THE INSTRUCTION MANUAL MAY CAUSE HARMFUL INTERFERENCE TO RADIO COMMUNICATIONS OPERATION OF THIS EQUIPMENT IN A RESIDENTIAL AREA IS LIKELY TO CAUSE HARMFUL INTERFERENCE IN WHICH CASE USERS WILL BE REQUIRED TO CORRECT...

Страница 4: ...tion This installation should be made by a qualified service person and should conform to all local codes 17 Correct Batteries Warning Risk of explosion if battery is replaced by an incorrect type Dispose of used batteries according to the instructions 18 Tmra p y q p p p y 8 Power Cords Operator or installer must remove power and TNT connections before handling the equipment 9 Lightning For added...

Страница 5: ...rough Video 19 Connecting the Monitor 19 Connecting Audio 20 Connecting Alarms 20 Connecting to the RS485 21 Connecting to the Network Port 22 Connecting to the Network Port 22 Connecting to the RS232 Port 22 Connecting to the USB Port 22 Connecting to the PTZ Camera Unit 23 Chapter 4 Quick Guide 24 How to Install 24 How to Install 24 Common User Interface 24 Monitoring 26 How to Record 26 How to ...

Страница 6: ... 55 Password Setup 58 Configuration 59 Shutdown 61 Setup 62 Setup 62 Camera Setup 62 Adjustment 63 PTZ Setup 64 Spot Setup 65 Sequence 66 Monitor Setup 67 p Record Setting 68 Schedule Setup 69 Time Record Setup 70 Event Setup 71 Audio Record Setup 76 Quick Setup 76 Network Setting 77 Ethernet Setup 78 Serial Setup 79 DDNS Setup 81 Client Setup 82 Email Setup 84 S t I f ti 85 System Information 85 ...

Страница 7: ...A Reviewing Backup Clip Images 88 Appendix B How to use the Virtual Keyboard 89 Appendix C Using Hot Keys 90 Appendix D Troubleshooting 91 Appendix E Specifications 92 Appendix F DVR FAQ 93 Appendix G PSTN Modem Setting 94 7 ST Series ...

Страница 8: ...ctor 22 Figure 14 USB connector 22 Figure 15 Live Cameo Menu 29 Figure 16 Cameo Camera Change 30 Figure 17 Cameo Record Change 30 Figure 18 Cameo Menu Freeze 30 Figure 19 Cameo Up Live Menu 31 Figure 19 Cameo Up Live Menu 31 Figure 20 Cameo Down Live Menu 31 Figure 21 PTZ Menu 33 Figure 22 PTZ Sub Menu 34 Figure 23 Search Menu 36 Figure 24 Calendar Search 37 Figure 25 Time Search 37 g Figure 26 Ev...

Страница 9: ...re 54 Adjustment 2 63 Figure 55 PTZ Setup 64 Figure 56 PTZ Setup 2 64 Figure 57 Spot Setup 65 Figure 58 Sequence 66 Figure 58 Sequence 66 Figure 59 Sequence 2 66 Figure 60 Monitor Setup 67 Figure 61 Schedule Setup 69 Figure 62 Schedule Setup Resolution 69 Figure 63 Time Record Setup 70 Figure 64 Time Record Setup Speed and Quality 70 Figure 64 Time Record Setup Speed and Quality 70 Figure 65 Event...

Страница 10: ...Setup User Account 82 Figure 83 Client Setup User Account 2 82 Figure 84 Client Setup User Account 3 82 Figure 85 Client Setup Access Range 83 Figure 86 Client Setup Access Range 2 83 Figure 87 E mail Setup 84 Figure 88 E mail Setup 2 84 Fi 89 E il S t 3 84 Figure 89 E mail Setup 3 84 Figure 90 E mail Setup 4 84 Figure 91 System Log 86 Figure 92 Status 86 Figure 93 Version 87 Figure 94 Mini Player...

Страница 11: ... Multiple Search Engines Date Time Calendar Event Records up to 240 NTSC Frames per Second 200 PAL Frames per Second Loop Through Video Connectors Continuous Recording in Disk Overwrite Mode Continuous Recording while Archiving Transmitting to Remote Site and during Playback g g g g y User friendly Graphical User Interface GUI Menu System Various Recording Modes Manual Schedule Event Audio Recordi...

Страница 12: ...lecting the time or Event Your DVR can be set up for event or time lapse recording You can define times to record and the p p g schedule can be changed for day night weekend and user defined holidays The DVR can be set up to alert you when the hard disk drive is full or it can be set up to record over the oldest video once the disk is full Your DVR uses a proprietary encryption scheme making it ne...

Страница 13: ...ly installed before proceeding Refer to Chapter 3 Installation 2 1 Front Panel Layout CD RW Arrow Buttons Display REC Menu ESC p y Rotate Backup Search Pause LED USB Ports NUMERIC KEYPAD FAST REWIND PTZ FAST FORWARD PLAY Power Fan CD RW Record Network Figure 2 16 Channel DVR front panel Others are similar FAST FORWARD PLAY 13 ST Series ...

Страница 14: ...tton Pressing the ESC button exits the menu screens or moves to the upper menu ROTATE Button Preset When in the live mode pressing the ROTATE button displays another screen whenever you press this button manually Also this button is used to control presets in the PTZ mode BACKUP Button Zoom Pressing the BACKUP button displays the Backup menu Pressing this button again will exit the Backup menu Thi...

Страница 15: ... the RW button plays video backward at high speed Pressing the button again toggles the playback speed from and and the screen displays and respectively Used for zooming out in the PTZ mode Pressing this button in the Pause mode plays video backward at slow speed Pressing the button again toggles the playback speed from 1 2 1 4 1 8 and 1 16 When pressing this button you can enter into the PTZ mode...

Страница 16: ...d The POWER LED lights when the DVR is turned on FAN LED The FAN LED lights when the fan is working CD RW LED The CD RW LED lights when the CR RW is being used REC LED The REC LED lights when the DVR is recording NET LED The NET LED lights when the DVR is connected to Network 16 ST Series ...

Страница 17: ...ar Panel Layout MONITOR OUTPUT MAIN SPOTS CAMERA INPUT 1 16 LOOP OUT 1 16 MONITOR OUTPUT MAIN SPOTS AC POWER INPUT RJ45 ETHERNET PORT RS232 S VIDEO OUT AUDIO IN OUT RS485 ALARM OUT ALARM IN VGA MONITOR OUT Figure 3 16 channel DVR rear panel 17 ST Series ...

Страница 18: ... User s Manual ID REC Number Lock Log out Menu Rotate Arrow Panorama Menu Display Escape Arrow Arrow Smart Enter Fast Rewind PTZ Fast Forward Play Search Backup Pause Backup Zoom Focus Preset Iris 18 ST Series Figure 4 IR Remote Controller ...

Страница 19: ...would like to connect your video source to another device you can use the Loop BNC connectors NOTE The Loop BNC connectors are auto terminated Do NOT connect a cable to the Loop BNC unless it is connected to another terminated device because it will cause poor quality video 3 3 Connecting the Monitor Figure 7 Video Out connectors Connect the monitor to either Main or VGA connector Connect the spot...

Страница 20: ... The audio input can be from an amplified source or directly from a microphone 3 5 Connecting Alarms Figure 9 Alarm Input connector strips NOTE To make connections on the Alarm Connector Strip press and hold the button and insert the wire in the hole above the button After releasing the button tug gently on the wire to make certain it is connected To disconnect a wire press and hold the button bel...

Страница 21: ... connectors See Chapter 6 Advanced Settings Alarm Setup 3 6 Connecting to the RS485 Figure 11 RS485 Connector The DVR can be controlled remotely by an external device or control system such as a control keyboard using RS485 half duplex serial communications signals The RS485 connector can also be used to control PTZ pan tilt zoom cameras Connect RX TX and RX TX of the control system to the TX RX a...

Страница 22: ...ork Setting Serial Setup and Appendix G PSTN Modem Setting NOTE The DVR is not supplied with a modem cable and many modems are not supplied with cables Make certain you have the correct cable when purchasing the modem 3 9 Connecting to the USB Port USB Figure 14 USB connector Two USB ports are provided One is for USB Mouse and another is for connecting external hard disk drives or USB memory stick...

Страница 23: ...S485 at the rear panel of DVR See the figure below PTZ units currently being supported are Pelco D P NVCC Z42N CyberDome Kalatel Samung Samsung Techwin Dongyang DRX 500 Fastrax II Sensormatic PIH 7600 Eyeview Dome etc DVR Rear Panel RS 485 Connector strips Ground RX TX RX TX PTZ Unit 23 ST Series ...

Страница 24: ...ault mode is to display all cameras at once Pressing any camera button will cause that camera to display full screen It displays live video until the user enters another mode The default mode for audio is mute on Please turn off the audio mute to play live audio NOTE Refer to the Chapter 3 Installation for more details 4 2 Common User Interface Icon Remarks Button that allows to changes individual...

Страница 25: ...ks Up Moves mouse pointer up or displays TOP menu at Live or Playback screen Up Moves mouse pointer up or displays TOP menu at Live or Playback screen Down Moves mouse pointer down or displays BOTTOM menu at Live or Playback screen Left Moves mouse pointer to the left Right Moves mouse pointer to the right Right Moves mouse pointer to the right Left Button Works as SET from keypad Displays full sc...

Страница 26: ...onfiguring Recording Settings in the Chapter 6 Advanced Settings 4 5 How to Playback Click the search button of the front panel of DVR to find the date and time of recorded material for playback Click the search button of the front panel of DVR to find the date and time of recorded material for playback User is able to search the video using the variety of playback methods of choice NOTE Refer to ...

Страница 27: ...d ADMIN level Press the MENU button to enter the setup screens The Admin Password screen appears overrides all Enter the password by pressing the appropriate combination of number buttons and then the Enter button The factory default password is 1111 The log in window appears when the following buttons are pressed Button Log in Authority Menu Admin REC Admin Backup Superuser Backup Superuser Searc...

Страница 28: ...he Log out button from the Top Menu using mouse The DVR system automatically does log out after a certain time is elapsed Menu Timeout that has been set in System Setting is the time for predefined automatic log out been set in System Setting is the time for predefined automatic log out B tt R k Button Remarks Lock It locks DVR as Log out stage 28 ST Series ...

Страница 29: ...nting images to a standard printer The Front Panel Display and controls are described in Chapter 2 Digital Video Recorder Layout As soon as the DVR completes its initialization process it will begin showing live video on the attached monitor The default mode is to display all cameras at once Pressing any camera button will cause that camera to display full screen It displays live video until the u...

Страница 30: ...ECORD CHANGE on the CAMEO menu the below menu will be popped up Figure 17 CAMEO RECORD CHANGE You can change the recording quality resolution and image quality to the selected channel in this menu You can freeze the live display screen by selecting the FREEZE or FREEZE ALL in the CAMEO menu shown in the following menu screen shown in the following menu screen Figure 18 CAMEO MENU FREEZE 30 ST Seri...

Страница 31: ...sor will appear When moving the cursor to the bottom or top the following pop up menu will appear Figure 19 CAMEO UP LIVE MENU You can enter to any menu of Search Backup Alarm Status Recording and Log out Figure 20 CAMEO DOWN LIVE MENU The Down Live Menu will allow you to change the live view formats 31 ST Series ...

Страница 32: ...ate In the live mode pressing the ROTATE button displays another screen whenever you press this button manually Pressing the button allows manual screen change in 1 4 9 split screens For example pressing the button in 4 split screen changes into the next 4 different camera inputs Enter Selecting Cameo or displaying Cameo menu Numeric Key Used for selecting the corresponding camera directly 10 Num ...

Страница 33: ... Menu screen will be displayed You can control the Zoom In Out Focus and Iris by pressing the buttons on the below menu Also you can open the PTZ setup screen menu by pressing the menu button on the below MENU ZOOM FOCUS IRIS Figure 21 PTZ Menu 2 By Front Key Buttons Press the Enter button and move to a PTZ camera channel Press the Enter button and move to a PTZ camera channel Press the Enter butt...

Страница 34: ...reset point You DVR can save up to 64 presets Preset Tour Preset Tour You can make a preset tour by listing 6 different presets Press the List and you can make a list with 6 different presets and press On to make the recorded preset tour Pattern Setup You can make a pattern by recording the movements zooming focusing and iris Press the begin button and move or zoom the PTZ camera and then press th...

Страница 35: ...tings for detailed descriptions of the recording mode options Here is a brief description of some of the settings Recording Audio If the DVR was set up to record audio It will record audio when video is recording NOTE Make certain you comply with all local federal laws and regulations when recording audio Recording Cameo Window TMAV 01 C0 REC 01 C0 T Time Recording M Motion Recording REC Default R...

Страница 36: ...nternal calendar program to search for the recorded video data by date time RECORD LIST Prioritized search for recorded date EVENT SEARCH Search for the event occurred by search date OVERLAPPED LIST Search for the data with overlapped date Figure 23 SEARCH MENU You can select the media from a down list by selecting the box beside TARGET You can playback the recorded video from HDD Hard Disk Drive ...

Страница 37: ...buttons Once you have highlighted a day press the ENTER button to recorded video by using the arrow buttons Once you have highlighted a day press the ENTER button to select it A time bar will be displayed at the bottom of the TIME SEARCH screen Hours in which video was recorded will be highlighted with blue You can use Left and Right arrow buttons to select the time Once the time bar is highlighte...

Страница 38: ...Sight EDVR User s Manual Once you have pressed the RECORD LIST your DVR will display a list with recorded video and Date information Select a list and press the PLAY button to playback the recorded video 38 ST Series ...

Страница 39: ...can change the date time and select the channels that you want to search You can search the recorded video by Motion Alarm In and Video Loss by turning on or off Once you have selected the events and channels for searching press the VIEW button and you will be asked to confirm the search of the recorded video with the events You will get a recorded list with events and you can playback by selectin...

Страница 40: ...LIST You can have an overlapped list by selecting OVERAPPED LIST in the SEARCH menu You can select one of the video files in the list and playback Your DVR will create the overlapped video list caused by Date Time changes or the DST Daylight Saving Time 40 ST Series ...

Страница 41: ...utton from Normal Playback mode Smart Playback will be activated Smart playback is a function that searches and playbacks the video that has movements Pressing the Down Arrow once again will return to the Normal Playback Mode It is convenient to search and playback the incidents that occurred over a long period of time Panorama Playback y Pressing up direction key from a single screen playback mod...

Страница 42: ...s Fast Rewind or Fast Forward button Low speed Playback p y After pressing the PAUSE button during playback press Fast Rewind or Fast Forward to have low speed playback It supports up to 4 different speeds x1 2 x1 4 x1 8 and x1 16 Single Step Playback When playback is paused pressing the Rewind or Forward button changes to Single Step Button Pressing the Right Arrow Button allows the playback of t...

Страница 43: ...m the Cameo Menu then select number of screens to be displayed If you press the Up Arrow Button during the single screen display panorama playback is activated The Display button controls the number of splitting screens GoTo Time Search It is the function that allows you to move into the selected time It is possible to jump by hour or minutes It can be done by pressing GOTO button on the Down Play...

Страница 44: ...changed to playback by selecting a channel on the Camera Change menu of the Playback Cameo Menu Playback Camera Change up While playing back the playback camera channels can be changed to live video easily by selecting a channel on the Play Cam Change of the Playback Cameo Menu Full Screen Playback While playing back the screen can be changed to full screen by selecting Full Screen on the Playback...

Страница 45: ...st Rewind Playback speed up and down control for backward direction Fast Forward Playback speed up and down control for forward direction Forward Pause Temporary stopping of playback Forward Play Forward playback of video data Reverse Backward playback of video data Play Up Panorama playback for a single screen Down Used for Smart Search PTZ Used for PTZ Control Display Change the split mode of pl...

Страница 46: ...UT for copying section Pressing CUT AND SAVE displays the below dialog window Press the Backup button again to set the end time When pressing the Backup button once again the below dialog window will be popped up DvrPlayer is copied into backup CD or USB device Make a copy after confirming the user selected channel and time frame Select CD or USB for storage media from TARGET Backup video can be p...

Страница 47: ...TE button and your DVR will calculate the data size and display it in the box beside DATA SIZE Press the WRITE button and your DVR will start burning NOTE When the data size is bigger than 650MB you will be asked to put a new CD after burning the first one You will be asked to confirm to backup the data to a CD DvrPlayer is copied into backup CD or USB device automatically Backup video can be play...

Страница 48: ... Auto Backup from the down list menu Figure 30 AUTO BACKUP You can target the external USB HDD and back the data to the external USB HDD while recording the same data to the internal HDD It s a kind of mirroring backup to the external USB HDD and internal HDD at the same time You can turn on or off the overwriting title the backup name and select the camera channels that you want to back up When p...

Страница 49: ... Status Checking Status You can check the status of the DVR by selecting STATUS from the Top Live Cameo Menu The status 5 11 Checking DVR Status screen displays Recording Event Network Alarm Disk and Key information Figure 31 STATUS 49 ST Series ...

Страница 50: ...sword Your DVR can be set up by using various screens and dialog boxes p g Press the MENU button to enter into the setup screens The Admin Password screen appears Figure 32 ADMIN PASSWORD Enter the password by pressing the appropriate combination of Camera number buttons and then the Enter button The factory default password is 1111 After Log in the menu window is displayed as below 50 ST Series F...

Страница 51: ...t EDVR User s Manual S l t th SYSTEM SETUP i th i d it Configuring System Settings Select the SYSTEM SETUP in the main menu and it s including General Setup Alarm Setup HDD Setup Password Configuration and Shutdown 51 ST Series ...

Страница 52: ...P 3 Figure 37 GENERAL SETUP 4 Video Format You can select the Video Format between Auto NTSC and PAL according to your location When You can select the Video Format between Auto NTSC and PAL according to your location When selecting Auto the DVR will detect the video format from the connected video sources automatically NOTE Please don t mix the video sources like NTSC and PAL cameras at the same ...

Страница 53: ...creen Date You can change the date by pressing the box beside the Date heading Time You can change the time by pressing the box beside the Time heading Buzzer You can turn on or off the internal buzzer Whenever pressing any button on the front the DVR will make buzzer sound Unit Address You can set up an ID for your DVR to distinguish the unit when using multiple DVRs in the same place Base Camera...

Страница 54: ...ALARM IN button and press the enter button to select the type for alarm in The ALARM IN screen displays the alarm inputs in groups of four 1 4 5 8 9 12 and 13 16 Figure 39 ALARM TYPE ALARM IN You can select proper alarm type from described earlier When pressing the ALARM CLEAR button the system will clear the triggered alarms The ALARM SET button activates the alarm settings again You can save you...

Страница 55: ...age will show the HDD Hard Disk Drive status and you can initialize new hard disk drives by selecting the boxes below INSTALL and pressing the enter button by selecting the boxes below INSTALL and pressing the enter button NOTE You have to initialize the disks when installing new hard disk drives Select the second page HDD SETUP OVERWRITE and the following screen will appear 55 ST Series Figure 41...

Страница 56: ... S Di l i OSD On Screen Display warning message Select the 3rd page CHECK and the following screen will appear Figure 42 HDD SETUP CHECK The HDD SETUP CHECK screen will display the earliest and latest recording information and you can check the files in the period from BEGIN TIME to END TIME by highlighting the START DISK CHECK and pressing the enter button Figure 43 HDD SETUP PLAYBACK PROTECT Fig...

Страница 57: ...rs to find out if the HDD s are healthy or not When pressing the CHECK NOW button your DVR will check the status of the HDD s and display the results Al t th i th d h th HDD t h lth Also you can set the warning methods when the HDD s are not healthy When pressing the HDD INFORMATION button the DVR will show the detailed HDD information with many different factors 57 ST Series ...

Страница 58: ...Highlight the ADD or DEL buttons and press the enter button to add or delete each user When adding a new user account you will be asked to enter the new password and to confirm it When deleting a user account you will be asked to confirm NOTE The Admin Superuser and User passwords are composed of up to eight digits using the number buttons The default Admin password is 1111 CAUTION Don t delete th...

Страница 59: ...ress the SAVE button Then the current configuration will be saved and the Save Date will be displayed DELETING CONFIGURATION Select one of saved configuration files and press the DEL button to delete it LOADING CONFIGURATION Select one of saved configuration files and press the LOAD button and you can select the configuration for Camera Record System and Network individually Press the enter button...

Страница 60: ...tion from the CD NOTE You can apply the same configuration to other DVR systems by using this function pp y g y y g CONFIGURATION S W UPGRADE Select the 3rd page S W UPGRADE The below screen will appear Figure 48 CONFIGURATION S W UPGRADE You can upgrade the system from USB or CD RW by selecting a button on the above screen 60 ST Series You can upgrade the system from USB or CD RW by selecting a b...

Страница 61: ...tton The following screen will appear Figure 50 SHUTDOWN Figure 51 SHUTDOWN 2 Select the RESTART in the SHUTDOWN menu and press the enter button You will be asked to confirm restarting the system You can also shutdown the system by pressing the SHUTDOWN button You can also shutdown the system by pressing the SHUTDOWN button 61 ST Series ...

Страница 62: ...splays the camera label and the camera inputs in groups of four 1 4 5 8 9 12 and 13 16 You can display or hide the camera number and camera name by selecting ALL NUMBER or OFF from a list on CAMERA LABEL You can assign names to each camera by highlighting the boxes below NAME and pressing the ENTER 62 ST Series You can assign names to each camera by highlighting the boxes below NAME and pressing t...

Страница 63: ...ER b tt Th ADJUSTMENT Highlight ADJUSTMENT in the main menu and press the ENTER button The ADJUSTMENT screen appears Figure 53 ADJUSTMENT Figure 54 ADJUSTMENT 2 The ADJUSTMENT screen displays the brightness contrast saturation hue and position You can select the live or recorded video by highlighting the box below LIVE and pressing the ENTER button The channel can be selected by highlighting the a...

Страница 64: ...ty and stop bit by highlighting the boxes below PORT and press the enter button Y t ID f h h l th ID h di You can set up IDs for each channel on the ID heading NOTE The IDs must be matched with PTZ units to control the PTZ units Selecting the TYPE causes a list of controllable cameras to display Select your camera from the list and press the enter button You have to connect the camera to the RS485...

Страница 65: ...eras by checking the camera numbers on the popup screen Refer to the Figure 59 SPOT SETUP 2 Also you can assign default camera to each spots You can set up the rotating dwell time by highlighting the box below INTERVAL and pressing the enter button It can be set up to 256 seconds When turning on Popup channels that are having events will be popped up to the assigned spot monitor NOTE Same cameras ...

Страница 66: ...ss the enter button The following screen will appear Figure 58 SEQUENCE Figure 59 SEQUENCE 2 The page dwell time is for page sequence in case of 4 or 9 split screens You can select cameras for cameo sequence and set up the dwell time NOTE The cameo sequence means rotating the selected cameras on a camera channel of split screens The cameras being displayed on the other channels will not be rotated...

Страница 67: ...nitor Setup screen will be displayed Figure 60 MONITOR SETUP You can adjust the transparency of the menu screen by highlighting the box beside ALPHA BLENDING and selecting a number on the pop up menu You can change the screen and GUI Graphic User Interface positions by clicking the or buttons buttons 67 ST Series ...

Страница 68: ...ng g Your DVR offers a variety of flexible recording modes You can set it up to record all the time or to record events only It can be set up to continue recording once the hard disk drive is full by recording over the oldest video or you can set it up alert you when the hard disk is full and stop recording g 68 ST Series ...

Страница 69: ...ing the box beside RESOLUTION and pressing the enter button If you want to change the resolution of certain cameras press the button in the RESOLUTION heading y g p g CAUTION Your changes in the main SETUP screens are applied to every channels If you want to change certain details enter into the sub menu by highlighting the detail button and pressing the enter button NOTE Whenever changing the res...

Страница 70: ... screen displays recording settings for Day Night and Weekend Highlight the RECORD heading for DAY NIGHT or WEEKEND and press the enter button to toggle between ON and OFF You can set up the recording speed and select the recording quality between LOW NORMAL HIGH and HIGHEST NOTE To select the recording speed use the or buttons in the sub menu g p You can change the certain details by highlighting...

Страница 71: ...ure 65 EVENT SETUP Highlight the INPUT MOTION or VIDEO LOSS in the EVENT INPUT menu and press the enter button to toggle between ON and OFF NOTE When turning off the input you can t select event inputs MOTION ALARM IN or VIDEO LOSS Highlight the button in the EVENT INPUT menu to change the details for certain cameras The following Highlight the button in the EVENT INPUT menu to change the details ...

Страница 72: ...to select grids and set f f up the motion area by pressing Up Down Left and Right cursor buttons on the front panel or remote NOTE When the dot color is Blue you can move that pointer by pressing the arrow buttons without selecting the grids NOTE When the dot color is Red you can select the grids or erase the selected grids by pressing the arrow buttons When pressing MENU button on the front panel...

Страница 73: ... Record in EVENT OUTPUT menu the associated events will be recorded when alarm is activated VIDEO LOSS SETUP Highlight the box below VIDEO LOSS for a channel that you want to set up and press the enter button The following VIDEO LOSS screen will appear Figure 69 EVENT SETUP INPUT VIDEO LOSS You can select a single or multiple VIDEO LOSS camera channels which will be associated with the 73 ST Serie...

Страница 74: ...g between LOW NORMAL HIGH and HIGHEST and this selection is not related to the recording frame per seconds When selecting Highest it gives better image quality but the file size will be bigger than LOW NORMAL or HIGH Y t th P t R di ti t 100 d b hi hli hti th b l b d i th You can set up the Post Recording time up to 100 seconds by highlighting the below box and pressing the enter button Highlight ...

Страница 75: ...You can turn on or off Alarm Image or Preset for all the channels at the same time by highlighting the headings ALARM IMAGE or PRESET and pressing the enter button You can associate the Alarm Out Alarm Delay and Dwell time for each camera You can also associate presets for installed PTZ cameras and set up the dwell time up to 100 seconds by highlighting the DISPLAY and pressing the enter button Al...

Страница 76: ...ive audio or audio recording by highlighting the boxes beside DAY NIGHT WEEKEND or LIVE and pressing the boxes You can also control the volume QUICK SETUP Highlight the QUICK SETUP in the main menu and press the enter button The QUICK SETUP screen appears Figure 74 QUICK SETUP 76 ST Series You can set up recording speed and picture quality easily in this menu and also possible to set up event opti...

Страница 77: ...ttings Control communication related setting from DVR It not only sets for commonly using Ethernet and g It not only sets for commonly using Ethernet and PSTN but also monitors the status of server from a remote site through the Client and E mail setting 77 ST Series ...

Страница 78: ...ation by highlighting the sub menu button and pressing the enter button Refer to the screen below Figure 76 ETHERNET SETUP 2 Enter the host name to the box beside HOST NAME by highlighting the box and pressing the enter button The virtual keyboard will appear for typing You can save your changes and return to the main menu by highlighting SAVE and pressing the button Selecting CANCEL exits the scr...

Страница 79: ... use You can connect the RS 232 devices like external modem external keyboard controller or POS Point Of Sale device to the RS 232 terminal on the back of the DVR by following the modem keyboard or POS manufacturer s instructions Figure 77 SERIAL SETUP You can connect the external modem to the RS232 terminal on the back of the DVR following the modem manufacturer s instructions Reset the external ...

Страница 80: ...keyboard controller or POS Point Of Sale device to the RS 485 terminal on the back of the DVR by following the keyboard or POS manufacturer s instructions Figure 78 SERIAL SETUP 2 Figure 78 SERIAL SETUP 2 You can connect the external modem to the RS232 terminal on the back of the DVR following the modem manufacturer s instructions Reset the external modem and the modem will be activated When selec...

Страница 81: ...n please enter the Domain Name User Name and Password When selecting the boxes beside Domain Name User Name or Password the virtual keyboard will be popped up and you can type in and you can type in After entering required information please visit the domain address ex http secube dyndns org on the Internet Explorer Then the Web browser client as shown below will appear on the Internet Explorer Fi...

Страница 82: ...ighlighting the side boxes and press the enter button Select the user account by highlighting the USER ACCOUNT and pressing the enter button Refer to the Select the user account by highlighting the USER ACCOUNT and pressing the enter button Refer to the Figure 83 You can create new accounts by highlighting ADD button and pressing the enter button Type the new account by using the virtual keyboard ...

Страница 83: ... Digital Video Recorder Figure 85 CLIENT SETUP ACCESS RANGE Figure 86 CLIENT SETUP ACCESS RANGE 2 When an IP address is not in the access range the IP address can t access the server and the default range is ALL NOTE The default range ALL is allowing any IP address to access the DVR 83 ST Series ...

Страница 84: ... notification Highlight the box below SEND and press the enter button The event list will appear Refer to the Figure 89 Also you can select cameras for emailing as in button The event list will appear Refer to the Figure 89 Also you can select cameras for emailing as in Figure 90 Your DVR will notify events for the selected cameras only You can set up the trial time for e mailing You can type the ...

Страница 85: ...6 5 SYSTEM INFORMATION Digital Video Recorder You can check the system log status and version 6 5 SYSTEM INFORMATION Checking System Information information 85 ST Series ...

Страница 86: ...STEM LOG in the main menu The below screen will show up Figure 91 SYSTEM LOG You can move to the previous page or next pages by pressing PREV or NEXT button in the SYSTEM LOG menu STATUS You can check the status of the DVR by selecting STATUS from the Top Live Cameo Menu The status screen displays Recording Event Network Alarm Disk and Key information 86 ST Series Figure 92 STATUS ...

Страница 87: ...VERSION Digital Video Recorder You can check the version of your DVR in the VERSION menu Refer to the screen below The VERSION screen will display the version information Figure 93 VERSION 87 ST Series ...

Страница 88: ...e Backward y List Figure 94 DVR MINI PLAYER Open video file Backward frame by frame Forward frame by frame Figure 94 DVR MINI PLAYER Your DVR will download the Mini Player with the backup files automatically You can play the backup files with the DVR Mini Player on your PC and convert the files to JPG or AVI format 88 ST Series ...

Страница 89: ...irtual keyboard when setting up the DVR Highlight the button and You will be using the virtual keyboard when setting up the DVR Highlight the button and press the enter button to enter The button will switch the page to the 2nd page showing Capital letters the button is deleting and X button is clearing 89 ST Series ...

Страница 90: ...n only You can change the screen to 2x2 3x3 4x4 formats by pressing the Display button in the Panorama mode Audio Playback Press the Log out button when playing back video that has recorded audio The audio control menu will be displayed Cut Save BACKUP Æ BACKUP Æ BACKUP You can set up the start time by pressing the Backup button first time and set up the end time by pressing the Backup button agai...

Страница 91: ... and connections Check monitor video cable and connections Check camera power Check camera lens settings f Live Video Too Bright If a cable is attached to the Loop connector make sure that it is properly terminated Mouse is not working Press the FREEZE to reset the mouse DVR has stopped recording If hard disk is full you will either need to delete video or set the DVR to the Overwrite Mode 91 ST S...

Страница 92: ...240 iPAL CIF 360x288 HVGA 720x288 Compression iEnhanced MPEG 4 Mode iMotion detection Sensor Schedule iVariable compression rates recording frame motion sensitivity Storage media iInternal 4 x HDD Option Recording Storage media iBuilt in CD R W Audio i1 Channel G 723 Compression Playback Mode iMulti channel playback Max 16ch Simultaneous playback Panorama playback Searching iBy Channel Time Date M...

Страница 93: ...CORD menu or Default Record button allows A Using the Time Record and Event Record from RECORD menu or Default Record button allows you to record Q What is Time Recording A It is recording that is not related to event recording Q What does that Event mean A That means Motion Alarm In Video loss event activity Q What is Event Recording A It only records when the event occurs A It only records when ...

Страница 94: ...e it Q Mail is not sent out A Please check all the setting in Ethernet Setup Miscellaneous Q Is it possible to use either mouse joystick or keyboard through the USB port A Mouse inputs device and memory sticks are supported as the primary device Q What types of cameras can be used A NTSC or PAL system cameras are OK to use 94 ST Series ...

Страница 95: ... 1 8 The following option can be set with your own discretion Click Next button 8 Connection Wizard completes Click Finish button 9 Click the short cut DVR of desktop Do not save User ID and Password for other user Enter the password pppsetup on each connection 10 Set Run Script to Generic Login in Security Tab in DVR Property DVR Property 11 After step 10 type in ID ppp Password pppsetup to conne...

Страница 96: ...For technical support contact us at 1 800 606 6514 300 Maple Park Blvd 300 Maple Park Blvd Suite 301 St Clair Shores MI 48081 96 ST Series ...

Отзывы: