1
2
3
4
5
6
Mounting
Screws
aa
Install the hardware
-
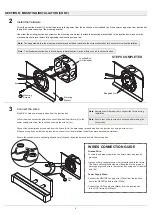
Orient the mounting bracket (C) so that the arms are facing away from the junction box (not included), pull the power supply wires from junction box
through the center opening of the mounting bracket.
Use either the existing junction box screws or the mounting screws (aa) to attach the mounting bracket flush to the junction box, make sure the
mounting bracket is level before fully tightening the mounting screws (aa).
-
Connect the wires
- Strip 3/8" of bare power supply wires from the junction box.
- Follow the wires connection guide to connect the wires from fixture (A) to the
power supply wires from the junction box using the wire nut (cc).
- Connect the yellow/green ground wire from the fixture (A) to the bare copper ground wire from the junction box using a wire nut (cc).
(If house wiring does not include a ground wire, consult your local electrical code for approved grounding methods).
- Ensure the connectors are spliced tightly and carefully push the spliced wires back into the junction box.
Ground Wire:
- For safety and proper operation, the fixture must be properly
grounded.
- A green or bare copper ground wire is preattached to the fixture.
The fixture yellow/ground wire must be spliced to the green or
bare copper ground wire in the junction box using one of the wire
nuts (bb).
Power Supply Wires:
- Connect the NEUTRAL supply wire (White) from the junction
box to the NEUTRAL fixture wire (White)
- Connect the HOT supply wire (Black) from the junction box
to the HOT fixture wire (Black)
3
2
SECTION B: MOUNTING INSTALLATION (CONT.)
Note:
Ensure that no bare wires are exposed after making the
connections.
Note:
The elongated slots in the mounting bracket may be utilized to achieve the correct orientation for horizontal or vertical installation.
Note:
The illustrated junction box is 4-inch, keyhole slots location may be different on a 3-inch Junction box.
Note:
Assistance will be required to support the fixture during
installation.
WIRES CONNECTION GUIDE
Mounting
Bracket
C
Junction Box
(Not Included)
Arm
STEPS COMPLETED
Wire
Nut
cc
Step 1
Step 2
Elongated Slots


