background image

Page 29

INF4030/INF4032 DigiEasel User Guide

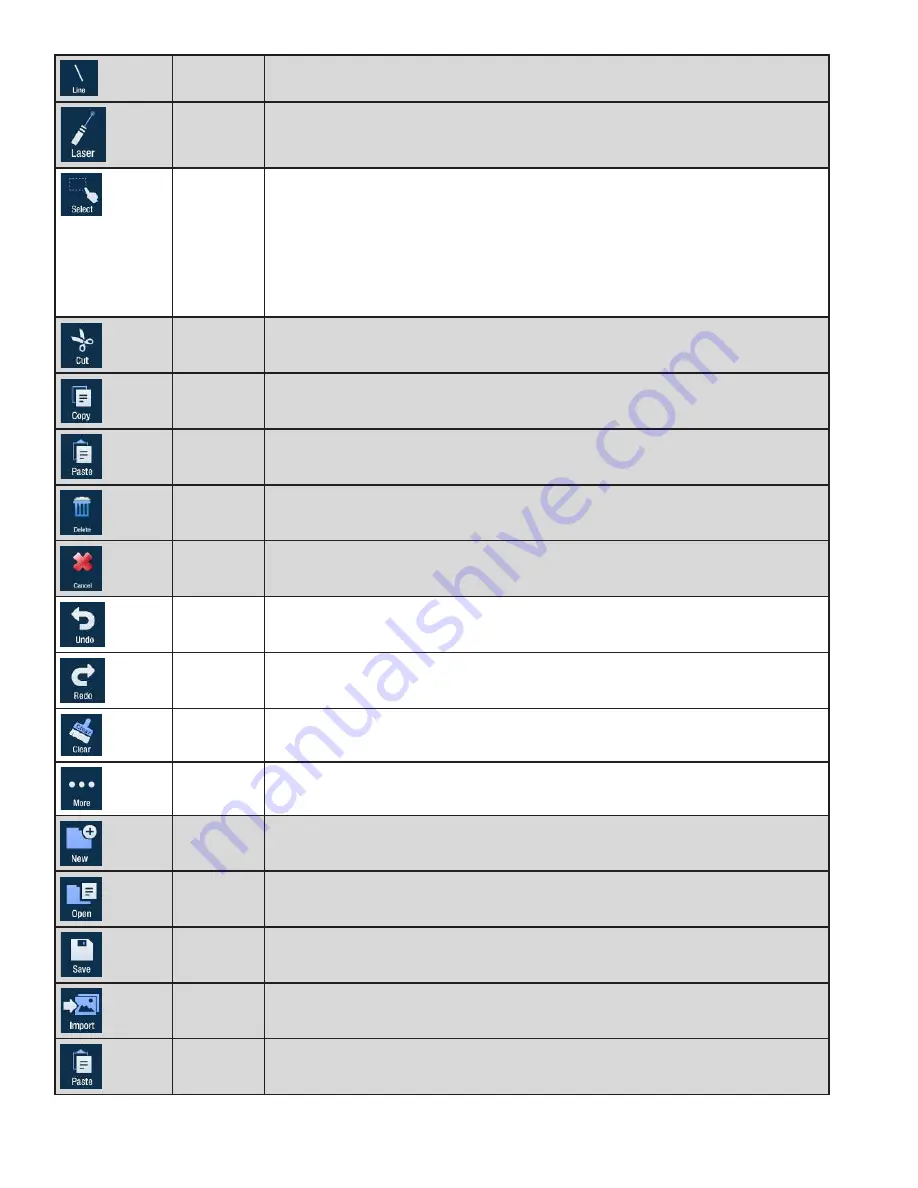
Line

Tap to draw a line.

Laser

Tap to highlight something temporarily. The red laser mark disappears when a new mark is 
made. Laser marks cannot be saved.

Select

Tap 

Select

. Tap and drag the selection box around the drawing objects which you want to 

move, copy or delete.

Tap and drag the selected objects to move them.

Tap 

Copy

 to copy or 

Delete

 to delete the selected drawing objects. 

Cancel

 removes the 

selection. 

TIP

: Copied objects are laid directly on top of existing drawing objects. Tap and 

drag the copied annotation mark to a new location.

Cut

Tap to cut the selected object(s).

Copy

Tap to copy the selected object(s).

Paste

Tap to paste the last copied or cut object(s) onto the whiteboard canvas.

Delete

Tap to delete the selected object(s).

Cancel

Tap to remove the selection box.

Undo

Tap to reverse the last executed command.

Redo

Tap to reverse the last Undo command.

Clear

Tap to clear the drawing objects from the whiteboard canvas.

More sub-
menu

Tap to access additional menu features.

New

Tap to open a new whiteboard canvas.

Open

 Tap to open a saved file.

Save

Tap to save the file as a JPG image or PDF file.

Import

Tap to import an image onto the whiteboard canvas. To remove an imported image, tap 
the red 

X

 in the top right-hand corner of the image.

Paste

Tap to paste the last copied or cut object(s) on the whiteboard canvas.

Содержание INF4030

Страница 1: ...009 1599 03...

Страница 2: ......

Страница 3: ...drawing object 19 Import an image 20 Modify whiteboard canvas objects 23 Save the whiteboard canvas 24 Save the whiteboard canvas to a USB thumb drive 25 Open a new whiteboard canvas 25 Open a whiteb...

Страница 4: ...Update a Monitor without LightCast Key 42 OSD On Screen Display Menu System 43 Picture menu 44 Screen menu 45 Audio menu 46 PIP menu 47 Configuration 1 menu 48 Configuration 2 menu 49 Advanced Option...

Страница 5: ...hese limits are designed to provide reasonable protection against harmful interference when the equipment is operated in a commercial environment This equipment generates uses and can radiate radio fr...

Страница 6: ...ollow all safety instructions provided below and on the monitor before connecting the monitor to a power source Failure to comply with safety instructions may result in fire electrical shock or person...

Страница 7: ...he manufacturer When disconnecting the power cord hold the plug not the cord Protect the power cord from being walked on or pinched particularly at plugs convenience receptacles and the point where th...

Страница 8: ...Page 6...

Страница 9: ...ded for all countries For setup purposes a keyboard and mouse are recommended For additional accessory options such as stands see the InFocus website www infocus com store or your local dealer VGA cab...

Страница 10: ...he monitor on an unstable surface which could result in serious personal injuries and monitor damage When mounting the monitor to a stand be sure to following the manufacturer s instructions Use only...

Страница 11: ...the panel in the indentation on the back side The stylus can also be placed on the tray if the tray is installed Orienting the monitor in Portrait or Landscape mode The monitor is automatically sense...

Страница 12: ...onent RCA 1 RS232 1 Audio In 3 5mm 1 Audio In RCA 1 R L USB 2 0 A 4 USB B 1 and Audio Out RCA 1 R L A B C A USB A Connect a USB device to one of the USB Type A 2 0 connectors e g USB thumb drive cam e...

Страница 13: ...such as a VCR or DVD player HDMI 1 4 Connect an HDMI cable from the monitor to an HDMI external device such as a VCR or DVD player PC IN Connect a VGA computer cable from the monitor to an external c...

Страница 14: ...IN jack on the back of the monitor 2 Connect the other end of the AC power cord to an AC outlet 3 Press the power switch The LED on the front of the monitor turns on NOTES Your monitor should only be...

Страница 15: ...he Source button and Up button simultaneously Up button Moves the highlight bar up when the OSD or Source menu is on To access the OSD menu or back out of an OSD submenu press the Source button and Up...

Страница 16: ...ard on page 19 If your monitor did not ship with a LightCast key and you would like to use the LightCast features you can purchase a LightCast key p n INA LCKEY1 INA LCKEY2 or INA LCKEY3 depending on...

Страница 17: ...nformation and tap the arrow to move to the next screen 4 Enter the Device Name and WiFi Connection information and tap the arrow A confirmation page displays The LAN information populates when a LAN...

Страница 18: ...or capturing meeting notes and annotation Browser provides access to the internet LightCast Casting If your monitor did not ship with a LightCast key and you would like to use the LightCast features y...

Страница 19: ...follow Airplay configuration guidelines as specified by Apple Using iOS on an iPad or iPhone 1 Open the Control Center on your device by swiping up from the bottom of your iPad or iPhone screen 2 Tap...

Страница 20: ...nes as specified by the Wi Fi Alliance www wi fi org Using an Android tablet 1 Launch the MiraCast App 2 Navigate to WiFi Settings 3 Search for and select the device name listed in step 3 of the Conne...

Страница 21: ...wing object from the Tools submenu 1 Select the color size and opacity desired 2 Draw on the whiteboard canvas with your finger or the stylus TIP Keep other objects including writing utensils other fi...

Страница 22: ...types include JPEG PNG BMP GIF and TIFF 1 Tap More 2 Tap Import 3 Choose Internal to import an image that has been saved to the monitor or External Storage to import an image that is located on an ex...

Страница 23: ...Page 21 INF4030 INF4032 DigiEasel User Guide 4 Navigate to the associated folder and tap the desired image...

Страница 24: ...the object is highlighted drag it to the desired location and re size it as needed using the sizing handles In addition you can cut copy paste and delete it using the features in the Select submenu 7...

Страница 25: ...ed To copy the selected objects tap Copy and tap Paste While the objects are selected drag them to the desired location To cut the objects and place them on a different page of the whiteboard canvas t...

Страница 26: ...will be prompted to save this file type on a USB thumb drive PDF creates a printable document for others to view Note The PDF file cannot be saved on the monitor and cannot be re opened by the monitor...

Страница 27: ...for later use PDF creates a printable document for others to view Note The PDF file cannot be saved on the monitor and cannot be re opened by the monitor for later use 5 For JPG and PDF file types ta...

Страница 28: ...save to delete the existing canvas and open a new one Cancel returns the user to the current canvas 4 By default the Open Files window displays whiteboard files saved internally on the monitor To ope...

Страница 29: ...to save the existing canvas or select Don t save to delete the existing canvas and open a new one Cancel returns the user to the current canvas 5 Navigate to the desired folder and tap the file you w...

Страница 30: ...o choose a color from the segmented color wheel The current selected color appears in the middle of the color wheel Size Tap and drag the thumbnail button along the slider path to adjust the size of t...

Страница 31: ...Cut Tap to cut the selected object s Copy Tap to copy the selected object s Paste Tap to paste the last copied or cut object s onto the whiteboard canvas Delete Tap to delete the selected object s Can...

Страница 32: ...send an email with an attachment of the whiteboard canvas as either a JPG or PDF file USB Tap to save or open files from an external USB thumb drive Setting Tap to access the Setting menu Next Tap to...

Страница 33: ...ding on your region from InFocus www infocusstore com or your local dealer Use the Browser to access the internet Icon Tool Name Description Home Tap to return to the Home page Back Tap to go back to...

Страница 34: ...tor did not ship with a LightCast key and you would like to use the LightCast features you can purchase a LightCast key p n INA LCKEY1 INA LCKEY2 or INA LCKEY3 depending on your region from InFocus ww...

Страница 35: ...etwork Settings section of the Settings menu tap WiFi Settings The WiFi submenu displays 2 Tap On to use a WiFi connection 3 If the list of available WiFi networks does not automatically display tap t...

Страница 36: ...Page 34 Change the monitor name 1 From the Device section of the Settings menu tap Name The Name window displays 2 Type or edit the name using the onscreen keypad or an attached keyboard 3 Tap OK...

Страница 37: ...humb drive into the side of the monitor 3 Tap Select to choose which file to use for the upgrade 4 Once selected press Update to begin the update process Reset to factory default settings 1 From the S...

Страница 38: ...age 36 Reset the registration parameters From the Systems and Security section of the Settings menu tap Reset to register the monitor with new information Tap Yes to initi ate the registration process...

Страница 39: ...Page 37 INF4030 INF4032 DigiEasel User Guide Resize the image From the Systems and Security section of the Settings menu tap Resize to digitally zoom the Display window smaller or larger up to 100...

Страница 40: ...Page 38 Define the default email address From the Accounts section of the Settings menu tap to update the default email address Tap OK when done...

Страница 41: ...Page 39 INF4030 INF4032 DigiEasel User Guide Request desktop site To use a desktop formatted website tap to select the Request Desktop site check box Otherwise a mobile web site will be used...

Страница 42: ...Page 40 Define the default browser home page From the Browser Preferences section of the Settings menu tap to update the default browser home page Tap OK when done...

Страница 43: ...nfocus com Activate Signage mode 1 Tap More 2 Tap Setting Switch to Signage should be highlighted 3 Tap Switch 4 To display an existing signage item tap Activate next to that item Only one sign can be...

Страница 44: ...e The Update dialog box displays 5 Insert a USB thumb drive with the software update on it into an available USB slot or navigate to the network 6 Follow the prompts to update the software or tap OK i...

Страница 45: ...ch of the OSD menus in detail Sel Adjust Enter Back Quit PICTURE BRIGHTNESS CONTRAST SHARPNESS COLOR TEMPERATURE COLOR CONTROL PICTURE MODE PICTURE RESET NATIVE STANDARD NO 70 50 50 100 100 100 RED GR...

Страница 46: ...in the image Range 0 100 Default 50 Sharpness changes the clarity of the edges of a video image Range 0 100 Default 50 Color Temperature changes the intensity of the colors Options include Native defa...

Страница 47: ...nge 0 100 Default 50 Clock adjusts the width of the image For VGA input only Range 0 100 Default 50 Clock Phase adjusts the focus clarity and stability of the image For VGA input only Range 0 100 Blan...

Страница 48: ...bar etc or just external speakers are used Options in clude Internal both internal and external speakers operate and External only external speakers operate Default Internal Audio Source selects the a...

Страница 49: ...ight Top left Bottom right Bottom left PIP Swap switches the source in the main and the PiP windows Options include Yes and No PIP Size changes the size of the PiP window used in the Corner to Corner...

Страница 50: ...If no source is detected the monitor will revert to the previously active source If Auto Source is disabled the monitor will stay on the last selected source regardless of whether an active source is...

Страница 51: ...djusts the vertical position of the OSD menu Range 0 100 Default 50 OSD Rotation rotates the image to either a landscape or portrait mode Options include Portrait and Landscape Power Saving When enabl...

Страница 52: ...e of the image and optimizes image brightness and contrast Options include Mode 1 Mode 2 Mode 3 Over scan removes noise around the edges of a video image Options include On and Off default DDC CI enab...

Страница 53: ...t the picture settings Verify that connections between the source and the monitor have been made correctly Verify that the cables are in good condition No touchpad activity with external computer Veri...

Страница 54: ...Then press the Power button on the keypad If that doesn t work plug another electrical device to the power outlet to verify that the outlet is supplying the proper voltage Red The monitor is in stand...

Страница 55: ...our product model please refer to the product specifications information on www infocus com By inputting your product model in the Quick Search box on the website you will find warranty terms in the S...

Страница 56: ...ntation including where a schedule is specified for regular cleaning of certain parts based on usage and environment k to loss or damage in transit or l if the product is not used under normal operati...

Страница 57: ...a telephone other charges may apply depending on your location When calling InFocus Technical Support or an ASP will help determine whether your product requires service and if it does will inform you...

Страница 58: ...arts that comply with local standards In accordance with applicable law InFocus may require that you furnish proof of purchase details and or comply with registration requirements before receiving war...

Отзывы: