background image

7

        The device is not designed to remain in the body long-
term,  or  to  be  replaced  ‘immediately’  with  a  similar  or 
identical device.

      Portable  RF  communications  equipment  (including 
peripherals  such  as  antenna  cables  and  external  antennas) 
should be used no closer than 30 cm (12 inches) to any part 
of the [ME EQUIPMENT or ME SYSTEM], including cables 
specified by the manufacturer. Otherwise, degradation of the 
performance of this equipment could result.

2.5 Precautions

       The sensors and transmitters of the Continuous Glucose 
Monitoring Systems should be suitable for each other. The 
products  of  different  generations  can  not  be  connected  to 
each other and can not work. Make sure that the system uses 
the correct INFINOVO Glunovo software version.

        If the sensor is stored in the refrigerator, please take it 
out half an hour before use. The sensor can be used at room 
temperature.

          Before  opening  the  sensor  package,  wash  your  hands 
with soap and water and dry them. Inserting the sensor with 
dirty hands can contaminate the insertion site. 

        Before  inserting  the  sensor,  clean  the  skin  with  a 
traditional method (such as an alcohol tablet) and let it dry . 
This helps prevent infection. Do not insert the sensor until 
the  skin  is  dry  so  that  the  tape  on  the  sensor  base  can  be 
attached better.

        Change the insertion site each time. Using the same i
nsertion site too often may not allow the skin to heal, and 
may cause scars or skin allergies.

          It  is  forbidden  to  insert  sensors  in  areas  that  may  be 
crush-squeezed, tattooed, or allergic. These sites are not ideal 
for measuring blood glucose. Inserting sensors in these places 
may  affect  the  performance  of  the  sensor,  missing  low/high 
blood glucose values.

          In  rare  cases,  the  sensor  electrode  may  fracture.  Don't 
ignore it. If the sensor electrode breaks and there is no visible 
sensor  electrode  on  the  skin,  do  not  attempt  to  remove  it. 
Seek professional medical help in the condition of infection 
symptoms or inflammation - redness, swelling or pain. If the 
sensor  electrode  ruptures,  please  report  to  our  technical 
support department.

        Do not use sensors that in damaged sterile packaging. 
Using unsterilized sensors may lead to infection. 

        The  storage  temperature  of  the  sensor  is  2oC-25oC, 
which  can  be  transported  at  room  temperature. The  storage 
time  is  the  lifetime  (8  months)  of  the  sensor.  If  the  t
emperature range of the refrigerator is 2oC-25oC, the sensor 
can be stored in the refrigerator. Sensors should not be stored 
in  the  freezer.  Improper  storage  results  in  inaccurate  blood 
glucose readings and missing low/high blood glucose levels.

Содержание i3

Страница 1: ......

Страница 2: ...1 1 2 3 5 6 6 6 6 6 7 8 8 9 9 9 9 12 14 14 14 15 15 16 17 17 18 18 18 19 20 20 22 22 22 22 23 24 25 25 25 26 26 26 26 26 27 27 27 27 30 31 31 31 ...

Страница 3: ...32 33 33 33 34 34 34 34 34 34 35 35 35 35 36 36 36 36 36 37 38 38 ...

Страница 4: ......

Страница 5: ......

Страница 6: ...t least two finger blood glucose values need to be inputted into the Continuous Glucose Monitoring Systems every day for calibration The Continuous Glucose Monitoring Systems calculates an average of every three minutes The Continuous Glucose Monitoring Systems can record 480 glucose readings every 24 hours continuously monitor the blood glucose data for 14 days and form a continuous blood glucose...

Страница 7: ...nsists of a PC base and an adhesive patch The sensor electrode is divided into three layers semi permeable membrane glucose oxidase layer and microelectrode Insert the sensor electrode into the subcutaneous tissue of the abdomen and remove the applicator The base is attached to the abdomen for up to 14 days of monitoring Please discard disposable sensor after wearing 1 2 2 The performance paramete...

Страница 8: ...hrough the App the transmitter sends the blood glucose message to the App When properly worn the transmitter and App have a transmission range of 2 m without obstruction Wireless connection in the water is not very well so the range of connections in places like swimming pools bathtubs and waterbeds will be even smaller The battery of the transmitter can be used for no less than 14 days 1 3 2 The ...

Страница 9: ...lost or degraded See the RF wireless communication equipment table in Recommended minimum separation distances 4 Recommended minimum separation distances Nowadays many RF wireless equipments have being used in various healthcare locations where medical equipment and or systems are used When they are used in close proximity to medical equipment and or systems the medical equipment and or systems ba...

Страница 10: ...itter status It has functions of adding events event records wearing records alarm notifications reading lists statistical analysis data export account management and so on The main interface of App mainly displays blood glucose readings trend curves and trend arrows App and transmitter can be connected through Bluetooth pairing for data communication A blood glucose meter is also needed to be use...

Страница 11: ...every 12 hours Calibrating less often than every 12 hours might cause sensor glucose readings to be inaccurate and you might miss a low or high blood glucose value 6 2 Safety Information 2 1 Application definition The device is intended for continuous or periodic recording of interstitial fluid glucose levels in adult patients with diabetes aged 18 or older The system is designed for patients to u...

Страница 12: ... the sensor until the skin is dry so that the tape on the sensor base can be attached better Change the insertion site each time Using the same i nsertion site too often may not allow the skin to heal and may cause scars or skin allergies It is forbidden to insert sensors in areas that may be crush squeezed tattooed or allergic These sites are not ideal for measuring blood glucose Inserting sensor...

Страница 13: ...ted or the connection distance may be shorter You may miss the low high blood glucose level The transmitter can be reused in its lifetime and do not discarded it 3 Risk and Efficacy 3 1 Risk Inserting sensors and wearing adhesive tapes are less likely to cause infection bleeding pain or skin irritation redness swelling bruising itching scarring or discoloration In the clinical studies a small numb...

Страница 14: ...blood glucose Recognizing trends in blood sugar can help you take steps to avoid high low blood sugar levels App alerts when blood glucose levels exceed your target blood glucose range or when blood glucose drops or rises rapidly The alerts can remind you to take measures to avoid low high blood sugar 4 App installation and System setting 4 1 App installation The mobile App installation package or...

Страница 15: ... the transmitter name to be connected GN xxxxxxx if there is no name of the transmitter that needs to be connected click Search Device again to continue the search 5 Click GN xxxxxxx to enter the pair code and the disconnect icon will display Wait for the App to connect to the transmitter automatically This section helps you to make the first App settings Read this chapter before the operation beg...

Страница 16: ... manually connect the transmitter Contraindications Part of sensor need to pierce the skin so it is recommended that allergy and skin ulcers people use the device cautiously The product must be removed before magnetic resonance imaging MRI Caution When properly worn the transmitter and App have a transmission range of 2 m without obstruction Wireless connection in the water is not very well so the...

Страница 17: ...tions 1 In the main interface of App click the icon in the upper right corner to enter the main menu 2 In the main menu interface click Settings to enter the settings menu 4 3 1 Unit setting Click the unit Settings in the Settings menu and the unit Settings dialog box pops up and click on the units you need to set up ...

Страница 18: ...sensor batch number 2 When the transmitter device is unable to connect to or operate the transmitter due to damage or insufficient power click cancel the device After the prompt dialog box pops up and confirms uncouple theApp and the current device 3 After logging off the device if you want to add a new transmitter device to continue the detection process click Add Device to enter the Select Devic...

Страница 19: ...t s residual rupture sensor electrode during in vitro NMR test There was no obvious migration or heating of the sensor electrode and the imaging was limited to the area around the sensor electrode 5 1 Preparation Check the expiry date on the sensor package insert the sensor before the expiration date Warning The storage temperature of the sensor is 2oC 25oC which can be transported at room tempera...

Страница 20: ...or is generally selected to be flat not easily deformed and not easily rubbed by a belt or a seat belt It is forbidden to insert sensors within 8 cm of insulin injection and placement of insulin pump The area where put the sensor needs to be shaved and cleaned so that the adhesive tape is kept firm Change the insertion site each time Make sure there are no traces of lotions perfumes or drugs on th...

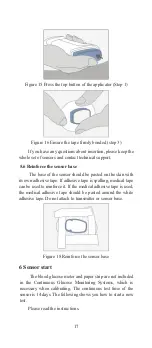
Страница 21: ... safety lock Step 5 5 5 Insert sensor After placing the applicator and pulling the safety lock prepare the sensor electrode for insertion as follows 1 Press the top button of the applicator and the sensor electrode have been inserted automatically 2 Gently pull applicator up until you see adhesive patch Using your finger or thumb hold front edge of patch and peel from skin at this time only the se...

Страница 22: ...sive tape is spalling medical tape can be used to reinforce it If the medical adhesive tape is used the medical adhesive tape should be pasted around the white adhesive tape Do not attach to transmitter or sensor base Figure 18 Reinforce the sensor base 6 Sensor start The blood glucose meter and paper strip are not included in the Continuous Glucose Monitoring Systems which is necessary when calib...

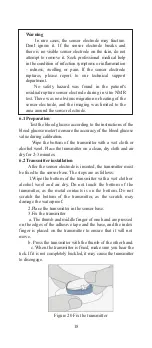
Страница 23: ...e bottom of the transmitter with a wet cloth or alcohol wool Place the transmitter on a clean dry cloth and air dry for 2 3 minutes 6 2 Transmitter installation After the sensor electrode is inserted the transmitter must be fixed to the sensor base The steps are as follows 1 Wipe the bottom of the transmitter with a wet cloth or alcohol wool and air dry Do not touch the bottom of the transmitter a...

Страница 24: ...displayed in the main interface and the remaining polarization time is displayed in the progress bar Figure 22 Polarization countdown 4 After the sensor polarization is completed a dialog box on the main interface of the App pops up to remind the user please input reference blood glucose After the reference blood glucose is input the App starts to display the blood glucose reading During the proce...

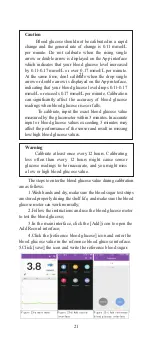
Страница 25: ...e blood glucose readings more accurate 3 Need more information or other reasons Caution Blood glucose must be entered manually during calibration It must be calibrated by accurate blood glucose values in order to obtain accurate blood glucose readings 7 2 How to calibrate Accurate blood glucose values need to be entered for each calibration Blood glucose for calibration must be between 2 2 and 22 ...

Страница 26: ...in 3 minutes Inaccurate input or blood glucose values exceeding 3 minutes may affect the performance of the sensor and result in missing low high blood glucose values Warning Calibrate at least once every 12 hours Calibrating less often than every 12 hours might cause sensor glucose readings to be inaccurate and you might miss a low or high blood glucose value The steps to enter the blood glucose ...

Страница 27: ...d sensors measure blood glucose through two different body fluids Therefore the values measured by the meter may not match the sensor readings The greatest benefit of using continuous blood glucose monitoring systems comes from dynamic information Concerned about the changing trend and speed of blood glucose is more important than accurate blood glucose readings Warning Continuous blood glucose te...

Страница 28: ... orange dotted line on the trend curve corresponds to the hyperglycemia cue line 4 The green dashed line on the trend curve corresponds to the hypoglycemic cue line 5 The area between the hyperglycemia cue line and the hypoglycemia cue line is the target glucose range 6 The reference blood glucose will be displayed directly on the trend curve 8 2 Reading lists Click the blood glucose reading on th...

Страница 29: ...he trend arrow is on the right of the current blood sugar readings When the trend arrow changes recent insulin doses activities food intake etc as well as the entire trend curve and blood glucose level before the activity should be considered Table 4 lists different trend arrows in App Table 4 Trend arrow ...

Страница 30: ...alarm notification screen 9 1 Notification In the alarm notification interface click the Notification icon to open the notification function After the notification function is enabled when prompted the notification will be displayed on the notification bar of the mobile phone when the notification occurs 9 2 Notification model The notification mode specifies the scenario and the repetition time In...

Страница 31: ...us of the App and transmitter Manually clicking the connection icon can switch the connection state between App and transmitter You can enable or disable the disconnection prompt function on the notification interface In the notification interface click Disconnect notification to open the status and enable the Disconnect notification function 9 5 Hyperglycemia notification The default value of hyp...

Страница 32: ...emind the user to input the reference blood glucose 10 Event An event refers to an activity or condition that can affect the state of blood sugar Tracking events can help patients or professional doctors understand how these activities and conditions affect blood glucose status Through the event log function of the App you can also check the status and trend of blood glucose before and after these...

Страница 33: ...ed diet information 7 Click Save to save the event information entered above click Cancel to exit the operation 10 1 3 Insulin Figure 30 Add insulin interface 1 In the add record interface click Insulin to enter the event interface 2 Click Time to set the date time of the event 3 Click Type to set the type of insulin such as long term medium term quick acting etc 4 Click Dose to set the dose of in...

Страница 34: ...ed exercise information 6 Click Save to save the event information entered above click Cancel to exit the operation 10 1 5 Medication 1 In the add record interface click Medication to enter the event interface 2 Click Time to set the date time of the event 3 Click Type to set the type of medication such as Sulfonylureas biguanides etc 4 Click Dose to set the dose of medication 5 Click description ...

Страница 35: ...ation Figure 33 Others interface 1 In the main application interface click Main menu icon in the upper right corner to enter the interface 2 In the main application interface click event records to enter the interface 3 Click on the glucose change of the corresponding event in the list where the curve is the blood glucose curve half an hour before and three and a half hours after the corresponding...

Страница 36: ...ta management 11 Stop the Sensor Caution The transmitter can be reused in its lifetime and do not discarded it Information on the end of sensor monitoring 1 Do not remove the transmitter when the sensor base is attached to the skin 2 Consult the local Medical Waste Administration for treatment 3 In some cases sensor monitoring may end prematurely The sensor can give a blood glucose reading for 14 ...

Страница 37: ...ration or heating of the sensor electrode and the imaging was limited to the area around the sensor electrode In rare cases the sensor electrode may fracture Don t ignore it If the sensor electrode breaks and there is no visible sensor electrode on the skin do not attempt to remove it Seek professional medical help in the condition of infection symptoms or inflammation redness swelling or pain If ...

Страница 38: ...serrated edge of the safety lock is downwards as shown in the figure below 11 3 Remove the transmitter 12 Faults and Troubleshooting This chapter provides effective advice and instructions for using the continuous blood glucose monitoring system 12 1 Sensor insertion failure Figure 39 Removed transmitter with safety lock Method 2 open the buckles on both sides of the sensor base and remove the tra...

Страница 39: ...rips are stored properly during the shelf life and make sure the blood glucose meter can work normally Test the blood glucose according to the instructions of the blood glucose meter Make sure no drugs that contain acetaminophen are taken Refer to chapter 7 for more information about the calibration 12 4 Transmitter low power When the transmitter battery level indicates the battery is near the end...

Страница 40: ...tion of sensors beyond their expiry date is prohibited The sensor is valid for 8 months from the production date Storage at the temperature of 2oC 25oC Storage outside this temperature range will reduce the response of the sensor to blood sugar resulting in inaccurate reading of blood sugar Storage at the relative humidity of 15 85 Transported at room temperature transmitter Store the transmitter ...

Страница 41: ...r free The purchaser must return the product to the sales support department in proper packaging Purchase receipt or similar sales certificate with date of purchase and seller s name and address should be send back together with the product Contact the sales support department to get the address Once the product is received the company will replace it immediately If the company determines that the...

Страница 42: ...17 Label symbol and graphic description 37 ...

Страница 43: ...he production date and expiry date are shown in the package Appendix Appendix 1 Warranty Card If there is a problem of non human damage to the product you purchased please return it to us for warranty Customer service information ...

Страница 44: ...I3 WJ XT SMS 01 version no A 0 effective date 2019 5 20 ...

Отзывы: