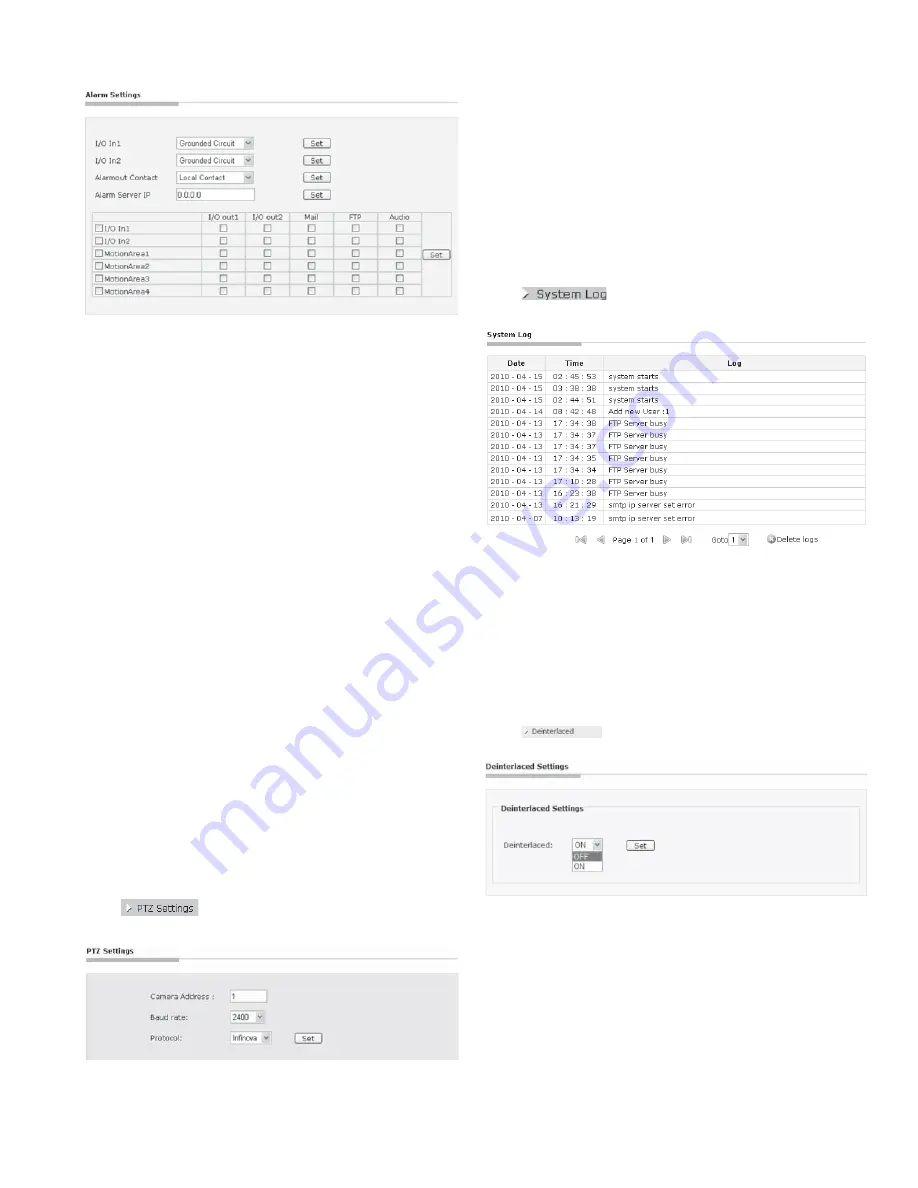
Infinova V1492N-18N05 Скачать руководство пользователя страница 17

 11

Figure 4-22 

I /O In

: Settable 2-channel alarm input In1/In2. 

Each alarm input has 2 modes   

(1)

Grounded Circuit 

(2)

Open Circuit 

Recommended: 

Grounded Circuit 

Alarm out Contact: used to set sending way of alarm.   

Local Contact:

 I/O out is triggered by I/O alarm in or motion 

detection alarm. Default: Local Contact. 

Net Contact:

 I/O out is controlled by the surveillance 

management software. 

Note:

 This function needs to be supported by digital video 

surveillance management software like V2216. If Net Contact is 
selected, user has to set Alarm Server IP the same as the IP address 
of V2216-CMS server. After setting finished, user can remotely 
control the relay via V2216 software. For detailed information, 
please refer to V2216 manual. 

Alarm Server IP: 

used to set the IP address of alarm server when 

NET contact is selected. If alarm occurs, it will inform the alarm 
server. 

Users can set alarm handling ways for alarm input or motion 
detection alarm, like sending Mail, FTP upload, audible alarm, 
Relay output After setting completes, click “Set” button to take 
effect. 

4.7 PTZ Settings 

Click

 button in the navigation bar to display the 

PTZ Setting box: 

Figure 4-23 PTZ Interface 

Camera Address:

 set the distributed address of V1492N-N 

Integrated High-speed IP PTZ Camera. The number of camera 
address is determined by different control protocol. 

Baud rate: 

set the communication baud rate of control and camera 

modules, the default value is 2400 bps. 

Protocol:

 select the corresponding protocol of camera. The built-in 

service software in this IP PTZ camera supports Pelco-P, Pelco-D 
and Infinova. 

4.8 System Log 

Click

 button on the navigation bar to enter the 

system log interface shown as below: 

Figure 4-24 

It can display 30 logs on a page. User can turn over the page by 
clicking the below arrows or skip to the designated page by clicking 
“Goto”. Click “Delete logs”, a prompt will come out. Then, click 
“Yes” to clear logs. 

4.9 Deinterlaced Settings 

Click

  button, and then comes out the deinterlaced 

settings interface: 

Figure 4-25 

It’s recommended to enable the Deinterlaced setting for many 
dynamic scenes and disable it for static scenes. Defaulted as: “ON”. 
.
Note: Only the super user can set this option. 

4.10 SD Card 

Click the “SD Card” button to display the following interface:   

Содержание V1492N-18N05

Страница 1: ...va V1492N N series high speed IP PTZ cameras Based on network technology V1492N N series integrated high speed IP PTZ cameras could easily realize network digital video transmission and network contro...

Страница 2: ......

Страница 3: ...ear belong to their respective proprietors FCC Warning The V1492N N series high speed IP PTZ cameras comply with the FCC rules Operation is subject to the following two conditions z This device will n...

Страница 4: ...commended by manufacturer z Position power source and related wires to assure to be kept away from ground and entrance z Refer to qualified personnel for all service matters z Save product packaging t...

Страница 5: ...9LGHR 6HWWLQJV 5 1 Video Size 14 5 2 Player 14 5 3 Stream Type 14 5 4 Motion Detection 14 5 5 Privacy mask 15 5 6 Color Setting 15 5 7 Image Quality 15 5 8 OSD Settings 15 5 9 Qos Setting 16 5 10 Res...

Страница 6: ......

Страница 7: ...rm function optional z Supports multiple ways to handle alarms such as sending an email FTP upload audible alarm relay output z Embedded INFINOVA PELCO P and PELCO D protocols SDUW IURP DERYH IHDWXUHV...

Страница 8: ...mat PAL 36X 24 VDC V1492N 36N16 Integrated High speed IP PTZ Camera System H 264 M JPEG Format PAL 36X 24 VAC 3DUW 1XPEHU WHQVLRQV IRU ODUP XGLR 56 6HOHFWLRQ LWKRXW ODUP XGLR 56 LWK ODUP XGLR 56 LWK O...

Страница 9: ...tings such as IP address via the One Button Reset function on the base PCB of high speed IP PTZ camera the Reset button is S100 Chapter II Installation 2 1 Dimensions There are 4 ways for the mounting...

Страница 10: ...used when there is enough room below the desktop 2 3 Wall Mount Wall mount is to fix the PTZ camera on the erect or slanting plane by means of some specific auxiliary mounting components and before m...

Страница 11: ...9 0c or greater image viewer software z Install Quicktime 3 1 Software Installation TXLSPHQW RQQHFWLRQ z Connection order Firstly connect the network cables then connect the video only used for serve...

Страница 12: ...e are not in sequence Please try step 1 and 2 first and if it fails you can proceed with step 3 or 4 The preparation of IE image browsing comes to and end 3 2 Set IE Browser You can watch the images a...

Страница 13: ...super username and password The default ID is admin password admin Click OK button to log on If the username or password is not correct the system will return to the above dialog box Click Reset to cl...

Страница 14: ...P setting video parameter setting alarm setting H 264 video settings M JPEG video settings etc 4 3 Account Settings After logging on as a super user click the button When the button turns to be high l...

Страница 15: ...sible 4 4 Network Settings Click button in the navigation bar the following interface concerning network parameter would display Figure 4 15 0 DGGUHVV 0 GGUHVV display MAC address of the device 3Y VHW...

Страница 16: ...l according to SMTP settings 6103 6HWWLQJV V1492N N Integrated High speed IP PTZ Camera has the heartbeat function In the SNMP Settings interface start the heartbeat server set its IP address and the...

Страница 17: ...k Set button to take effect 4 7 PTZ Settings Click button in the navigation bar to display the PTZ Setting box Figure 4 23 PTZ Interface Camera Address set the distributed address of V1492N N Integrat...

Страница 18: ...ing when Network anomaly Enable or disable automatic recording during network abnormity Note It only supports recording of minor stream If the resolution of minor stream is set OFF recording cannot be...

Страница 19: ...other program to update 1RWH After update successfully it needs to restart the system DFWRU 6HWWLQJV Figure 4 33 Click Set button the following hint would display Figure 4 34 Click OK system starts t...

Страница 20: ...04 576 704 288 352 288 176 145 5 2 Player Click Player button and Player setting interface will be shown as follows Figure 5 2 Users can select player to play video QILQRYD 3OD HU Choose Infinova play...

Страница 21: ...he parameters adjusted here include brightness hue contrast and saturation For different cameras in different situations to get a good video image may require adjustment of the video parameters Defaul...

Страница 22: ...ecommended setting as CIF 5 11 I P Rate Click I P Rate button in the navigation bar to display the following interface Figure 5 11 I P rate means the ratio of I frame to P frame in compressed video im...

Страница 23: ...btain audio output function select on in the scroll field of Out and click Set to save it XGLR 6DPSOH 5DWH 8K 44K optional At present for Infinova Player 8K and 44K are available for QuickTime Player...

Страница 24: ...jor stream whereas when it comes to Minor Stream the resolution of M JPEG video will be identical with that of H 264 minor stream 6 2 Image Quality Figure 6 2 As shown in the figure above there are 5...

Страница 25: ...el iris value For 22X 23X 35X PTZ cameras only z Set default iris value z Select iris mode M A Manual Priority z Turn on off backlight compensation z Select white balance mode z Set white balance R ga...

Страница 26: ...illustrated as below Lens Direction Keys Lens Function Keys Pattern Preset Special Function Keys Autopan Speed Adjust Figure 8 1 The keys could be divided into three function areas 1 Area one Lens di...

Страница 27: ...are available the greater the number is the faster the speed is 7LOW VSHHG Adjust tilt speed of pan tilt 8 grades are available the greater the number is the faster the speed is 6HWWLQJ 3UHVHW DQG DOO...

Страница 28: ...Q Click to call up scanning track of the camera DOOLQJ XS OLS RUL RQWDO Click to call up Flip Horizontal 180 Chapter VIIII Video Download V1492N N series high speed IP PTZ camera supports storage with...

Страница 29: ...details of videos which comply with your requirements will appear in the download list as shown in the figure below Figure 9 4 Download List Select a video by clicking the left mouse button or multip...

Страница 30: ...lead the power cable through 6WHS Wire the power cable on the magnetic ring filter 3 rounds or more Make sure the filter can be well closed 6WHS Close the magnetic ring filter 1RWLFH The magnetic ring...

Страница 31: ...er set the Protocol and Baud rate The High speed IP PTZ camera can t be controlled after successful initiation Wrong setting in the Interface Setting Perform the setting correctly Don t correctly inst...

Страница 32: ...ID and baud rate via DIP switch please refer to the procedures below 6WHS Loosen the two screws that fasten DIP switch window with a Philips head screwdriver Then take off the window The position of D...

Страница 33: ...I I O O 60 I I O I I I O O 61 O O I I I I O O 62 I O I I I I O O 63 O I I I I I O O 64 I I I I I I O O I I ON O OFF I ON O OFF Switch Positions Camera ID I ON O OFF I ON O OFF 1 2 3 4 5 6 7 8 65 O O O...

Страница 34: ...I O I 191 O I I I I I O I 192 I I I I I I O I I ON O OFF Switch Positions Camera ID Switch Positions I ON O OFF Camera ID 1 2 3 4 5 6 7 8 193 O O O O O O I I 194 I O O O O O I I 195 O I O O O O I I 19...

Страница 35: ...S2 protocol can be set via the 3rd position of DIP Switch S2 the other 5 positions are reserved for future use Refer to the following tables for specific setting X indicates not available 3 6ZLWFK DXG...

Страница 36: ...m cable diameter shall be 0 8000mm A lower diameter value tends to cause voltage loss and even system instability 10 283 86 451 137 716 218 1811 551 20 141 42 225 68 358 109 905 275 30 94 28 150 45 23...

Страница 37: ...head wiring is prohibited because it s more likely to encounter lightning strike Use shielded cables or thread the cables through metal tubes for burial thus to ensure the electric connection to the m...

Страница 38: ...les InfiReplayer Also you can select other locations However you are strongly recommended to use the default location 4 After selecting the location click Next to select the start menu folder 5 Click...

Страница 39: ...e available to remove the InfiReplayer 1 Click Start menu in the Windows taskbar select Control Panel in the Settings double click Add or Remove Programs under the Control Panel and then select InfiRe...

Страница 40: ...Infinova 6WRXWV DQH 0RQPRXWK XQFWLRQ 1 8 6 7HO 86 RQO D VDOHV LQILQRYD FRP V1 4 1208...

Отзывы: