60
de
fr
en
nl
!
°C
0
40
min
max
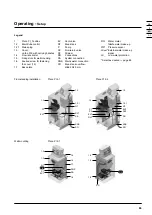
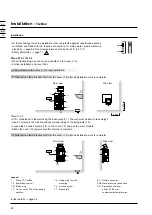
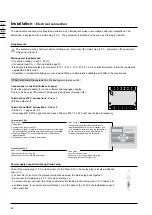
Legend:
1
Pleno PI_ TecBox
1.2 BrainCube control
1.2.1 Mains plug
1.3 Cover, on the PI 6 with carrying
handles
1.5 Fixing slots for wall
mounting
1.6 Knurled screw
1.7 Base plate
SA Outlet connection
SNS Water make-up connection
SÜ Break tank overflow,
di/da = 20/25 mm,
customer waste water pipe
230 V
1.3
1.2.1
1.2
1
SA
SNS
SÜ
230 V
1.3
SA
SÜ
1.2
1.6
1.6
1.6
1.6
1.5
1.7
≥
600
≥
600
Installation -
TecBox
Installation
• As the technology room, the installation room is protected against unauthorized access,
ventilated, and fitted with the required connections for mains water, waste water and
electricity
:
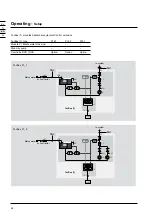
page 62. Room temperature should be from 0°C to 40 °C.
• Safety information
:
page 71.
Pleno PI 6.1 | PI 6.2
• When transporting, use the carrying handles on the cover (1.3).
• Vertical installation on a level floor.
Do not remove the cover (1.3) during installation.
Only remove the protective film from the cover (1.3) after
all
installation work is complete!
Rear
view
Top
view
Pleno PI 9.1
• PI 9.1 is fastened to the wall using the base plate (1.7). The wall must be able to take weight.
• Insert 2 screws in the wall at positions corresponding to the fixing slots (1.5).
• Loosen the 4 knurled screws (1.6) on the cover (1.3) and pull the cover forward
• Attach the cover (1.3) again only after start-up is complete.
Only remove the protective film from the cover (1.3) after
all
installation work is complete!
Front
view
Side
view
further details
:
page 55
Содержание Pleno PI 6.1
Страница 25: ...25 25 de fr en nl...
Страница 49: ...49 49 de fr en nl...
Страница 73: ...73 73 de fr en nl...
Страница 97: ...97 97 de fr en nl...
Страница 98: ...98...

