7
S
e
tti
n
g
U
p
th
e
M
a
c
h
in
e
W
in
dows
®
USB
W
indows
®
Par
a
llel
W
indo
w
s
NT
®
4.
0
Pa
ra
lle
l
M
a
ci
nt
osh
®
USB
M
a
c
int
osh
®
Net
w
or
k
W
in
dows
®
Net
w
or
k
Fo
r
Admi
n
is
tr
a
to
rs
Do not connect the Parallel or USB
cable yet.
1
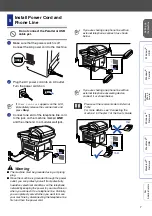
Make sure that the power switch is off.
Connect the AC power cord to the machine.
2
Plug the AC power cord into an AC outlet.
Turn the power switch on.
3
Connect one end of the telephone line cord
to the jack on the machine marked
LINE
and the other end to a modular wall jack.
Warning
■
The machine must be grounded using a 3-prong
plug.
■
Since the machine is grounded through the power
outlet, you can protect yourself from potentially
hazardous electrical conditions on the telephone
network by keeping the power to your machine on
when you connect it to a telephone line. Similarly,
you can protect yourself when you want to move
your machine by disconnecting the telephone line
first and then the power cord.
5
Install Power Cord and
Phone Line
If
Check Scan Lock
appears on the LCD,
immediately release the scanner lock and
press
Stop
.
If you are sharing one phone line with an
external telephone, connect it as shown
below.
If you are sharing one phone line with an
external telephone answering device,
connect it as shown below.
Please set the receive mode to External
TAM.
For more details, see “Connecting the
machine” in Chapter 1 of the User’s Guide.
TAM
TAM


