6
2.2.2 Connecting the TV set
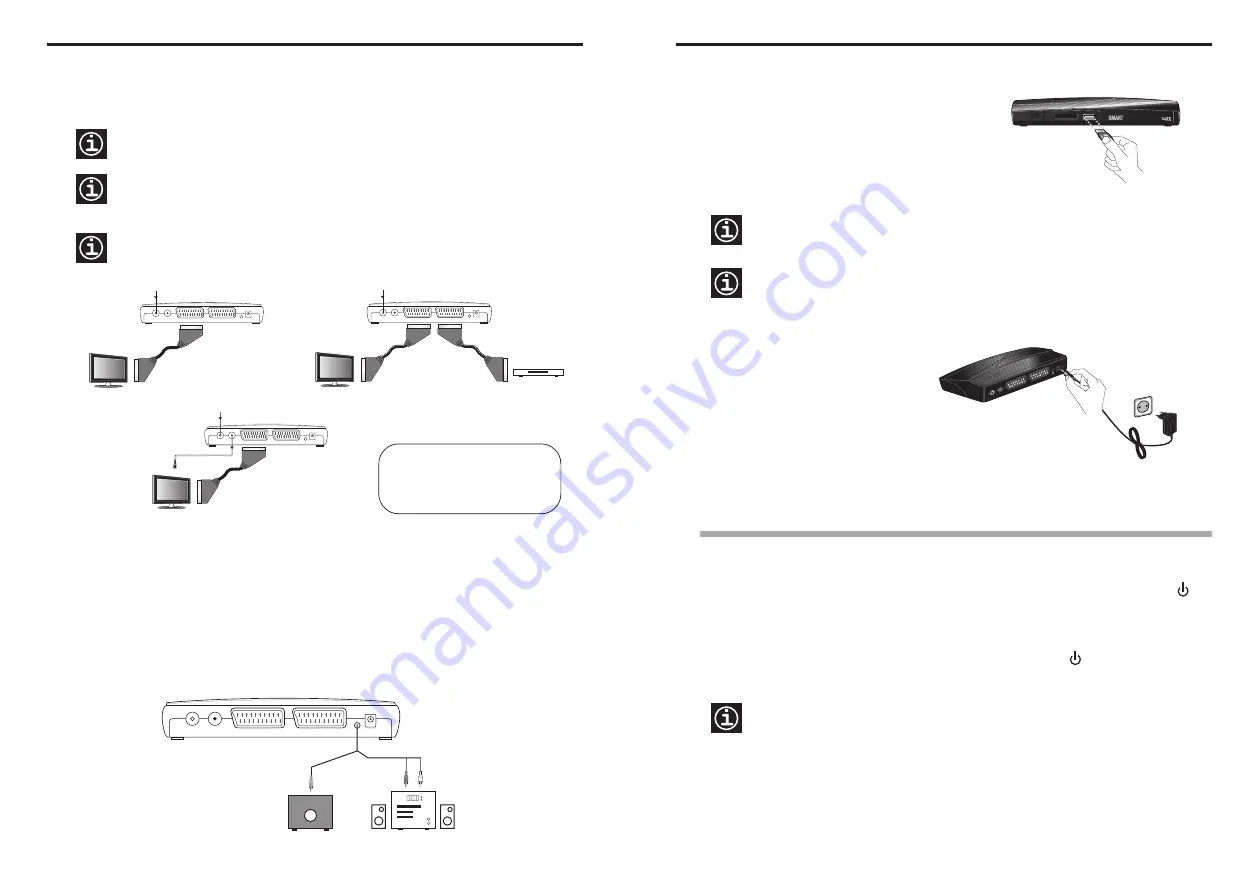
Using the supplied SCART cable, connect the SCART socket marked
TV
on the receiver to an available
SCART socket on the TV set (Fig. 3).
The format of the video signal provided by the receiver can be either RGB or CVBS PAL/NTSC composite
video. The TV set must therefore be compatible with one of these two video formats.
If your TV set does not have a free SCART socket, disconnect one of the other devices from the TV set
–typically a DVD player– and connect this device to the SCART socket marked
VCR
on the
SMARTmini
receiver (Fig. 4). When the device is turned on, the signal will automatically be diverted to the TV set.
If you install your
SMARTmini
receiver before the analogue switchover comes into effect in your region, you
should connect the antenna to the TV set (and to your video or DVD) in order to continue receiving the
analogue channels. To do so, use a second antenna cable and connect the
RF Out
output on the
SMARTmini
receiver to the antenna input on the TV set (Fig. 5).
2.2.3 Connecting to a Hi-Fi system
The
SMARTmini
receiver can also deliver the analogue audio signal to your Hi-Fi system, allowing you to
enjoy a far better sound quality than that provided by a normal TV set. For this you will need a Jack-(3x)RCA
cable (not supplied). Connect the cable to the
A/V
output of the
SMARTmini
and then make the audio
connections indicated in figure 6.
RF In
RF Out
VCR
TV
A/V
12V
RF In
RF Out
VCR
TV
A/V
12V
Fig. 3
Fig. 4
TV
TV
DVD
RF In
RF Out
VCR
TV
A/V
12V
Fig. 5
RF In
RF Out
VCR
TV
A/V
12V
Fig. 6
Projector
Hi-Fi System
video
audio R
audio L
Jack-(3x)RCA cable
SMARTmini Receiver
2.2.4 Connecting to a video projector
You will need the previously mentioned Jack-(3x)RCA cable. Connect the mini-jack of the cable to the
A/V
output on the
SMARTmini
, and the video connector to the input on the projector.
Connecting the TV set in AUSTRALIA :
Using the supplied Jack-(3x)RCA cable,
connect the mini-jack of the cable to the
A/V
output on the
SMARTmini
, and then make the
video and audio connections to the TV set.
7
2.2.5 Connecting an external USB device
You can use your
SMARTmini
to play video, music and
photo digital files stored on external USB devices (flash
drives, hard disks), as well as record onto these devices
the video and audio from the DTT channel which is
currently tuned in. Using a USB cable, connect the USB
connector of the external device to the
USB
port on the
front panel of the receiver.
2.2.6 Connecting the power supply
Insert the jack connector of the power supply
into the
12V
input on the
SMARTmini
receiver
and then plug the power supply unit into the
mains socket.
2.3 Turning the receiver ON and OFF
2.3.1 Turning ON the receiver
When the power supply is plugged into the mains socket, the light on the front panel will light green
(receiver in
on
mode). When in daily use the light is red or out (receiver in standby mode), press the
button on the remote contro; the light will turn green (receiver in
on
mode).
2.3.2 Turning OFF the receiver
With the receiver in
on
mode (the light on the front panel is green), press the button to turn it off
(receiver in standby mode).
The
SMARTmini
receiver does not feature a switch for completely disconnecting the power supply. When you
wish to completely disconnect it from the mains, unplug the power supply from the mains socket. The light on
the front panel will go out.
Unplug the power supply if you are not going to use the receiver for a prolonged period of time (e.g. whilst on
holiday).
Preparation
RF In
RF Out
VCR
TV
A/V
12V
1.
2.
Fig. 8
IKUSI
mini
IKUSI takes no responsibility for the loss of any data from the external device caused by the incorrect use of
the
SMARTmini
receiver. We recommend that a backup copy of all data is made prior to use.
Fig. 7
The
SMARTmini
is mainly designed to work with external hard disks that have their own power suppy, i.e.
which are powered from the mains supply. However, although we cannot guarantee that they will work with
the receiver, the use of self-powered disks may also be possible. In any event, the disk must be formatted
using the FAT32 file system.


