background image

18

Interface and output

The device can be connected to a PC and operated with the labora-
tory software labworld

soft

®

 through USB interface (5).

 NOTICE

Please observe the system require-

ments as well as the operating in-

structions and help section of the 

software.

RS 232 interface communication PC

Konfiguration:

The functions of the interface connections between the stir-
rer machine and the automation system are chosen from the
signals specified in EIA standard RS 232 in accordance with
DIN 66 020 Part 1.

For the electrical characteristics of the interface and the allo-
cation of signal status, standard RS 232 applies in accordance
with DIN 66 259 Part.

Transmission procedure: asynchronous character transmission
in start-stop mode.

Type of transmission: full duplex.

Character format: character representation in accordance
with data format in DIN 66 022 for start-stop mode. 1 start
bit; 7 character bits; 1 parity bit (even); 1 stop bit.

Transmission speed: 9600 bit/s.

Data flow control: none

Access procedure: data transfer from the stirrer machine to
the computer takes place only at the computer’s request.

USB interface:

The Universal Serial Bus (USB) is a serial bus for connecting the device 
to the PC. Equipped with USB devices can be connected to a PC dur-
ing operation (hot plugging). Connected devices and their properties 
are automatically recognised.
Use the USB interface in conjunction with labworld

soft

®

 for opera-

tion in “Remote” mode and also to update the firmware.

USB device drivers:

First, download the latest driver for 

IKA

®

 devices with USB inter-

face from: 

http://www.ika.com/ika/lws/download/usb-driver.zip.


Install the driver by running the setup file. Then connect the 

IKA

®


device to the PC using the USB data cable.
The data communication is via a virtual COM port. 

Command syntax and format:

The following applies to the command set:

Commands are generally sent from the computer (master) to
the device (slave).

The device sends only at the computer’s request. Even fault
indications cannot be sent spontaneously from the device to
the computer (automation system).

Commands are transmitted in capital letters.

Commands and parameters including successive parameters
are separated by at least one space (code: hex 0x20).

Each individual command (incl. parameters and data) and
each response are terminated with blank CR LF (Code: hex
0x20 hex 0x0d hex 0x20 hex 0x0A) and have a maximum
length of 80 characters.

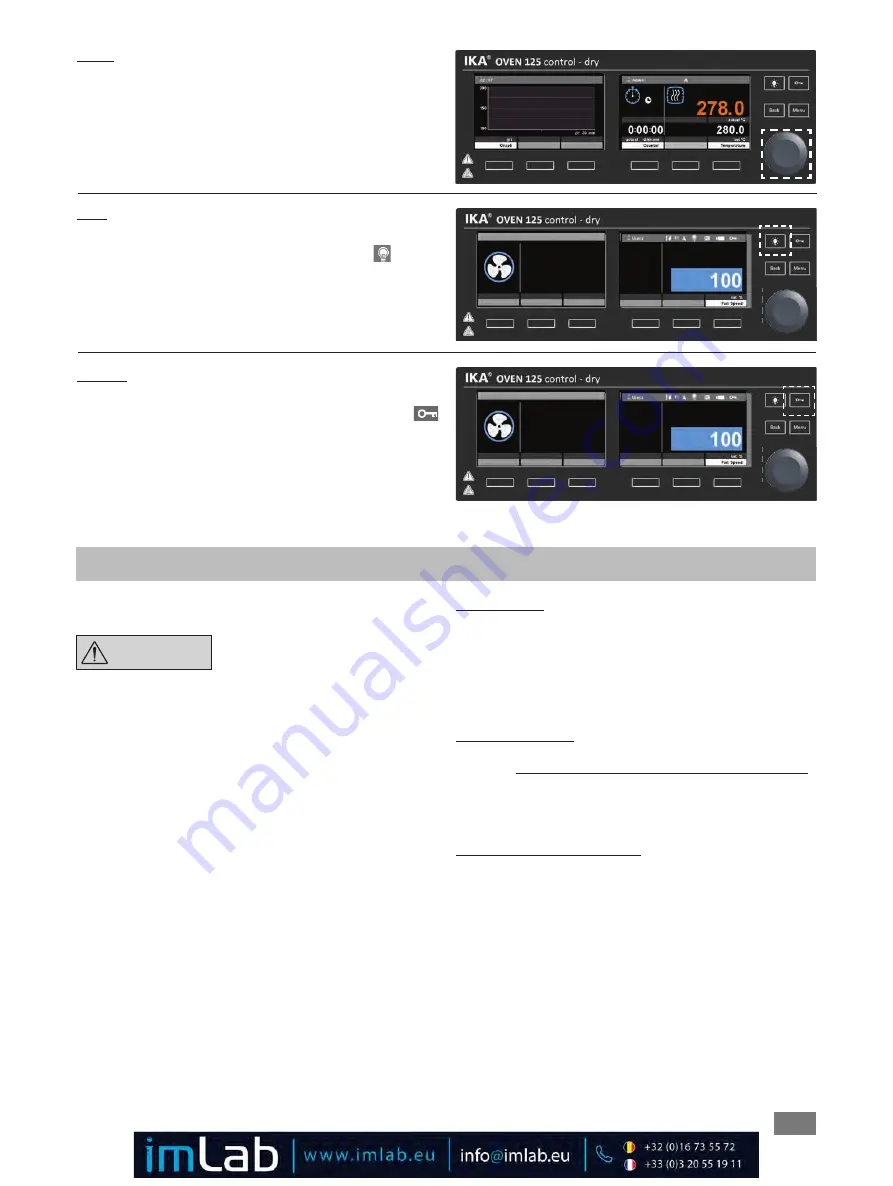
Light:

Activates the light


Press and hold the light button (A). The symbol

 appears 

on the display. This function can always be activated.

Open/close the oven door.

Lock key:

Press the Lock key (B) for 2 seconds to lock/unlock. All keys
and the rotary/push knob (E) are locked. The symbol
appears on the display.

Graph:

On the working screen:
1.

Press the graph selection button (K). The graph shows the
current measurements during operation.

2.

Press the graph selection button (K) again. --> working screen.

Содержание Oven 125 control - dry glass

Страница 1: ...20000023854 Operating instructions EN DO 125 control_032019 IKA Oven 125 control dry IKA Oven 125 control dry glass...

Страница 2: ...nterface RS323 7 Mains socket 8 Venting flap 9 Cable feed through external temperature sensor 10 Oven light 11 Fan 12 Rack slide in supports Device setup Dangerous spots Dangerous spots Device setup F...

Страница 3: ...rature monitoring 7 Transportation and storage 7 Unpacking 8 Installation 8 Operator panel and display 11 Setting the temperature limit 12 Commissioning 12 Menu settings 13 Menu structure 13 Navigatio...

Страница 4: ...ospheres it is not EX protected With substances capable of forming an explosive mixture appropriate safety measures must be applied e g working under a fume hood To avoid bodily injury and property da...

Страница 5: ...will automatically restart in mode B and C follow ing any interruption to the power supply Protect the power cable against kinks Check power cables at regular intervals for possible material fatigue M...

Страница 6: ...is operated with accessories that are not supplied or recommended by IKA If the device is operated improperly or in contravention of the IKA specifications If the device or the printed circuit board...

Страница 7: ...eeds hysteresis limit and recovers If the user did not select the option to turn OFF heating operation whenever the temperature overshoots or undershoots the stable set temperature and passes the pred...

Страница 8: ...ble Setting up Fixing against the wall is compul sory Place the device on and even clean dry and fireproof surface in well ventilated environment Fixing the device to the wall NOTICE The screws used f...

Страница 9: ...ad shelves evenly Stacking the device CAUTION Never stack more than two devices When stacking the device four per sons are required to lift it B NOTICE In order to keep enough space please use stackin...

Страница 10: ...weight of the door about 15 kg WARNING Open the door Hold the door and loosen the hinge pin with a suitable tool Remove the door carefully Alternate the position of the keepers and hinges with a 4 mm...

Страница 11: ...or ventilation flaps open K Graph selection button Graph function display Symbols at working screen Symbol Description Key lock is activated USB storage medium is connected USB B is connected Light is...

Страница 12: ...ing c Fan target speed d Counter Timer display e Temperature target value f Actual oven temperature g Actual temperature of inserted external temperature sensor h Timer target value a b c d e f g h If...

Страница 13: ...n Timer Counter Timer Days Hours Minutes Controller Time Temperature activated Operating mode A B C activated Program Program 1 5 Start Loop count Endless loop Immediately Delayed Immediately Delayed...

Страница 14: ...3 point calibration Actual temperature note Gives a notification when the actual temperature is in the range of 1 0 K of the target temperature and the symbol is shown next to the target temperature T...

Страница 15: ...matrix of lines segments and columns functions Seg No column Segment Number Temp column specifies the desired target temperature Control Mode column The temperature time profiles can be created using...

Страница 16: ...ew of the device temperature parameters Software Displays the device software version used Operation Temperature Temperature control NOTICE The temperature calibration and comparison for the external...

Страница 17: ...n under the fan speed 3 Press and turn the rotary push knob E to set the speed in 10 steps 0 stopped 100 full speed 4 Press the rotary push knob E The value is saved as a mea surement 5 Press the back...

Страница 18: ...recognised Use the USB interface in conjunction with labworldsoft for opera tion in Remote mode and also to update the firmware USB device drivers First download the latest driver for IKA devices wit...

Страница 19: ...for motor speed ramps for example OUT_WD2 m Watchdog mode 2 if event WD2 should occur the temperature target value is changed to the WD safety temperature limit value The warning WD2 is displayed The...

Страница 20: ...tion method than the method defined by IKA is planned you must ascertain from IKA that this method does not damage the device Spare parts order When ordering spare parts please specify Machine type Se...

Страница 21: ...external temperature sensor correctly Contact the IKA Service Department Temperature in the device too high PCB power a Ambient temperature PCB too high b PCB malfunction Heating off Turn off the dev...

Страница 22: ...control dry kg 89 Oven 125 control dry glass 2 racks Permitted ambient temperature range C 5 40 Permissible relative humidity 80 Protection class according to DIN EN 60529 IP 20 RS 232 interface yes U...

Отзывы: