English
4
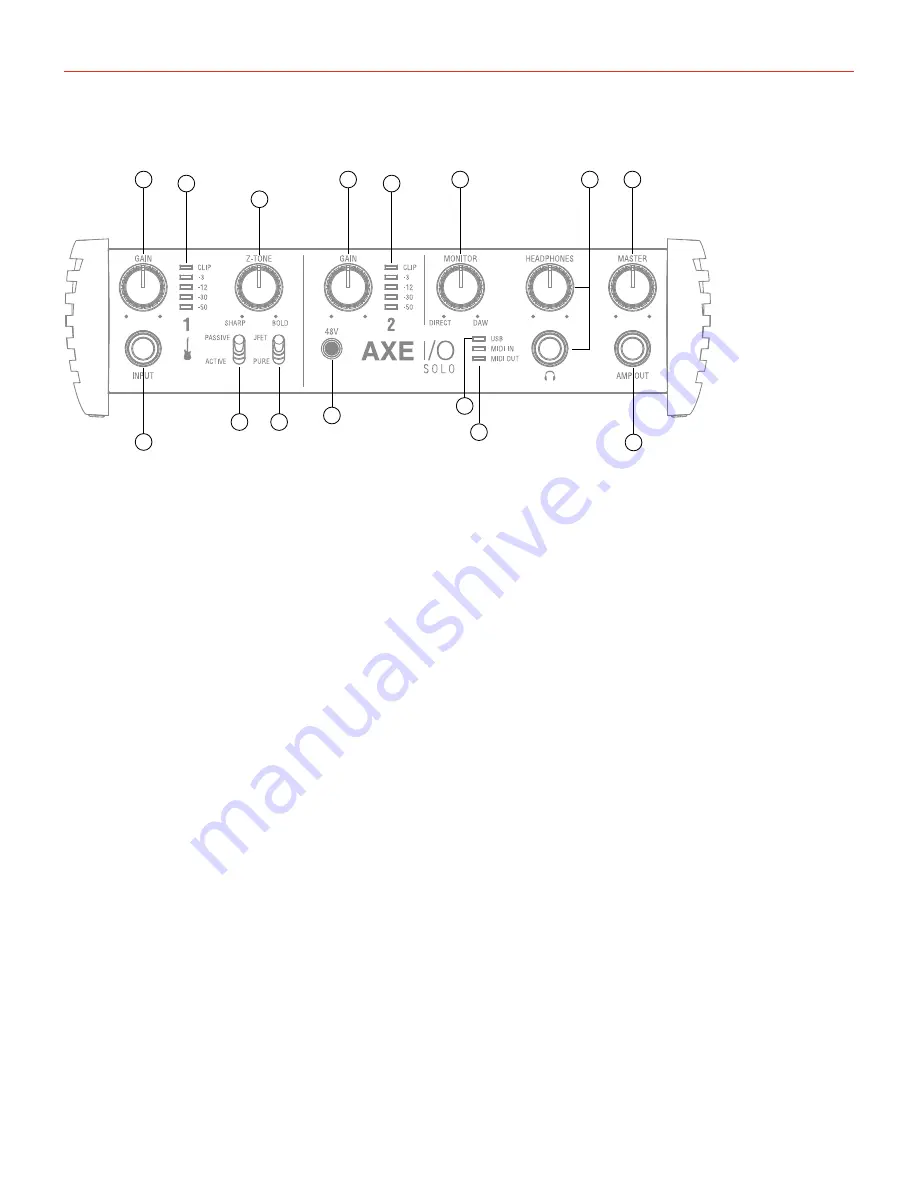
Front panel
1
4
6
5
7
9
8
2
2
10
12
11
3
3
13
1. Instrument input 1 - 1/4” (6.35mm) jack type - Connect your instrument here (e.g., guitar).
2. GAIN 1 and GAIN 2 - adjust the input gain for the signals at Inputs 1 and 2 respectively.
3. Peak Meters - each input has a dedicated 5-segments peak meter, with 1-second hold on CLIP, that
indicates the level of the input signal.
4. Z-TONE™ - Variable impedance control - the front control named Z-TONE™ allows you to change the input
impedance on the instrument input 1 allowing for a unique possibility for tone shaping on your instruments.
5. PASSIVE/ACTIVE - Pick-Up selector - this selector allows you to match the type of pick-up installed on the
connected instrument. This control will act exclusively on the instrument input 1.
6. JFET/PURE - Preamp topology selector - this selector allows you to select two different preamp topologies
for your connected instrument: JFET preamp type and Pure preamp type. This control will act exclusively on
the instrument input 1.
7. 48V - This switch enables 48V phantom power on both microphone inputs. The switch illuminates when
phantom power is selected.
8. MIDI IN/OUT LEDs - these LEDs illuminate when MIDI data is received from/transmitted to the MIDI port.
9. USB LED - this LED illuminates when the unit is recognised by the computer to which it is connected.
10. MONITOR - the Monitor knob allows you to blend your input signals with the playback streams from your
computer. This allows you to monitor your input signal with zero latency. If the knob is positioned at 12
o’clock, the input signal and the playback stream will be equally balanced. Turning the knob to the left will
increase the level of the direct signal; turning to the right will increase the level of the playback stream from
the DAW. This control works both for Outputs 1-2 and Headphones.
11. HEADPHONES - connect one pair of headphones to the 1⁄4” (6.35 mm) TRS jack sockets below the
headphone volume controls. The headphone outputs always carry the signals that are currently routed to
outputs 1 & 2.
12. MASTER - main output level control – this control adjusts the level at Outputs 1 and 2 on the rear panel.
13. AMP OUT - this is a third 1/4” physical unbalanced, floating output with selectable ground lift (controlled
with software). It’s independent from main Outputs 1-2. This output is specifically designed to allow the
interface to feed guitar amps or stomps without the typically associated risk or hum or buzz noises caused
by ground loops or mismatched levels and impedances.


