Part 1 – Introduction
8
Overview
Product color and design may vary depending on the
model.
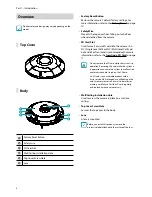
Top Cover
Body
1
2
3
4
5
6
1
Factory Reset Button
2
Safety wire
3
SD Card Slot
4
Wall/Ceiling Installation Hole
5
Top Cover Screw Hole
6
Lens
•
Factory Reset Button
Restores the camera's default factory settings. For
more information, refer to the
Factory Reset
on page
10.
•
Safety Wire
Prevents the top cover from falling on to the floor
when detached from the camera.
•
SD Card Slot
Used to insert a microSD card into the camera. (An
SLC (Single Level Cell) or MLC (Multi Level Cell) card
by SanDisk or Transcend is recommended) For more
information, refer to the
Inserting a SD Card
on page
11.
• Do not remove the SD card while the system is in
operation. Removing the card while the system is
in operation can cause the system to malfunction
and/or corrupt data stored on the SD card.
• An SD card is a consumable product with a
finite service life. Prolonged use will damage the
card's memory sectors and result in data loss or
memory card failure. Test the SD card regularly
and replace it whenever necessary.
•
Wall/Ceiling Installation Hole
Used to screw the camera in place on a wall or a
ceiling.
•
Top Cover Screw Hole
Secures the top cover to the body.
•
Lens
A lens is mounted.
Before you install this product, remove the
protective label attached to the surface of the lens.
Содержание DC-E3212WRX
Страница 1: ...Powered by Network Camera Installation Manual DC Y1513 DC Y1513W ...
Страница 19: ......
Страница 20: ...IDIS Co Ltd For more information please visit at www idisglobal com ...

