Part 1 – Introduction
12
1
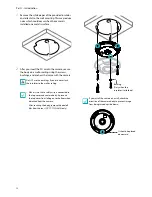
Remove the white paper of the provided insulator
and attach it to the wall or ceiling. This may reduce
noise which could occur when the camera is
installed on a metalic surface.
2
After you insert the SD card in the camera, secure
the body on a wall or ceiling using the screws,
bushings, and anchors that came with the camera.
Do NOT use the bushings if you did not attach
the insulator to the wall or ceiling.
• Make it sure that a safety wire is connected to
the top cover and camera body. It prevents
the top cover from falling on to the floor when
detached from the camera.
• After securing the body, remove the peel off
film from the lens. (
DC-Y1513 model
only)
Bushing
(Only when the
insulator is attached)
If you install the camera on a wall, check the
direction of the camera body to prevent image
from being turned upside down.
It should be placed
downward.
Содержание DC-E3212WRX
Страница 1: ...Powered by Network Camera Installation Manual DC Y1513 DC Y1513W ...
Страница 19: ......
Страница 20: ...IDIS Co Ltd For more information please visit at www idisglobal com ...

