background image

14


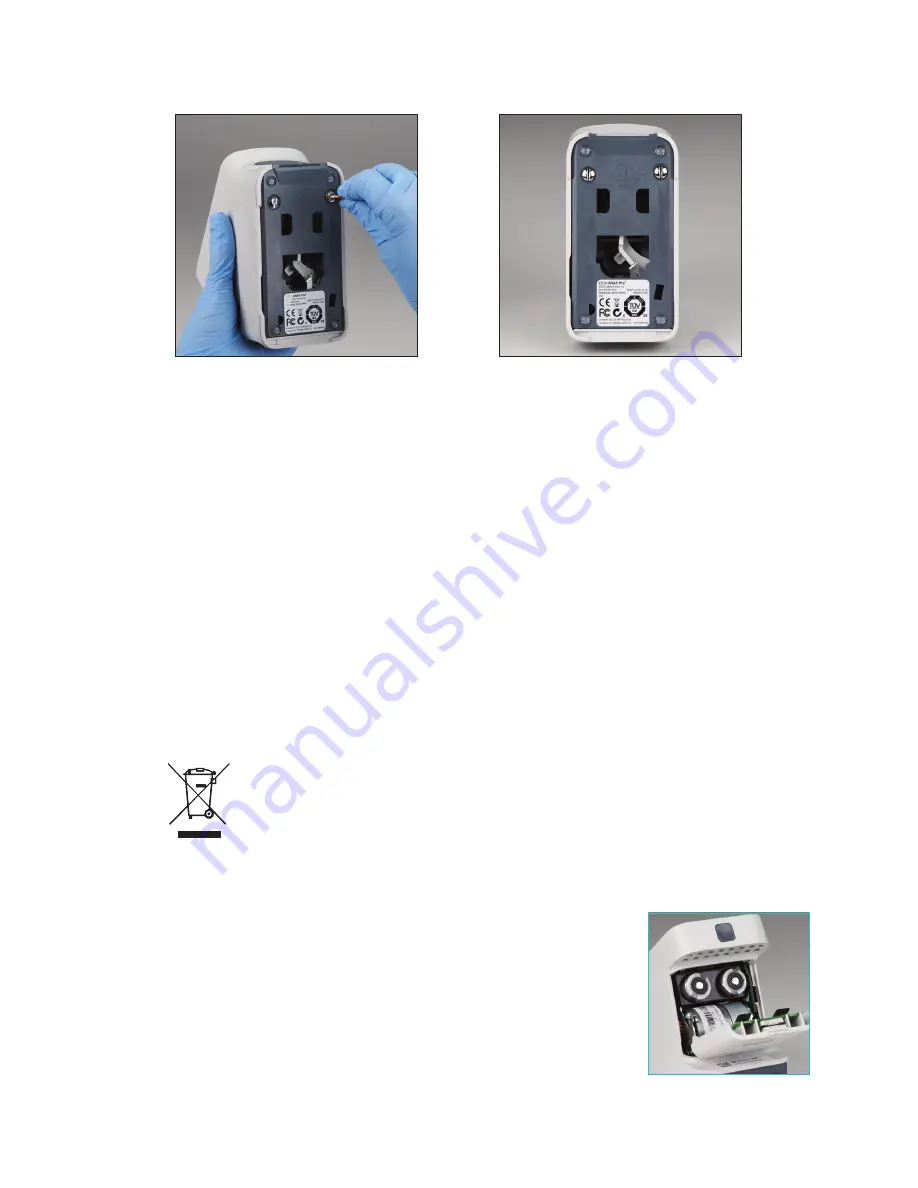
7.  Turn the silver fasteners clockwise a quarter 

turn to lock the base into place. 

8.  Ensure the base and silver fasteners 

are flush with the analyzer and locked 
into place. 

Not locking the base and 

fasteners properly can impact analyzer 
performance.

Cleaning the Case and Screen (To Be Performed As Needed)

Clean the case and screen using a lint-free cloth dampened with 70% isopropyl alcohol, mild liquid 
soap and water, or a 10% bleach solution. DO NOT wipe the vents underneath the power button or 
the USB/power/Ethernet ports.

Replacing the Batteries

The analyzer uses two different types of batteries:

•  Two 3.7 V DC, 2,600 mAh batteries
•  One 3 V DC, 48 mAh button cell battery

Note:

 IDEXX recommends replacing all batteries at the same time. Contact IDEXX Laboratories to 

obtain replacement batteries. 

This symbol is placed in accordance with the European Union Directive 2002/96 on the 
Waste Electrical and Electronic Equipment (the WEEE Directive). If disposed of within 
the European Union, this product should be treated and recycled in accordance with 
the laws of your jurisdiction implementing the WEEE Directive. For additional information, 
visit idexx.com/weee.

To Replace the Two 3.7 V DC, 2,600 mAh Batteries

1.  Power off and unplug the analyzer.
2.  Open the battery compartment on the back of the analyzer by 

pressing down on the latch on the top of the door. 

3.  Remove the two batteries from the compartment.
4.  Insert two new batteries, 

negative end first

, into the 

compartment.

5.  Close the battery compartment.

Note:

 It will take up to 8 hours to fully charge the analyzer (the 

status light will turn green when fully charged). The analyzer may 
be used while charging.

Maintenance and Troubleshooting

Содержание SNAP Pro

Страница 1: ...SNAP Pro Analyzer Operator s Guide...

Страница 2: ...industrial property rights covering this document or subject matter in this document The furnishing of this document does not give a license to these property rights except as expressly provided in a...

Страница 3: ...onnected to an IDEXX VetLab Station 8 Confirming Results 9 Viewing Test Results 9 Modifying the Preferences 10 Changing the ProRead Settings 10 Changing the Connection Settings 10 Viewing Past Notific...

Страница 4: ...he IDEXX VetLab Station helps you attain a comprehensive picture of your patient s health with the ability to view test results from multiple analyzers on a single report determine disease progression...

Страница 5: ...n snap into place 3 Connect the power cord to the analyzer and an appropriate electrical outlet The status light should appear steady yellow Note It will take up to 8 hours to fully charge the analyze...

Страница 6: ...analyzer is being used cordlessly or plugged into an electrical outlet corded When the status light appears And is The analyzer Green Solid Has interpreted that all results on the test are negative O...

Страница 7: ...power button until you hear a beep To Power the Analyzer Off Hold the power button for 3 seconds and release when you hear a beep Charging the Analyzer The analyzer will charge automatically when it...

Страница 8: ...analyzer activates the test and then a countdown timer displays When analysis is complete results are shown on the results screen and are sent to the IDEXX VetLab Station automatically Tip The color...

Страница 9: ...lts tap the Check Mark icon The results will then be saved on the analyzer and sent to the IDEXX VetLab Station if applicable Note To cancel the test and return to the Home screen tap the Close icon V...

Страница 10: ...etwork and select the IDEXX network OR Tap No if you do not want to connect the analyzer to an IDEXX VetLab Station 3 Tap the Home icon to return to the Home screen Viewing Past Notifications 1 At the...

Страница 11: ...ettings and then tap Time 2 If you want to change the time format select a new format underneath the current time display 3 Use the numeric keypad to change the time if necessary 4 Tap the Home icon t...

Страница 12: ...il you the updated software for the analyzer For detailed upgrading instructions see the insert included with the upgrade USB drive Cleaning the Internal Components To Be Performed Weekly or As Needed...

Страница 13: ...ach solution reflectors lens activator axle 5 Clean the 3 white reflectors the axle and the activator using a new lint free wipe or cotton swab dampened with 70 isopropyl alcohol mild liquid soap and...

Страница 14: ...IDEXX Laboratories to obtain replacement batteries This symbol is placed in accordance with the European Union Directive 2002 96 on the Waste Electrical and Electronic Equipment the WEEE Directive If...

Страница 15: ...clude many behind the scenes improvements We also recommend rebooting the analyzer weekly If your software is up to date and rebooting did not resolve your issue consult this section for more informat...

Страница 16: ...e always upgrade the software when prompted Improper sample preparation An anticoagulant was not used with the whole blood sample The pipette provided with the SNAP test was not used to properly measu...

Страница 17: ...use The analyzer base isn t properly locked into place ensure the base is secure and that both fasteners on the base are in the locked position The batteries are in backwards or missing see photo D sh...

Страница 18: ...sumption Operating maximum 5 W Batteries Main Batteries Output 3 7 V DC 2 600 mAh Chemistry Lithium ion Type Portable 18650 Rechargeable Yes Weight 50 0 g Button Cell Battery Output 3 V DC 48 mAh Chem...

Страница 19: ...n the European Union and is strongly encouraged in all other countries If the equipment is used in a manner other than specified the protection provided by the analyzer may be impaired The SNAP Pro An...

Страница 20: ......

Отзывы: