SERVICING
26
Mexico Slimline CF440 -
Installation & Servicing
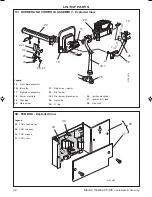
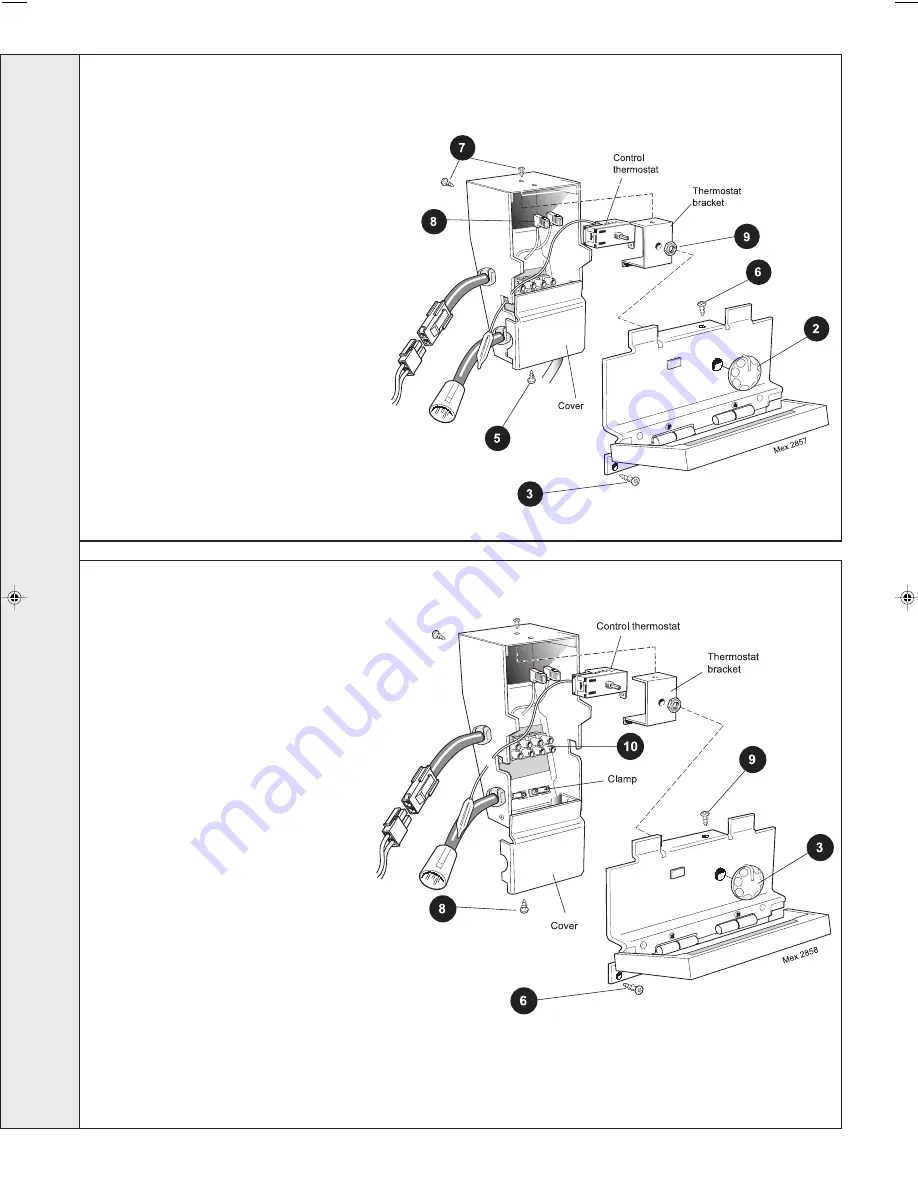
38 CONTROL THERMOSTAT REPLACEMENT
39 CONTROL PANEL REPLACEMENT
1.
Refer to Frame 35.
2.
Remove 2 screws and lift off the front
lower panel. Refer to Frame 29.
3.
Disconnect the in-line connector on the
PCB lead.
4.
Remove the Burner On neon cable from the
back of the control panel.
5.
Pull off the thermostat knob.
6.
Remove the 2 screws and pull down the control
panel tabs clear of the top panel.
7.
Remove the thermostat phial from the pocket.
Refer to Frame 29.
8.
Remove the bottom screw and remove the
cover.
9.
Remove the top screw and ease the control
box off the control panel.
10.
Remove the 2 screws to release the
thermostat bracket.
11.
Disconnect the electrical leads.
12.
Unscrew the thermostat nut to withdraw the thermostat.
13.
Fit the new thermostat and reassemble in reverse order.
1.
Refer to Frame 35.
2.
Remove the 2 screws and lift off the lower
front panel. Refer to Frame 29.
3.
Pull off the thermostat knob.
4.
Disconnect the in-line connector on the PCB
lead.
5.
Remove the Burner On neon cable from the
back of the control panel.
6.
Unscrew the 2 screws and pull down the
control panel so that the 2 tabs clear the top
panel.
7.
Remove the thermostat phial from the
pocket. Refer to Frame 29.
8.
Remove the bottom screw and remove the
cover from the control box.
9.
Remove the top screw and ease the control
box off the control panel.
10.
Disconnect the mains electrical supply from
the terminal strip and release from its
clamp.
11.
Remove the 2 screws to release the
thermostat bracket.
12.
Unplug the in-line connector to the TTB
thermostat.
13.
On the new control box gain access to the
control thermostat as described above.
14.
Reconnect the TTB thermostat lead to the control thermostat and terminal
strip marked 'L
G
'.
15.
Assemble new control box and panel and fit to the casing in reverse order.
SER
VICING
200946-1.p65
3/9/2004, 3:30 PM
26


