background image

INSTALLATION

21

Mexico Slimline CF440 - 

Installation & Servicing

26 GENERAL CHECKS

Make the following checks for correct operation:

1.

Turn the boiler thermostat OFF and ON to check that the
main burner is extinguished and relit in response.

2.

Set the boiler thermostat knob to position 6 and operate
the mains on/off switch.  Check that the main burner lights
and extinguishes in response.

3.

Check that the programmer, if fitted, and all other system
controls function correctly.

Operate each control separately and check that the main
burner or circulating pump (as the case may be)
responds.

4. Water Circulation System

a.

With the system HOT, examine all water connections
for soundness.

b.

With the system still hot, turn off the gas, water and
electricity supplies to the boiler and drain down, in
order to complete the flushing process.

c.

Refill and vent the system, clear all air locks and again
check for water soundness.

d.

Balance the system.

5.

Finally, set the controls to the user's requirements and
refit the lower panel and close the controls door.

1.

Hand the User's Instructions to the householder and
explain his or her responsibilities under the current Gas
Safety (Installation and Use) Regulations or rules in force.

2.

Draw attention to the lighting instruction label affixed to the
inside of the controls door.

3.

Explain and demonstrate the lighting and shutting down
procedures including the function of the TTB downdraught
thermostat.

4.

The operation of the boiler and the use and adjustment of
ALL system controls should be fully explained to the
householder,  to ensure the greatest possible fuel
economy consistent with household requirements of both
heating and hot water consumption.

Advise the User of the precautions necessary to prevent
damage to the system and to the building, in the event of
the system remaining inoperative during frosty conditions.


5.

Explain the function and the use of the boiler thermostat
and external controls.

Notes.

a.

If an optional programmer kit is fitted refer to the
separate Programmer Kit Installation Instructions
and User's Instructions.

b.

The temperatures quoted below are approximate
and vary between installations.

27 HANDING OVER

After completing the installation and commissioning of the system the
installer should hand over to the householder by the following actions:

6.

Explain and demonstrate the function of time and
temperature controls, radiator valves etc.,  for the
economic use of the system.

7.

If an optional Programmer Kit is fitted then draw attention
to the Programmer User's Instructions and hand them to
the householder.

8. After installation, commissioning and customer hand-

over please complete the 

 appliance log

book and leave this with the customer.  For IE, it is
necessary to complete a "Declaration of Conformity" to
indicate compliance to I.S. 813:2002.

9.

Stress the importance of regular servicing by a CORGI
registered installer and that a comprehensive service
should be carried out AT LEAST ONCE A YEAR.  In IE
servicing work must be carried out by a Competent
Person.

Thermostat

Flow Temperature

Knob Setting

0

C

0

F

1

54

130

2

60

140

3

66

150

4

71

160

5

77

170

6

82

180

INST

ALLA

TION

200946-1.p65

3/9/2004, 3:30 PM

21

Содержание Mexico Slimline CF440

Страница 1: ...ers guide ENGINEERED FOR PEACE OF MIND When replacing any part on this appliance use only spare parts that you can be assured conform to the safety and performance specification that we require Do not use reconditioned or copy parts that have not been clearly authorised by Ideal Boilers CF440 December 2003 UIN 200 946 A01 ...

Страница 2: ...s appliance care should be taken when handling edges of sheet steel components Table 2 Performance Data Key to symbols GB United Kingdom IE Ireland Countries of destination PMS Maximum operating pressure of water B11BS An appliance designed for connection to a flue discharging the products of combustion outside the room with air for combustion being drawn directly from the room where the appliance...

Страница 3: ... only Scale reducer n a Hot water mode Heat input n a Max operating burner pressure n a Max operating water pressure n a Cold water inlet temp n a Hot water outlet temp n a Water flow rate at max setting n a For condensing boilers only Condensate drain n a For all boilers complete sign hand over to customer For GB to comply with Building Regulations Part L1 Part J in Scotland the boiler should be ...

Страница 4: ...ot water systems small bore and microbore domestic central heating systems BS 5546 Installation of gas hot water supplies for domestic purposes 2nd Family Gases BS 5440 1 Flues for gas appliances of rated input not exceeding 60 kW BS 5440 2 Ventilation for gas appliances of rated input not exceeding 60 kW BS 7593 Treatment of water in Domestic Hot Water Central Heating Systems Health and Safety Do...

Страница 5: ...pliance LOCATION OF BOILER The boiler must be installed on a flat and level floor capable of adequately supporting the weight of the boiler and any ancillary equipment The boiler may be fitted on a combustible floor Insulation is not necessary unless required by the local authority The boiler must not be fitted outside The boiler must not be installed in a bedroom or in a room containing a bath or...

Страница 6: ...3 If twin walled flue pipe is used it should be of a type acceptable to British Gas 4 If a chimney is to be used it should preferably be one that is composed of or lined with a non porous acid resistant material Notes Chimneys lined with salt glazed earthenware pipes are acceptable if the pipes comply with BS 65 and BS 5440 1 2000 A flue pipe constructed from one of the materials listed in 2 a c s...

Страница 7: ... a double pole switch having a 3mm 1 8 contact separation in both poles or a plug and socket serving only the boiler and system controls The means of isolation must be accessible to the user after installation VENTILATION IN SERIES In installations requiring 2 ventilators to be fitted in series e g across a cavity wall EACH ventilator should be sized in accordance with the above data Where there a...

Страница 8: ...r If in any doubt contact Caradon Ideal Limited 3 MINIMUM REQUIREMENTS Fully pumped systems 4 GRAVITY HOT WATER PUMPED CENTRAL HEATING 1 Separate flow and return connections are used for each service All possible configurations are given in Frame 1 but ONLY those shown should be used 2 The use of a cylinder thermostat is recommended This will prevent excessive DHW temperatures and thus reduce gas ...

Страница 9: ... Expansion Vessel a A diaphragm type expansion vessel must be connected at a point close to the inlet side of the pump the connecting pipe being not less than 15mm 1 2 nominal size and not incorporating valves of any sort b The vessel capacity must be adequate to accept the expansion of the system water when heated to 110 o C 230 o F c The charge pressure must not be less than the static water hea...

Страница 10: ...op valve with an automatic air vent connected between them the stop valve being located between the system and the automatic air vent The stop valve may remain open during normal operation of the system if automatic water make up is required b Through a self contained unit comprising a cistern pressure booster pump if required and if necessary an automatic pressure reducing valve and flow restrict...

Страница 11: ...Y Exploded View LEGEND 1 Heat exchanger 6 Thermostat pocket 16 Front plate assembly 18 Burner manifold 20 Main burner 24 Gas valve 28 Gas cock 29 PCB box insulation not shown for clarity 44 1 TTB downdraught stat bracket 46 Boiler feet assembly 49 Flue baffle 66 Thermostat 68 Retaining clip 69 Split pin 95 Draught diverter assy INSTALLATION ...

Страница 12: ...the in line connector on the PCB lead 4 Remove the Burner On neon cable from the back of the control panel 5 Unplug the in line connector to the TTB thermostat 6 Remove the 2 screws securing the control panel and disengage the panel by lowering and pulling it forward In order to remove the control panel entirely the TTB thermostat in line connector has to be unplugged 7 Remove the 2 screws securin...

Страница 13: ...sition any gas and water connections at the rear of the boiler should be prepared due to the possible lack of access 1 Fully pumped systems using more than 1 pump serving separate zones must have a common return connection to the boiler 2 Select the desired pumped flow tapping 3 Connect pipe fittings to the rear tappings and plug any unused tappings 4 Place the boiler in position Note The pump may...

Страница 14: ...low and return pipework to the boiler as appropriate Refer to Frames 3 and 4 for guidance on system design 2 Ensure that all valves are open Fill and vent the system and check for water soundness 13 WATER CONNECTIONS 1 A MINIMUM working gas pressure of 20 mbar 8 in w g MUST be available at the boiler inlet with the boiler operating 2 Extend a gas supply pipe NOT LESS THAN 15mm 1 2 OD to the boiler...

Страница 15: ... Table 16 16 INTERNAL WIRING Flow and pictorial wiring diagrams are shown in Frames 17 and 18 1 Remove the securing screw and lift off the control box cover 2 Route the electrical leads into the box and wire into the terminal strip as shown Notes a Secure each lead with one of the cable clamps b The mains lead connection MUST be made so that should the lead slip from its anchorage the current cond...

Страница 16: ...ow and also Frame 18 Difficulty in wiring should not arise providing the following directions are observed 1 Controls that switch the system ON and OFF e g a time switch MUST be wired in series in the live mains lead to the boiler 2 Controls that override an ON OFF control e g a frost thermostat MUST be wired into the mains lead in parallel with the control s to be overridden Refer to Frame 20 TTB...

Страница 17: ...th wires are omitted for clarity Ensure proper earth continuity when wiring 2 Numbering of terminals on thermostats is specific to the manufacturer indicated 3 This is a fully controlled system set the boiler thermostat to maximum 4 Switchmaster Midi is similar in operation but the wiring differs slightly see manufacturer s literature MEX 2132 Room Thermostat Terminal Mid Position valve details Cy...

Страница 18: ... MUST be left in the running position The frost stat should be sited in a cold place but where it can sense heat from the system Wiring should be as shown with minimal disturbance to other wiring of the programmer Designation of the terminals will vary but the programmer and thermostat manufacturer s leaflets will give full details Diagram A shows a double pole frost thermostat which should suffic...

Страница 19: ...he required gas soundness test and purging air from the gas installation open all windows and doors extinguish naked lights and DO NOT SMOKE 23 FITTING THE CASING MEX 2281 3 1 4 7 1 Offer up the LH side panel and secure the panel to the baseplate and heat exchanger 2 Repeat step 1 to refit the RH side panel 3 Place the top panel on top of the side panels 4 Secure the top panel to the side panels I...

Страница 20: ...nce continuing until the pilot is established The main burner will then cross light smoothly If this sequence does not occur refer to the Fault Finding section 6 Test for gas soundness around ALL boiler gas components using leak detection fluid 7 Operate the boiler for 10 minutes to stabilise the burner temperature 8 The boiler is preset at the factory If the burner setting requires adjustment rem...

Страница 21: ... use and adjustment of ALL system controls should be fully explained to the householder to ensure the greatest possible fuel economy consistent with household requirements of both heating and hot water consumption Advise the User of the precautions necessary to prevent damage to the system and to the building in the event of the system remaining inoperative during frosty conditions 5 Explain the f...

Страница 22: ...serviced as necessary The frequency of servicing will depend upon the installation condition and usage but should be carried out at least annually It is the law that any service work must be carried out by a CORGI registered installer In IE servicing work must be carried out by a Competent Person a Light the boiler and carry out a pre service check noting any operational faults b Clean the main bu...

Страница 23: ...UST NOT be used 3 Remove the main burner injector Check clean or replace as required 4 Refit the injector using an approved jointing compound 32 CLEANING THE FLUEWAYS 30 BURNER AND CONTROLS ASSEMBLY 2 1 MEX 2286 MEX 2285 1 Remove the 2 screws and lift off the front panel and remove the grille assembly from the casing Refer to Frame 29 2 Disconnect the electrical leads from the gas valve 3 Disconne...

Страница 24: ...he flue baffle into the boiler flueway ensuring that it is correctly repositioned Refer to Frame 10 2 Refit the flue cleanout cover renewing any damaged or deteriorating sealing gasket 3 Refit the casing top panel 4 Check the sightglass in the front plate clean or renew as necessary 5 Renew any damaged or deteriorating front plate gasket 6 Refit the burner and controls assembly 1 Pilot Pressure Pi...

Страница 25: ...the front plate 3 Fit the new sightglass and reassemble as shown 4 Retighten the 2 wing nuts to ensure an airtight seal Do NOT overtighten 1 Refer to Frame 35 2 Undo the 2 screws lift off the front panel and remove the grille assembly Refer to Frame 29 3 Disconnect the electrical leads from the gas valve 4 Disconnect the ignition lead from the PCB 5 Undo the gas cock union Remove the 2 wing nuts a...

Страница 26: ...reverse order 1 Refer to Frame 35 2 Remove the 2 screws and lift off the lower front panel Refer to Frame 29 3 Pull off the thermostat knob 4 Disconnect the in line connector on the PCB lead 5 Remove the Burner On neon cable from the back of the control panel 6 Unscrew the 2 screws and pull down the control panel so that the 2 tabs clear the top panel 7 Remove the thermostat phial from the pocket ...

Страница 27: ...placement polarity is not important 9 Fit the new thermostat ensuring that the alignment peg on the thermostat sits in the small hole adjacent to the main fixing hole 10 Reassemble in reverse order 11 Replace the lower front panel and secure with the 2 fixing screws 12 Check the operation of the boiler 1 Refer to Frame 35 2 Remove the 2 screws lift off the front panel and remove the grille assembl...

Страница 28: ...ws lift off the lower front panel then remove the grille assembly Refer to Frame 29 3 Disconnect the electrical leads from the gas valve 4 Disconnect the ignition lead from the PCB 5 Undo the gas cock union Remove the 2 wing nuts and withdraw the burner and controls assembly complete from the boiler 6 Undo the nut securing the pilot bracket to the main burner and remove the pilot bracket 7 Remove ...

Страница 29: ...old 9 Fit the new injector using an approved jointing compound and reassemble in reverse order 1 Refer to Frame 35 2 Remove the 2 screws lift off the lower front panel then remove the grille assembly Refer to Frame 29 3 Disconnect the electrical leads from the gas valve 4 Disconnect the ignition lead from the PCB 5 Undo the gas cock union Remove the 2 wing nuts and withdraw the burner and controls...

Страница 30: ...ostat bracket and lead down the side of the boiler 7 Locate and fit the new TTB downdraught thermostat bracket and lead and reassemble in reverse order ensuring that the in line connector is secured 1 Refer to Frame 35 2 Remove the 2 screws and lift off the lower front panel Refer to Frame 29 3 Undo the PCB cover fixing screws and remove the cover 4 Remove the HT lead from the PCB 5 Remove the 6 p...

Страница 31: ...Thermostat knob 1 111 904 When ordering spares please quote 1 Boiler model 2 Appliance G C number 3 Description 4 Quantity 5 Product no The following are parts commonly required as replacement components due to damage or expendability Their failure or absence is likely to affect safety or performance of this appliance The list is extracted from the British Gas List of Parts which contains all avai...

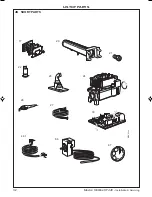
Страница 32: ...LIST OF PARTS 32 Mexico Slimline CF440 Installation Servicing 48 SHORT PARTS MEX 2242 17 20 22 21 24 23 26 27 30 66 67 44 1 ...

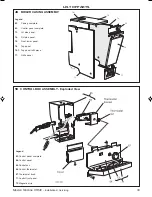
Страница 33: ...mplete 73 LH side panel 74 RH side panel 75 Front lower panel 76 Top panel 76 1 Top panel infill piece 77 Grille panel 76 75 77 73 74 63 MEX 2239 76 1 50 CONTROL BOX ASSEMBLY Exploded View Legend 63 Control panel complete 64 Control panel 65 Control box 66 Control thermostat 67 Thermostat knob 71 Control front panel 72 Magnetic strip ...

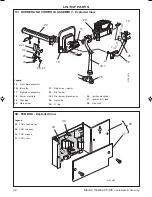
Страница 34: ...ghtglass assembly 18 Burner manifold 19 Pilot pipe 20 Main burner 21 Main burner injector 22 Pilot burner 22 1 Pilot burner bracket assy 24 Gas valve 25 O ring 51 BURNER AND CONTROLS ASSEMBLY Exploded View 26 Ignition electrode 27 Ignition HT lead 28 Gas cock 52 PCB BOX Exploded View Legend 29 PCB chassis assy 30 PCB sub assy 34 PCB support 37 PCB cover MEX 2257 34 30 37 29 ...

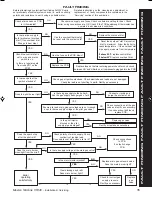
Страница 35: ...erheat stat Has the fuse on the PCB blown Reset the overheat stat Set control stat to maximum Allow the boiler to reach temperature if the overheat stat trips again measure flow temperature If above 90 C replace control stat If below 90 C replace overheat stat YES Is there a spark at the ignition electrode Does the pilot burner light NO Is there a gas supply to the boiler has the gas supply been p...

Страница 36: ...of first class training courses for domestic commercial and industrial heating installers engineers and system specifiers For details of courses please ring 01482 498 432 THIS SYMBOL IS YOUR ASSURANCE OF QUALITY These appliances are designed for use with Natural Gas only They have been tested and conform with the provisions of BS 6332 and BS 5258 CERTIFIED PRODUCT Manufactured under a BS EN ISO 90...

Отзывы: