


42
Figure 4-33
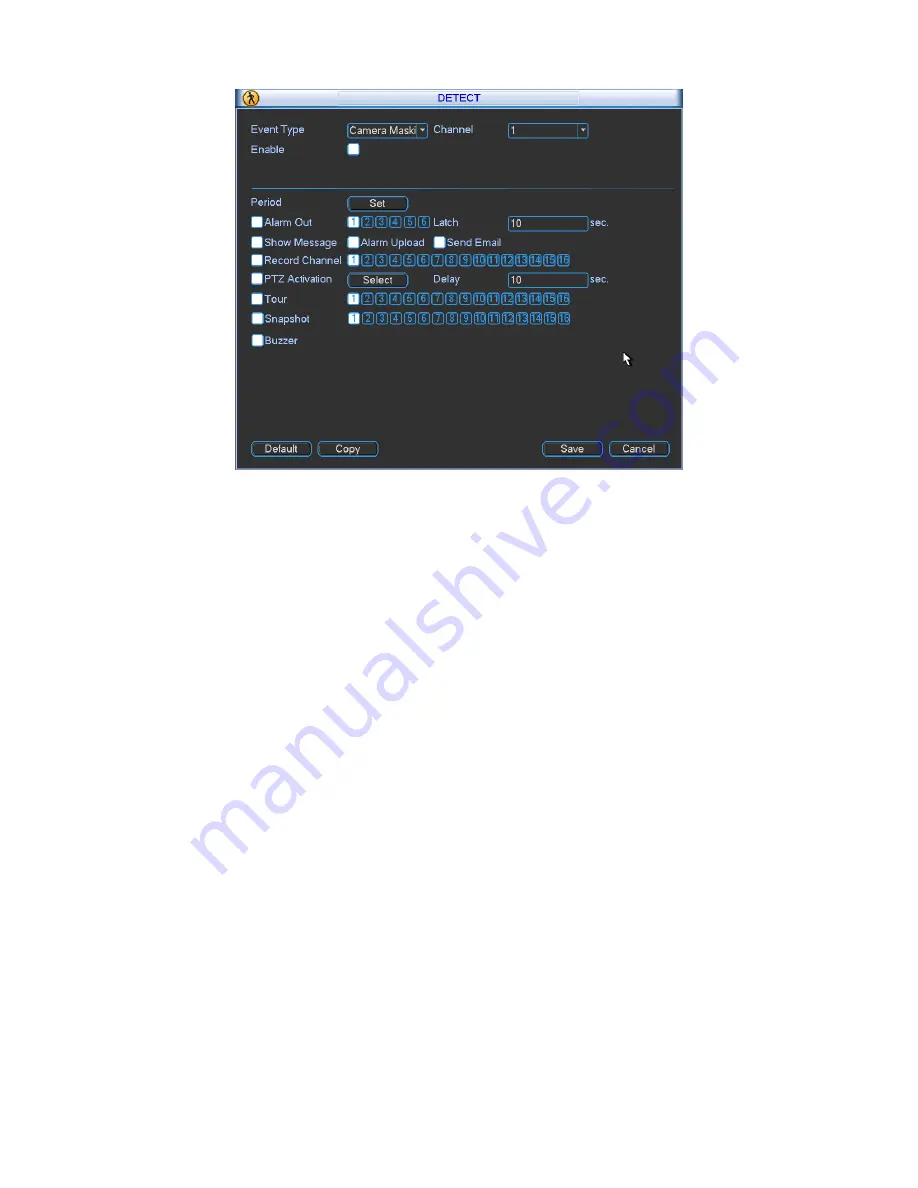
4.7
Alarm Setup and Alarm Activation
Before operation, please make sure you have properly connected alarm devices such as
buzzer.
4.7.1 Go to alarm setup interface
In the main menu, from Setting to Alarm, you can see alarm setup interface. See Figure 4-34.
4.7.2 Alarm setup
Alarm interface is shown as below. See Figure 4-34.
Alarm in: Here is for you to select channel number.
Event type: There are two types. One is local input and the other is network input.
Type: normal open or normal close.
PTZ activation: When an alarm occurred, system can activate the PTZ operation. The PTZ
activation lasts an anti-dither period.
In the Pan/Tilt/Zoom interface (Main menu->Setting-> Pan/Tilt/Zoom), please set video
channel, speed dome protocol and etc.
Select the channel of current speed dome as current monitor video and the right click
mouse to select Pan/Tilt/Zoom item. Now you can set preset, tour pattern.
In Figure 4-34, click
“select” button, you can see an interface is shown as in Figure 4-35.
Here you can set the activation operation such as preset tour, pattern and enable.
Period: Click set button, you can see an interface is shown as in Figure 4-36. Here you can
set for business day and non-business day. In Figure 4-36, click set button, you can see an
interface is shown as in Figure 4-37. Here you can set your own setup for business day and
non-business day.
Anti-dither: Here you can set anti-dither time. The value ranges from 5 to 600s. The anti-
dither time refers to the alarm signal lasts time. It can be seem as the alarm signal activation
stays such as the buzzer, tour, PTZ activation, snapshot, channel record. The stay time
Содержание MAX5XXD Series
Страница 1: ...ICRealtime MAX5XXD Series Standalone DVR User s Manual Version 6 0 0 ...
Страница 48: ...38 Figure 4 25 Figure 4 26 Figure 4 27 ...
Страница 49: ...39 Figure 4 28 Figure 4 29 Figure 4 30 ...
Страница 54: ...44 Figure 4 34 Figure 4 35 Figure 4 36 ...
Страница 62: ...52 Figure 4 52 ...
Страница 66: ...56 Figure 5 3 Figure 5 4 Figure 5 5 Figure 5 6 ...
Страница 68: ...58 Please highlight icon to select the corresponding function Figure 5 8 Figure 5 9 Figure 5 10 ...
Страница 74: ...64 Figure 5 16 Figure 5 17 Figure 5 18 5 3 5 3 NTP Setup ...
Страница 115: ...105 Figure 6 11 ...
Страница 141: ...131 Figure 7 39 Figure 7 40 Figure 7 41 Please refer to the following sheet for detailed information ...
Страница 185: ...175 Maxtor DiamondMax 20 STM3250820AS 250G SATA ...


