IBM Bull Escala E5-700 Скачать руководство пользователя страница 21

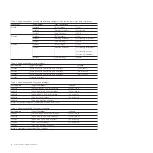
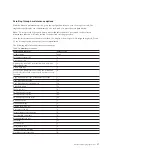
Table 6. LTO Ultrium data cartridges

Part Number

Type of Cartridge

Length

08L9120

100/200GB LTO Ultrium 1 Data
Cartridge

610 m (2000 ft )

08L9870

200/400GB LTO Ultrium 2 Data
Cartridge

610 m (2000 ft )

24R1922

LTO-3 Data Cartridge (400GB/800GB)

96P1203

LTO-3 Worm Data Cartridge

95P4436

LTO-4 Data Cartridge (800GB/1.6TB)

95P4450

LTO-4 Worm Data Cartridge

45E1129

LTO-4 Test Cartridge

24R0395

LTO Gen-2 Test Cartridge

610 m (2000 ft )

35L2086

Universal Cleaning Cartridge

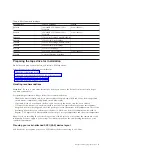
Preparing the tape drive for installation

Find what you need to know before you install a SCSI tape drive.

Select the appropriate information from this list:

v

“Handling recommendations”

v

“Planning your serial-attached SCSI (SAS) device layout”

v

“Configuring the tape drive” on page 10

v

“Updating microcode levels” on page 10

Handling recommendations

Attention:

Be sure to read these instructions before you remove the device from its anti-static bag or

any time you handle it.

For optimum performance, always follow these recommendations:

v

Handle the drive carefully and by its external metal chassis. Keep your hands away from the printed
circuit boards, components, and printed circuit (flex) cables.

v

If possible, work on a cushioned surface, and do not drop the device onto the work surface.

v

If you move the device to an environment that is colder or warmer than its previous environment,
keep the drive in its package and allow the package to reach the current room temperature. This action
prevents potential data loss or damage to the device. Allow one hour of acclimatization for each 10
degrees C (18 degrees F) difference between the ship or storage temperature and the room temperature.

Note:

If you are installing the auto-docking version of this device on your system, the remainder of this

information does not apply to your system. For information about the auto-docking feature, see your
system documentation.

Planning your serial-attached SCSI (SAS) device layout

SAS devices do not require you to set a SCSI address before connecting to a SAS bus.

Chapter 2. Managing tape drives

9

Содержание Bull Escala E5-700

Страница 1: ...Managing Devices for the M6 700 or M7 700 ESCALA Power7 REFERENCE 86 A1 84FF 00...

Страница 2: ......

Страница 3: ...ing models Bull Escala E5 700 Power 750 8233 E8B Bull Escala M6 700 Power 770 9117 MMB Bull Escala M7 700 Power 780 9179 MHB References to Power 755 8236 E8C models are irrelevant Hardware March 2010...

Страница 4: ...m is provided at the end of this book for this purpose To order additional copies of this book or other Bull Technical Publications you are invited to use the Ordering Form also provided at the end of...

Страница 5: ...20 and 6279 29 Loading and unloading cartridges 30 Loading a cartridge 30 Unloading a cartridge 30 Setting the write protect switch FC 6279 30 Status lights FC 6279 31 Performing the internal self tes...

Страница 6: ...tape drive 68 Chapter 3 Managing DVD drives 69 SATA Slimline DVD RAM Drive FC 5762 69 Handling and storing the DVD media 69 Opening a DVD tray manually 70 DVD RAM type II disc 70 Chapter 4 Managing di...

Страница 7: ...the publications package shipped with the product The booklet contains the safety information in your national language with references to the U S English source Before using a U S English publicatio...

Страница 8: ...y equipment that will be attached to this product to properly wired outlets v When possible use one hand only to connect or disconnect signal cables v Never turn on any equipment when there is evidenc...

Страница 9: ...e customer to ensure that the outlet is correctly wired and grounded to prevent an electrical shock CAUTION v Do not install a unit in a rack where the internal rack ambient temperatures will exceed t...

Страница 10: ...u choose can support the weight of the loaded rack cabinet Refer to the documentation that comes with your rack cabinet for the weight of a loaded rack cabinet v Verify that all door openings are at l...

Страница 11: ...This product might contain one or more of the following devices CD ROM drive DVD ROM drive DVD RAM drive or laser module which are Class 1 laser products Note the following information v Do not remove...

Страница 12: ...suitable for installation in the following v Network telecommunications facilities v Locations where the NEC National Electrical Code applies The intrabuilding ports of this equipment are suitable for...

Страница 13: ...t has changed in Managing devices since the last edition of this topic March 2010 v Added information on Handling and storing the DVD media February 2010 v Added information for IBM Power Systems serv...

Страница 14: ...2 Power Systems Managing devices...

Страница 15: ...rive is a streaming device used primarily for v Saving and restoring system data files v Archiving important records v Distributing operating system software upgrades Note The following information de...

Страница 16: ...this surface builds up and causes errors in reading and writing Customers are responsible to clean the tape drive in accordance with the cleaning information that was provided with the tape drive Cle...

Страница 17: ...n the IBM specified cleaning cartridge can damage your device and might void your warranty To order additional cartridges refer to Ordering tape cartridges Recommendations for data cartridge usage The...

Страница 18: ...a tape cartridge let it acclimatize to the operating environment by placing the cartridge in the operating environment for as long as it has been away from the environment or for 24 hours whichever is...

Страница 19: ...Do not use any tape for archival purposes if it has been used outside of the ranges specified in Table 1 on page 6 for an extended period of time The magnetic and physical strength of the tape will ha...

Страница 20: ...artridge 150 m 492 ft 18P6484 60 GB AME with SmartClean Data Cartridge 225 m 738 ft 35L1409 Cleaning Cartridge Table 4 Recommended VXA X type data cartridges Part Number Type of Cartridge Length 24R21...

Страница 21: ...u handle it For optimum performance always follow these recommendations v Handle the drive carefully and by its external metal chassis Keep your hands away from the printed circuit boards components a...

Страница 22: ...t system configuration v Operation Streaming v Form Factor 5 25 inch half high v Attributes required One 1 6 inch 41 mm half high media bay and one integrated internal SAS controller Tools The followi...

Страница 23: ...second You are in maintenance mode when the light becomes solid amber and 0 appears in the single character display Scroll through the maintenance functions While in maintenance mode push the eject b...

Страница 24: ...ing1 Wait 30 to 60 seconds After Power On Self Test and drive reset 2 3 0 seconds on2 3 0 seconds on2 3 0 seconds on2 Wait 30 to 60 seconds No cartridge is loaded Off Off or on3 Off or C3 Wait 30 to 6...

Страница 25: ...le expired cleaning cartridge SAS interface failure Off Flashing1 8 Check SAS cable and connector Recoverable drive error 8 Off On A Clean drive and retry operation Incorrect media Off On J Insert cor...

Страница 26: ...rtridge is inserted v The drive is powered off and on 6 A drive dump will be stored before the drive is powered off The SCD light serves as a dump indicator When this light is lit a dump file is store...

Страница 27: ...system I O error occurs that is related to the device Attention Use only the recommended cleaning cartridge to clean the tape drive Use of other than recommended cleaning cartridges can damage your dr...

Страница 28: ...ce provider To determine how many times a cleaning cartridge can be used check the information printed on the cartridge If you attempt to use a depleted cleaning cartridge the fault indicator will be...

Страница 29: ...ons Display code Normal mode None Exit maintenance mode 0 Drive diagnostics 1 Update drive microcode from the firmware microcode release FMR tape 2 Create FMR tape 3 Force a drive dump same as pressin...

Страница 30: ...might need to reset your tape drive Use the procedure in this topic to perform this task Use this information to reset your tape drive without affecting server operation Allow up to 2 minutes for the...

Страница 31: ...dge that is not damaged See Table 11 v If a cleaning cartridge is inserted while the drive is in diagnostic mode it will be ejected While self testing is in progress the LEDs will remain active and th...

Страница 32: ...ion processing large databases and other storage intensive applications Each tape cartridge can store up to 200 GB of data uncompressed or up to 400 GB of data compressed assuming a 2 to 1 compression...

Страница 33: ...cartridge into the opening on the front of the drive until the loading mechanism pulls the cartridge into the drive After the cleaning cartridge has been inserted the remainder of the cleaning process...

Страница 34: ...dges into magazines set the write protect switch of each cartridge to enable or disable data recording When the switch is set to the left data can be written to the tape When the switch is set to the...

Страница 35: ...lights and their definitions are shown in the following table Table 12 Definition of Status Light Combinations Operation Ready Activity Cleaning Fault Power On LED Test1 On for 2 0 seconds On for 2 0...

Страница 36: ...or unloading Off Flashing On3 Off Off Unrecoverable drive failure On Off Off On3 Off Flashing5 Firmware download is in progress Flashing Off On3 Off Off Firmware update is in progress Flashing Flashi...

Страница 37: ...ctive cartridge media or cartridge state and will require the drive to eject the cartridge if possible to clear the flashing LED 6 The firmware download failed and the drive is not functional The driv...

Страница 38: ...unction to complete Note A solid amber Cleaning LED light indicates that the reset is complete but the tape unit requires cleaning Clean the tape unit by inserting an IBM Universal LTO Cleaning Cartri...

Страница 39: ...operating mode To reenter diagnostic mode return to step 1 v While self testing is in progress the Ready LED continues to flash The following three test steps are performed The initialization sequence...

Страница 40: ...is a 5 25 inch half high Ultra2 LVD 16 bit tape drive which provides a high capacity for save restore and achieve functions This tape drive uses VXA tape data cartridges and is capable of compression...

Страница 41: ...ill turn on the cleaning required LED to indicate the drive needs cleaning The tape drive will continue to operate but it is recommended the tape drive be cleaned at the next opportunity to insert a c...

Страница 42: ...ge into the opening on the front of the device until the loading mechanism pulls the cartridge into the drive and the drive door closes To indicate that the load operation was successful the Ready sta...

Страница 43: ...When the switch is set to the left data can be written to and read from the tape 2 When the switch is set to the right data can only be read Status lights FC 6279 You might need to read the status li...

Страница 44: ...Off Cartridge loading or unloading2 Off Flashing On2 Off Off Unrecoverable drive failure3 On Off Off On2 Off Flashing3 Firmware Download Flashing Off On2 Off Off Firmware Update Flashing Flashing On2...

Страница 45: ...drive with firmware code V2123 or higher or one VXA 320 tape drive with firmware V3209 or higher v One VXA cleaning cartridge X style v One blank VXA X23 data cartridge Performing the test Follow thes...

Страница 46: ...by this tape drive v X cartridges are the newer version of the VXA cartridge v V cartridges are the original VXA cartridge The V and X cartridges have similar shells and come in a variety of tape leng...

Страница 47: ...pacity for save restore and achieve functions This tape drive uses VXA tape data cartridges and is capable of compression providing a capacity of up to 160 GB Characteristics v FRU part number 19P4898...

Страница 48: ...rs are defined as the time that the tape drive is moving tape If the tape drive reaches 75 tape motion hours since the tape drives was last cleaned the drive will turn on the cleaning required LED to...

Страница 49: ...1 Make sure that the tape device power is on 2 Grasp the cartridge by the outer edges with the window side up and the write protect switch facing you Note Make sure that the write protect switch is c...

Страница 50: ...pe or the drive The position of the write protect switch on the tape cartridge determines when you can write to the tape 1 When the switch is set to the left data can be written to and read from the t...

Страница 51: ...the following table Table 19 Definition of status light combinations Operation Ready Activity Cleaning Fault Power on self test1 Flashing Off Off Off Power On LED Test On for 2 0 seconds On for 2 0 s...

Страница 52: ...n is applied An unrecoverable drive failure is usually the result of a hardware error condition One of the following actions will be needed to clear the flashing Fault LED v Hard SCSI reset v Cartridg...

Страница 53: ...are required If the internal self test indicates a drive failure contact your service provider Table 20 Internal self test status light combinations Internal self test operation Ready Activity Cleani...

Страница 54: ...ape cartridges Table 21 X tape cartridges Part Number Description Type Other information 24R2137 230m 80 160GB X23 Data Cartridge Green accent 24R2136 124 m 40 80GB X17 Data Cartridge Green accent 24R...

Страница 55: ...2 16 bit Low Voltage Differential LVD Single ended SE Asynchronous Synchronous v Compatibility Contact your authorized service provider v Attributes provided 60 150GB 16 bit 8 mm Internal Tape Drive v...

Страница 56: ...h time the cartridge is used mark one of the dots on the cartridge with a pen or marker When all of the dots have been marked discard the cleaning cartridge 3 Grasp the cleaning cartridge by the outer...

Страница 57: ...might take from 15 seconds to several minutes depending on the position of the tape and the amount of data written During this task the status lights do the following sequence v The Ready status light...

Страница 58: ...in the REC Record position 2 data can be written to and read from the tape Status lights FC 6134 You might need to read the status lights on your tape drive to determine the operating status of the d...

Страница 59: ...s light combinations Operation Ready Activity Fault POST or Reset On On On Error or Failed POST Off Off Flash Ready No Cartridge Loaded Off Off Ready Cartridge Loaded On Off Normal Cartridge Motion On...

Страница 60: ...eration The drive will then be ready to use 36 72 GB Data72 4 mm internal tape drive FC 6258 or 5907 Learn about the features of this media device Description The 36 72 GB Data72 4 mm Internal Tape Dr...

Страница 61: ...lated information Your package contains the following items v The tape drive v Media kit containing 1 cleaning cartridge 1 test tape Jumpers located in a plastic bag v Specific hardware for attaching...

Страница 62: ...g process Note If the cleaning operation completes but the Fault light remains on repeat the cleaning procedure with a new cleaning cartridge If the light still remains on contact your authorized serv...

Страница 63: ...ss fails The emergency eject and reset feature procedure might result in loss of data To perform an emergency eject operation of the tape cartridge or a reset operation of the drive press and hold the...

Страница 64: ...r 6 Unload Reset button The status lights and their ISO symbols are on the device as follows Ready Activity Fault The combinations of the lights and their definitions are shown in the following table...

Страница 65: ...light is off no tape movement is occurring On Flashing Off or On The tape is in motion and the device is running an operation or is cleaning Off Off Flashing The device detected an internal fault that...

Страница 66: ...tridge To correctly erase a 4mm data cartridge with a bulk eraser device the erasure coercivity rating must be a minimum of 3900 Oersted Resetting the tape drive You might need to reset your tape driv...

Страница 67: ...ternal SAS Tools The following tools and documentation are needed to complete the installation v A flat blade screwdriver if this device is not an auto docking feature on your system v Your system uni...

Страница 68: ...nt In extreme low humidity conditions of less than 15 relative humidity the tape drive might request cleaning every 10 tape motion hours or even more frequently For this reason it is best not to use t...

Страница 69: ...5 seconds to several minutes depending on the position of the tape and the amount of data written During this task the status lights do the following sequence v The Ready status light turns off v The...

Страница 70: ...etermine the operating status of the drive Use the information in this topic to perform this task The following illustration is a front view of the tape drive 1 Cleaning LED amber 2 Media fault LED am...

Страница 71: ...ing Cleaning succeeded cleaning cartridge ejected Off Off Flashing 3 or off Off Cleaning failed cleaning cartridge ejected On1 On Flashing 3 or off Off Unrecoverable drive failure4 On1 or off On or of...

Страница 72: ...s applied An unrecoverable drive failure is usually the result of a hardware error condition One of the following actions is needed to clear the flashing fault LED v Hard SCSI reset v Cartridge emerge...

Страница 73: ...treaming v Data transfer rate 12 MBps native mode v Interface integrated internal SAS with right angle connector v Compatibility DAT160 read write and DAT320 read write Note DAT160 media is more abras...

Страница 74: ...xpected from a cleaning cartridge is 50 the minimum is 27 and the maximum is 70 The maximum recommended time between preventive maintenance cleaning is 50 tape motion hours Tape motion hours are defin...

Страница 75: ...plete the following steps 1 Make sure that the tape device power is on 2 Grasp the cartridge by the outer edges with the window side up and the write protect switch facing you Note Make sure that the...

Страница 76: ...e protect switch on the tape cartridge determines when you can write to the tape 1 When the switch is set to the right data can be written to and read from the tape 2 When the switch is set to the lef...

Страница 77: ...ading On1 or off On2 or off Flash_2Hz 4 or off Off Flash_2Hz Ejected On1 or off On2 or off Flash_2Hz 4 or off Off Off Cleaning cartridge Loading cleaning unloading On Off Flash_2Hz 4 or off Off Flash_...

Страница 78: ...ash_4Hz Off Off Normal Flash_4Hz Passed9 tape ejected Off Off Off Normal Flash_4Hz See Data cartridge ejected Failed6 On On On Normal Flash_4Hz See Data cartridge ejected Encryption related11 No encry...

Страница 79: ...e data or if the hardware was unable to complete the task This sequence is not activated if the microcode headers are invalid or if the code fails its checksum 6 The LED states for SCSI tape diagnosti...

Страница 80: ...esetting a tape drive before the current backup operation has completed can cause loss of customer data To reset the tape drive follow these steps 1 Press and hold the eject button for 20 seconds and...

Страница 81: ...s 4 7 GB DVD RAM discs v Interface SATA v Connector Slimline SATA v Connector SATA v Loading tray supports 12 cm and 8 cm discs v Operating positions vertical or horizontal 8 cm discs require horizont...

Страница 82: ...hutting down your system then turn off the power to your system unit Unplug the power cord from the wall outlet 2 Insert the straightened end of a paper clip into the emergency eject hole until you fe...

Страница 83: ...ompatible with DVD RAM drive Only for playback in DVD ROM drives compatible with DVD RAM The DVD RAM T 1 2 3 1 Locking Pin 2 Lock Button 3 Cartridge Lid Returning a disc to the cartridge To return a d...

Страница 84: ...72 Power Systems Managing devices...

Страница 85: ...rive Installation and Using Guide http publib16 boulder ibm com pseries en_US infocenter base hardware_docs pdf 231332 pdf If you are installing this device on a system or partition running any other...

Страница 86: ...74 Power Systems Managing devices...

Страница 87: ...ively manage your disk units disk pools and independent disk pools for the IBM i operating system Find information to help you protect the data on your disk units including information about using hot...

Страница 88: ...76 Power Systems Managing devices...

Страница 89: ...sk drive The docking station is available as an internal or external device The disk drive is a backup and restore device that can be used as an alternative to tape drives The removable disk drive is...

Страница 90: ...D Write protect switch E Power connector F USB connector Figure 11 Internal drive rear view and connectors Figure 12 External drive rear view and connectors 78 Power Systems Managing devices...

Страница 91: ...king Station for Removable Disk Drive FC 1104 uses an external USB cable to connect to an external USB port The 1104 feature code includes a USB cable external power supply and power cord as part of t...

Страница 92: ...add on USB cables or USB cable extenders The external docking station can be connected to the external integrated USB ports on POWER7 systems or to the USB ports on 4 Port USB PCI Express Adapter FC 2...

Страница 93: ...s a raw device or non raw device You might get improved performance by using the device as a raw device See the AIX documentation for additional information Using the drive with Linux Linux configures...

Страница 94: ...Drive is ready Flashing green Activity Drive is reading writing or seeking Flashing amber Fault Docking station has detected a fault condition with the cartridge Installing the docking station for th...

Страница 95: ...nstalled in a rack take care with routing the cables to ensure the cables do not interfere with other devices mounted in the rack The 7036 P16 when used with Digi RealPort software will convert the se...

Страница 96: ...ps is supported Network throughput The 7036 P16 is an Ethernet attached device and as such any number may be attached to a given network However attaching more devices to any network reduces the overa...

Страница 97: ...he locations indicated 4 Attach the power cord A power cord for use in North America is provided 5 Use an Ethernet cable to connect the 7036 P16 to the network 6 Connect serial devices as needed Insta...

Страница 98: ...equired to bring the operating system to the supported levels 2 Install all Linux packages required to compile and create binaries from the Digi RealPort Software source code The following is a list o...

Страница 99: ...he CD ROM into the CD ROM drive 4 Type mount t auto dev cdrom mnt 5 Type cp mnt linux 40002086_M src rpm usr src packages SOURCES 6 Type umount mnt 7 Type cd usr src linux 8 Type make mrproper 9 Type...

Страница 100: ...RealPort software is installed on the server Gather the following information v IP Address of the target 7036 P16 7036 P16 IP Address v IP Address of the host server Host Server IP Address v Root pas...

Страница 101: ...ping then it is on the network and the user may proceed to the next step If the 7036 P16 does not respond to the ping then the 7036 P16 is not on the network and the user must perform the network con...

Страница 102: ...nstalled on the server Type the following command rpm qa grep dgr The response from the command is dgr 1 9 6 Note If there is no response then the Digi RealPort software is not installed and the user...

Страница 103: ...Name v Domain Name Domain Name 2 Connect the power cord from the 7036 P16 to a power source and turn the power on 3 Connect the Ethernet cable from the 7036 P16 to an Ethernet network 4 Log in to a s...

Страница 104: ...the user to be in the same room as the 7036 P16 This method requires the user to have a tty terminal or a PC available This method requires a serial cable to connect the tty terminal or PC to the serv...

Страница 105: ...o on The diagnostic is not intended to resolve protocol problems network problems or a faulty host server to which the 7036 P16 may be attached Requirements for using the 7036 P16 diagnostic program v...

Страница 106: ...036 P16 IP Address v Default Gateway IP Gateway Address v Name Server Name Server Address v Host Name Host Name if a host name is assigned For the host server v Machine Type and Model v AIX Level v IP...

Страница 107: ...indow then log in as the root user 2 Select Backup Restore 3 Select Backup 4 Select Save 5 The program will create a file named backup cfg Consider changing that name to something more meaningful Exam...

Страница 108: ...d on the host server Web user interface method To modify the configuration file using the web user interface method do the following steps 1 Use the host server to access the web interface of the targ...

Страница 109: ...e rack 8 Remove the replacement 7036 P16 unit from the shipping package 9 Remove the right angle brackets and screws from the plastic bag 10 Use a Phillips screw to attach the brackets in the predrill...

Страница 110: ...Table 35 FRUs for the 7036 P16 continued Part number Description 39J5823 RJ 45 to DB09 male cable 12H1204 DB25 to DB25 male cable 98 Power Systems Managing devices...

Страница 111: ...rated in new editions of the publication The manufacturer may make improvements and or changes in the product s and or the program s described in this publication at any time without notice Any refere...

Страница 112: ...edures to ensure that there is independent data verification before relying on such data in sensitive or critical operations Users should periodically check the manufacturer s support websites for upd...

Страница 113: ...tion requirements of EU Council Directive 2004 108 EC on the approximation of the laws of the Member States relating to electromagnetic compatibility IBM cannot accept responsibility for any failure t...

Страница 114: ...Statement People s Republic of China Declaration This is a Class A product In a domestic environment this product may cause radio interference in which case the user may need to perform practical act...

Страница 115: ...ne Zustimmung der IBM ver ndert bzw wenn Erweiterungskomponenten von Fremdherstellern ohne Empfehlung der IBM gesteckt eingebaut werden EN 55022 Klasse A Ger te m ssen mit folgendem Warnhinweis verseh...

Страница 116: ...your enterprise without the express consent of the manufacturer Except as expressly granted in this permission no other permissions licenses or rights are granted either express or implied to the pub...

Отзывы: