background image

IBM BladeCenter HX5
Type 7873, 7872, 1910 and 1909

Installation and User's Guide

Содержание BladeCenter HX5

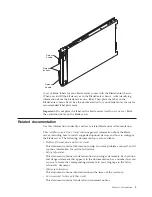
Страница 1: ...IBM BladeCenter HX5 Type 7873 7872 1910 and 1909 Installation and User s Guide...

Страница 2: ......

Страница 3: ...IBM BladeCenter HX5 Type 7873 7872 1910 and 1909 Installation and User s Guide...

Страница 4: ...arranty Information document and the IBM Safety Information and the Environmental Notices and User Guide documents on the IBM Documentation CD Seventh Edition May 2011 Copyright IBM Corporation 2011 U...

Страница 5: ...d 49 Removing a CIOv expansion card 49 Installing a microprocessor and heat sink 50 Installing the 1 node speed burst card 56 Removing the 1 node speed burst card 57 Completing the installation 58 Ass...

Страница 6: ...A emission compliance statement 123 Avis de conformit la r glementation d Industrie Canada 123 Australia and New Zealand Class A statement 123 European Union EMC Directive conformance statement 124 Ge...

Страница 7: ...dukt Lees voordat u dit product installeert eerst de veiligheidsvoorschriften Ennen kuin asennat t m n tuotteen lue turvaohjeet kohdasta Safety Information Avant d installer ce produit lisez les consi...

Страница 8: ...abeled with a number This number is used to cross reference an English language caution or danger statement with translated versions of the caution or danger statement in the Safety Information docume...

Страница 9: ...nt when there is evidence of fire water or structural damage v Disconnect the attached power cords telecommunications systems networks and modems before you open the device covers unless instructed ot...

Страница 10: ...Repair or disassemble Dispose of the battery as required by local ordinances or regulations Statement 12 CAUTION The following label indicates a hot surface nearby Statement 21 CAUTION Hazardous energ...

Страница 11: ...independent servers without changing the physical configuration The ability to switch between single partition mode and stand alone mode is provided through the advanced management module Web interfac...

Страница 12: ...available on the IBM Documentation CD You can obtain up to date information about the blade server at http www ibm com systems bladecenter The blade server might have features that are not described i...

Страница 13: ...uide contains general information about the blade server including how to install supported optional devices and how to configure the blade server The following documentation is also available v Probl...

Страница 14: ...lanning and Installation Guide for your BladeCenter chassis for information to help you prepare for system installation and configuration To check for updated documentation complete the following step...

Страница 15: ...insert the CD into the CD or DVD drive then run the following command from the mnt cdrom directory sh runlinux sh Select your blade server from the Product menu The Available Topics list displays all...

Страница 16: ...an be potentially hazardous to you A caution statement is placed just before the description of a potentially hazardous procedure step or situation v Danger These statements indicate situations that c...

Страница 17: ...port is not supported v Serial over LAN SOL v Wake on LAN WOL v Redundant buses for communication with keyboard mouse and removable media drives Predictive Failure Analysis PFA alerts v Microprocesso...

Страница 18: ...on see Chapter 6 Accessing the IMM on page 107 v Dynamic System Analysis DSA IBM Dynamic Systems Analysis DSA collects and analyses system information to aid in diagnosing server problems DSA collects...

Страница 19: ...acity and capability of the server Any microprocessors that you install must have the same specifications as the microprocessors that came with the servers v Integrated network support All blade serve...

Страница 20: ...in the BladeCenter chassis This policy is enforced when the initial power is applied to the BladeCenter chassis or when a blade server is inserted into the BladeCenter chassis The following settings...

Страница 21: ...ermining how these systems relate to one another and identifying their statuses helping to correlate technical resources with business needs A set of common tasks that are included with IBM Systems Di...

Страница 22: ...ms Director Major components of the blade server Use this information to locate the major components on the blade server The major components of the blade server include field replaceable units FRUs c...

Страница 23: ...you install the primary blade server of a scalable blade complex in blade server bay 7 of a BladeCenter H Type 8852 chassis the secondary blade server is installed in blade server bay 8 The primary bl...

Страница 24: ...de servers If they are not the settings that are defined for the primary blade server replace the UEFI settings on the secondary server Note When you upgrade the firmware for the blade servers operati...

Страница 25: ...erver controls and LEDs on page 16 for the power LED states v If a power failure occurs the BladeCenter chassis and the blade server can be configured through the advanced management module Web interf...

Страница 26: ...ace see the IBM BladeCenter Advanced Management Module User s Guide Blade server controls and LEDs Use this information for details about the controls and LEDs on the blade server and IBM MAX5 expansi...

Страница 27: ...power and is turned on When the blade server is on pressing this button causes an orderly shutdown of the blade server so that it is safe to remove This includes shutting down the operating system if...

Страница 28: ...system in the blade server to recognize the media tray If there is no response when you press the media tray select button you can use the advanced management module web interface to determine whether...

Страница 29: ...able on the IBM MAX5 expansion blade light path diagnostic panel See Light Path Below LP1 This amber LED indicates that there is a problem with the BladeCenter HX5 to which the IBM MAX5 expansion blad...

Страница 30: ...d alone mode The scalability indicators show whether a BladeCenter HX5 blade server is a stand alone blade server or a node in a scalable blade complex operating as a single hardware partition When a...

Страница 31: ...ctor Microprocessor 2 I O expansion connector SSD Blade expansion connector I O expansion connector CIOv Microprocessor 1 Scaling card connector Power sharing connector DIMMs 1 8 DIMMs 9 16 Note The o...

Страница 32: ...and the keyboard video mouse select button See Blade server controls and LEDs on page 16 for information about these buttons and their functions The Ethernet controllers on the blade server communicat...

Страница 33: ...ove a blade server from the BladeCenter chassis you must shut down the operating system and turn off the blade server You do not need to shut down the chassis itself v Blue on a component indicates to...

Страница 34: ...where others can handle and damage it v While the device is still in its static protective package touch it to an unpainted metal part of the BladeCenter chassis or any unpainted metal surface on any...

Страница 35: ...is part of a scalable blade complex operating in single partition mode pressing the power button on one blade server causes both blade servers to shut down 4 Open the two release handles as shown in...

Страница 36: ...lable blade complex came preassembled you must disassemble it to add components to each of the blade servers in the scalable blade complex Note This procedure assumes that you are disassembling a scal...

Страница 37: ...ean flat work surface with the 2 node scalability card facing up 5 Release the lower handles rotate the lower handles down to allow the blade servers to sit flat on the work surface 6 Remove the 2 nod...

Страница 38: ...2 node scalability card using the provided 3 16 hex driver Alternate the loosening of each screw until both screws are removed 3 Lift the 2 node scalability card off both blade servers and store the c...

Страница 39: ...wing steps 1 Before you begin read Safety on page v and Installation guidelines on page 23 2 Loosen each screw on the 1 node scalability card using the provided 3 16 hex driver Alternate the loosening...

Страница 40: ...each side of the blade server and lift the IBM MAX5 from the blade server b Rotate the IBM MAX5 open then lift the IBM MAX5 from the blade server 5 Complete the following steps if you are not going to...

Страница 41: ...lay the blade server on a flat static protective surface orienting the blade server with the bezel pointing toward you 3 Locate the blade expansion connector and remove the cover if one is installed s...

Страница 42: ...2 If the blade server or scalable blade complex is installed in a BladeCenter chassis remove it See Removing the blade server from the BladeCenter chassis for instructions 3 Carefully lay the blade se...

Страница 43: ...versions of the IBM MAX5 expansion blade referred to as the IBM MAX5 version 1 and IBM MAX5 version 2 in this document IBM MAX5 version 2 has a MAX5 identifying label on the bottom of the front bezel...

Страница 44: ...IMM 2 and DIMM 7 must be the same size and speed However DIMM 1 and DIMM 2 have to be the same technology but they do not need to be the same size and speed v When populating the IBM MAX5 use the DIMM...

Страница 45: ...ted between DIMM pairs Installed memory DIMM connector 1 2 3 4 5 6 7 8 9 10 11 12 13 14 15 16 17 18 19 20 21 22 23 24 4 DIMMs X X X X 8 DIMMs X X X X X X X X 12 DIMMs X X X X X X X X X X X X 16 DIMMs...

Страница 46: ...ctly installed Press the DIMM firmly into the connector and then press the retaining clips toward the DIMM until the tabs are fully seated When the DIMM is correctly installed the retaining clips are...

Страница 47: ...oving a CFFh expansion card on page 49 for instructions 3 Insert the back of the SSD expansion card into the expansion card standoffs on the blade server and rotate the expansion card down toward the...

Страница 48: ...s using RAID 0 or RAID 1 when two storage drives are installed See Using the LSI Logic Configuration Utility program on page 82 for information about RAID configuration To install a solid state drive...

Страница 49: ...he solid state drive out of the slot Note When you remove a drive from the SSD expansion card consider labeling the drive to indicate the slot from which the drive was removed so that you can install...

Страница 50: ...6 DIMMs X X X X X X 8 DIMMs X X X X X X X X 10 DIMMs X X X X X X X X X X 12 DIMMs X X X X X X X X X X X X 14 DIMMs X X X X X X X X X X X X X X 16 DIMMs X X X X X X X X X X X X X X X X Important If yo...

Страница 51: ...following steps Table 11 Memory sparing with two processors DIMM Pair Spare Pair DIMM 1 DIMM 4 DIMM 2 DIMM 3 DIMM 5 DIMM 8 DIMM 6 DIMM 7 DIMM 9 DIMM 12 DIMM 10 DIMM 11 DIMM 13 DIMM 16 DIMM 14 DIMM 15...

Страница 52: ...en correctly installed Press the DIMM firmly into the connector and then press the retaining clips toward the DIMM until the tabs are fully seated When the DIMM is correctly installed the retaining cl...

Страница 53: ...lade servers in a scalable blade complex are operating independently you might have to install a hypervisor key in each blade server To determine whether you need a hypervisor key see the documentatio...

Страница 54: ...ng the hypervisor key for at least 2 seconds then remove the USB module from its package 5 Install the hypervisor key into the hypervisor adapter a Orient the connector on the hypervisor key with the...

Страница 55: ...middle of the blade server until it is in the locked position Removing a hypervisor key Use this information to remove a hypervisor key from the blade server The following illustration shows the remo...

Страница 56: ...ey away from the hypervisor interposer Installing an I O expansion card The following sections describe how to install the following expansion cards v CFFh expansion cards for example QLogic 2 Port 10...

Страница 57: ...m servers eserver serverproven compat us eserver html Product documentation for expansion cards is available at http publib boulder ibm com infocenter bladectr documentation index jsp topic com ibm bl...

Страница 58: ...blade server see Installing a CFFh expansion card for instructions Installing a CFFh expansion card Use these instructions to install a compact form factor expansion card in the blade server The blade...

Страница 59: ...card Use these instructions to remove a CFFh expansion card from the blade server To remove a CFFh expansion card complete the following steps 1 Before you begin read Safety on page v and Installatio...

Страница 60: ...card then lift the card out of the connector Installing a microprocessor and heat sink Use this information to install a microprocessor and heat sink in the blade server Note The optional microproces...

Страница 61: ...age 23 2 Carefully lay the blade server on a flat static protective surface 3 Remove the access panel if you are installing standard heat sinks Note If you installing tall heat sinks you do not need t...

Страница 62: ...microprocessor socket from its closed and locked position until it stops in the fully open position approximately a 135 angle b Rotate the microprocessor retainer on the microprocessor socket from its...

Страница 63: ...fully remove the microprocessor from the static protective bag touching only the edges of the microprocessor d If there is a plastic protective cover on the bottom of the microprocessor carefully remo...

Страница 64: ...Make sure that the microprocessor is oriented and aligned correctly in the socket before you try to close the microprocessor retainer v Do not touch the thermal material on the bottom of the heat sink...

Страница 65: ...lling a new heat sink complete the following steps Attention v Do not set down the heat sink after you remove the plastic cover v Do not touch the thermal material on the bottom of the heat sink Touch...

Страница 66: ...n the blade server c Using a screwdriver or a coin turn each of the screws away from the middle of the blade server until it is in the locked position Installing the 1 node speed burst card Use this i...

Страница 67: ...filler off the blade server 5 Align the pins on the bottom of the 1 node speed burst card with the holes on the scalability connector on the blade server 6 Press down firmly so that the 1 node speed...

Страница 68: ...e Installing a blade server in a BladeCenter chassis on page 68 5 Turn on the blade server see Turning on the blade server on page 15 If you have just connected the power cords of the BladeCenter chas...

Страница 69: ...the bottom blade server as shown in the illustration b Pivot the topmost blade server to the closed position as shown in the illustration until it clicks into place 4 Install the 2 node scalability ca...

Страница 70: ...ensure that the spring plates are engaged Installing the 2 node scalability card Use this information to install the 2 node scalability card on a blade server To install the 2 node scalability card c...

Страница 71: ...4 Align the pins on the bottom of the IBM 2 node scalability card with the holes on the scalability connector on the blade server 5 Press down firmly so that the 2 node scalability card is flush with...

Страница 72: ...ut updating the server firmware you might get unexpected system behavior or the server might not power on For information about updating the firmware on the BladeCenter HX5 blade server see Updating f...

Страница 73: ...nector on the BladeCenter HX5 blade server and remove the power sharing cover if one is installed see Blade server connectors BladeCenter HX5 on page 21 4 There are two types of access panels availabl...

Страница 74: ...e access panel away from the blade server c Install the EMC gasket on the upper ridge of the BladeCenter HX5 blade server bezel d Install the operator control panel access panel 1 Align the holes in t...

Страница 75: ...npainted metal surface on the BladeCenter unit or any unpainted metal surface on any other grounded rack component then remove the optional expansion unit from the package 6 Orient the IBM MAX5 as sho...

Страница 76: ...server b Lift the filler off of the blade server 3 Install the IBM MAX5 expansion blade see Installing an IBM MAX5 on page 62 4 Remove the cover for the expansion blade see Removing the blade server...

Страница 77: ...nstall and close the cover for a blade server or for the topmost blade server in a scalable blade complex Attention You cannot insert the blade server into the BladeCenter chassis until the cover is i...

Страница 78: ...y and that you have not left loose tools or parts inside the blade server Blade server cover release Cover pins Blade server cover 4 Pivot the cover to the closed position as shown in the illustration...

Страница 79: ...igure the blade server c To maintain proper system cooling do not operate the BladeCenter chassis without a blade server expansion unit or filler module installed in each blade server bay 3 Make sure...

Страница 80: ...erver configuration Use this information to update the blade server configuration When the blade server starts for the first time after you add or remove an internal device you might receive a message...

Страница 81: ...an temporarily redefine the boot order by using the Boot menu program that is provided with the blade server firmware 3 Configure the RAID array You can install up to two solid state drives in the bla...

Страница 82: ...er on page 15 2 Immediately give the blade server control of the BladeCenter unit shared keyboard video and mouse ports v If you are managing the blade server by using the BladeCenter system console p...

Страница 83: ...ess Enter 3 When you have finished changing settings press Esc to exit from the program select Save to save the settings that you have changed Processors Select this choice to view or change the proce...

Страница 84: ...t set the IMM OS Loader watchdog Network Configuration Select this choice to view the system management network interface port the IMM MAC address the current IMM IP address and host name define the s...

Страница 85: ...d then checks a network adapter This choice is on the full UEFI Setup utility menu only v Boot Manager Select this choice to view add delete or change the device boot priority boot from a file select...

Страница 86: ...nges that you have made in the settings and restore the previous settings v Load Default Settings Select this choice to cancel the changes that you have made in the settings and restore the factory se...

Страница 87: ...integrated management module IMM based blade servers for the IMM firmware and IBM System x Server Firmware v Modify a limited number of VPD settings on IMM based blade servers v Modify iSCSI boot set...

Страница 88: ...AN USB IP address The default value is 169 254 95 118 imm_user_id The IMM account 1 of 12 accounts The default value is USERID imm_password The IMM account password 1 of 12 accounts The default value...

Страница 89: ...d not using the default values Example that does not use the user ID and password default values asu set SYSTEM_PROD_DATA SYsInfoUUID uuid_value host imm_ip user user_id password password Example that...

Страница 90: ...is the server model number s n The serial number on the server Type sn zzzzzzz where zzzzzzz is the serial number asset_method The server asset tag number Type asset aaaaaaaaaaaaaaaaaaaaaaaaaaaaaaaaa...

Страница 91: ...Examples that do not use the user ID and password default values asu set SYSTEM_PROD_DATA SYsInfoProdName m t_model asu set SYSTEM_PROD_DATA SYsInfoSerialNum s n asu set SYSTEM_PROD_DATA SYsEncloseAss...

Страница 92: ...3 Use the arrow keys to select the controller from the list of adapters then press Enter 4 Follow the instructions on the screen to change the settings of the selected items then press Enter If you s...

Страница 93: ...n the scalable blade complex to the same levels before resetting the scalable blade complex Refer to the following table to select the correct procedure to follow based on your configuration and prefe...

Страница 94: ...MM firmware on the primary blade server Then update the IMM firmware on the secondary blade server 2 Reset the IMM on the primary and secondary systems Complete the following steps to reset the IMM th...

Страница 95: ...using Expect see the Expect website at http expect sourceforge net For more information about using the advanced management module CLI see the BladeCenter Advanced Management Module Command Line Inte...

Страница 96: ...he logfile path test_results_set_base_dir Set it set fm_logfile g_test_results_base_dir Logfile txt Capture a log message with a nice time stamp proc ft_log message global fm_logfile set date_val time...

Страница 97: ...any zombies catch close i amm_id wait nowait The AMM closed the connection on us try to resume set amm_id set rv amm_login save_amm save_userid save_password set rv amm_restore_save_target Save off t...

Страница 98: ...init_capture blade set rv imm_ffdc_collect_capture blade set fn imm_ffdc_get_service_file_name blade set rv collect_file_from_amm service fn g_test_results_dir IMM_FFDC tgz if rv 0 ft_log Blade blade...

Страница 99: ...lade_gator blade global amm_id Gator zap set gator_map 1 2 3 4 5 6 7 8 9 a b c d e f set gator_offset lindex gator_map blade_no send i amm_id dbg gator x gater_offset Tsystem mm 1 r n expect i amm_id...

Страница 100: ...stem r expect i amm_id OK set rv amm_save_target system return 0 return 1 Set the CLI target to a blade Returns 0 on success and 1 on failure proc amm_set_blade_target blade_no global amm_id send i am...

Страница 101: ...id amm_id Install an end of file handler to bomb out incase the AMM connection dies expect_after i amm_id eof eof_handler Log into the AMM expect password send password r Make sure we made it expect e...

Страница 102: ..._id Build ID expect i amm_id n set temp expect_out buffer set length string length temp set length expr length 3 set imm_level string range temp 1 length set g_imm_fw_levels blade imm_level return 0 C...

Страница 103: ...expect i amm_id OK return 0 return 1 Code from source support include MultiNode exp set multinode_complex list Build a list of complexes proc populate_complex_list global amm_id multinode_complex set...

Страница 104: ...ex set empty list set temp list Return an empty list if the multinode complex is has nothing set count llength multinode_complex if count 0 return empty Search each list in the multinode complex list...

Страница 105: ...slot number foreach slot slots if slot complex_name continue ft_log Flashing slot number slot Send the update command send i amm_id update i tftp_server l firmware_image T system blade slot sp r n Pro...

Страница 106: ...mmand for the blade proc flash_update_blade blade_no firmware_image global amm_id tftp_server g_normal_timeout_value Get a big timeout value while we flash set timeout 1000 Make sure the AMM knows too...

Страница 107: ...rmware update success else ft_log Blade slot Firmware update failed set rv collect_flash_failure_logs slot global amm_id send i amm_id r set rv ft_delay 2 Script startup check usage and assign globals...

Страница 108: ...to the primary bank complete the following steps 1 Download the blade server UEFI firmware update from the World Wide Web see Updating firmware and device drivers on page 82 2 Turn off the server see...

Страница 109: ...BladeCenter unit see Removing the blade server from the BladeCenter chassis 21 Remove the server cover See Removing the blade server cover 22 Reset the CMOS by removing the battery see Removing the b...

Страница 110: ...position see System board switches 20 Replace the cover and reinstall the blade server in the BladeCenter unit making sure that the media tray is selected by the relevant blade server See Installing...

Страница 111: ...the server UEFI firmware update package from the World Wide Web complete the following steps Note Use this method if the SYS BRD LED on the light path diagnostics panel is lit and there is an AMM even...

Страница 112: ...102 IBM BladeCenter HX5 Type 7873 7872 1910 and 1909 Installation and User s Guide...

Страница 113: ...your blade server The ServerGuide program detects the blade server model and optional hardware devices that are installed and uses that information during setup to configure the hardware The ServerGui...

Страница 114: ...installing This section describes a typical ServerGuide operating system installation Note Features and functions can vary slightly with different versions of the ServerGuide program 1 After you have...

Страница 115: ...eCenter 3 Under Popular links select Operating system installation 4 Under Choose the system you want instructions for click BladeCenter HX5 5 From the Installation list select your operating system t...

Страница 116: ...106 IBM BladeCenter HX5 Type 7873 7872 1910 and 1909 Installation and User s Guide...

Страница 117: ...the blade servers in a complex Table 13 LAN over USB addresses Blade server Logical node ID IMM IP address Host address Host subnet Host subnet mask Keyboard Controller Style KCS address Primary 0 16...

Страница 118: ...ocesses For more information about LAN over USB configuration on different operating systems see the IBM white paper Transitioning to UEFI and IMM at http www ibm com systems support supportsite wss d...

Страница 119: ...the message This connection has limited or no connectivity is displayed ignore this message 10 Return to the Device Manager IBM USB Remote NDIS Network Device appears under Network Adapters 11 Use the...

Страница 120: ...110 IBM BladeCenter HX5 Type 7873 7872 1910 and 1909 Installation and User s Guide...

Страница 121: ...problems The following tools are available to help you diagnose and solve hardware related problems v POST codes error messages and error logs The POST error codes indicate the detection of a problem...

Страница 122: ...a chronologically ordered merge of the system event log as the IPMI event log the integrated management module IMM chassis event log as the ASM event log and the operating system event logs You can se...

Страница 123: ...ot start the operating system CD Make sure that the operating system CD is supported by the ServerGuide program See the ServerGuide Setup and Installation CD label for a list of supported operating sy...

Страница 124: ...114 IBM BladeCenter HX5 Type 7873 7872 1910 and 1909 Installation and User s Guide...

Страница 125: ...de You can obtain the latest downloads for your IBM product from http www ibm com support fixcentral systemx groupView query productGroup ibm 2FBladeCenter v If you have installed new hardware or soft...

Страница 126: ...e World Wide Web On the World Wide Web up to date information about IBM systems optional devices services and support is available at http www ibm com systems support You can find the most up to date...

Страница 127: ...are available Monday through Friday from 9 a m to 6 p m IBM Taiwan product service Use this information to contact IBM Taiwan product service IBM Taiwan product service contact information IBM Taiwan...

Страница 128: ...118 IBM BladeCenter HX5 Type 7873 7872 1910 and 1909 Installation and User s Guide...

Страница 129: ...504 1785 U S A INTERNATIONAL BUSINESS MACHINES CORPORATION PROVIDES THIS PUBLICATION AS IS WITHOUT WARRANTY OF ANY KIND EITHER EXPRESS OR IMPLIED INCLUDING BUT NOT LIMITED TO THE IMPLIED WARRANTIES OF...

Страница 130: ...he United States and or other countries Cell Broadband Engine is a trademark of Sony Computer Entertainment Inc in the United States other countries or both and is used under license therefrom Intel I...

Страница 131: ...s Total user accessible capacity can vary depending on operating environments Maximum internal hard disk drive capacities assume the replacement of any standard hard disk drives and population of all...

Страница 132: ...gases Contaminant Limits Particulate v The room air must be continuously filtered with 40 atmospheric dust spot efficiency MERV 9 according to ASHRAE Standard 52 21 v Air that enters a data center mus...

Страница 133: ...equipment in a residential area is likely to cause harmful interference in which case the user will be required to correct the interference at his own expense Properly shielded and grounded cables an...

Страница 134: ...erungen der EU Richtlinie 2004 108 EG zur Angleichung der Rechtsvorschriften ber die elektromagnetische Vertr glichkeit in den EU Mitgliedsstaaten und h lt die Grenzwerte der EN 55022 Klasse A ein Um...

Страница 135: ...ions Department M456 IBM Allee 1 71137 Ehningen Germany Telephone 49 7032 15 2937 Email tjahn de ibm com Generelle Informationen Das Ger t erf llt die Schutzanforderungen nach EN 55024 und EN 55022 Kl...

Страница 136: ...lers and users need to pay attention to it This is for any areas other than home Russia Electromagnetic Interference EMI Class A statement People s Republic of China Class A electronic emission statem...

Страница 137: ...nfiguring blade server 71 LAN over USB manually 108 connectors input output 22 connectors system board 21 connectors system board IBM MAX5 21 contamination particulate and gaseous 122 control panel co...

Страница 138: ...lation 109 resolving conflicts 108 Windows driver installation 108 LEDs activity 16 fault 16 information 16 KVM select 16 location 16 media tray select 16 power 16 scalability 20 single partition mode...

Страница 139: ...telephone numbers 116 solid state drive removing 39 specifications BladeCenter HX5 6 speed burst card installing 56 removing 57 SSD installing 38 SSD expansion card installing 37 removing 37 stand al...

Страница 140: ...130 IBM BladeCenter HX5 Type 7873 7872 1910 and 1909 Installation and User s Guide...

Страница 141: ......

Страница 142: ...Part Number 90Y5562 Printed in USA 1P P N 90Y5562...

Отзывы: