Preparing the site and host server
Before beginning the enclosure installation, verify that the site where you will install your storage system
has the following:
• A mechanical lift that can safely hoist a 280lb. high-density enclosure for installation into a 1.2 m rack.
• A proper redundant AC power source or a rack power distribution unit (PDU) with an Uninterruptible
Power Supply (UPS).
• A host computer configured with the appropriate software, BIOS, and drives. Contact your supplier for
the correct software configurations.
• A static-protected environment for temporarily storing CRUs and disk drive modules if the enclosure is
intended for rack-mount use. See the CAUTION before unpacking the enclosure and installing it in the
rack.
Before installing the enclosure, verify the existence of the following:
• ESS supported SAS HBA
• Qualified cable options for host connection and EBOD cascades.
• One suitable C20 to C19 power cord per PSU
• Rail kit and Cable Management Arm (for rack installation)
• Disk drive modules for use in populating the disk slots after the enclosure is secured into the rack.
Refer to your supplier for a list of qualified accessories for use with the enclosure. The accessories box
contains the power cords and other accessories.
Unpacking the enclosure
Before unpacking the enclosure, familiarize yourself with the exploded view of packaging components
that pertain to your enclosure product. See also Appendix C, “Enclosure packaging,” on page 91.
1. Examine the packaging for crushes, cuts, water damage, or any other evidence of mishandling during
transit.
If you suspect that damage has happened, photograph the package before opening, for possible future
reference. Retain original packaging materials for use with returns.
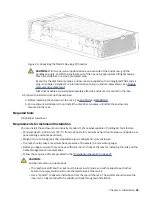
2. The unpacking sequence pertaining to Model 106 enclosures is shown in the following illustrations.
CAUTION: The enclosure does not ship with disk drive modules installed, but all rear panel
CRU modules are installed. This partially populated enclosure is quite heavy: 44.9 kg (99 lb).
You can remove the enclosure from its shipping box using the standard belt-style lifting straps. If
available, you can remove the enclosure from its box using the optional lift handles instead of the
straps.
a. Default method: remove the enclosure from its box using the straps.
See Figure 23 on page 30 and the CAUTION above and below the illustration. The illustration
shows buckled belt-straps secured longitudinally on the Model 106 enclosure. Only the straps and
plastic bag are shown. They are isolated from the remainder of the packaging. As a visual aid for
this unpacking task, see Appendix C, “Enclosure packaging,” on page 91 for more information
about the packaging materials.
CAUTION: Verify that each strap is securely wrapped and buckled before performing the lift.
Chapter 4. Installation 29
Содержание 106
Страница 1: ...IBM ESS expansion Version 5 3 5 Hardware Installation and Maintenance Guide Model 106 IBM SC27921101...
Страница 6: ...Russia Electromagnetic Interference Class A Statement 100 Homologation statement 100 vi...
Страница 12: ...xii...
Страница 18: ...xviii IBM ESS expansion Hardware Installation and Maintenance Guide Model 106...
Страница 20: ...2 IBM ESS expansion Hardware Installation and Maintenance Guide Model 106...
Страница 44: ...26 IBM ESS expansion Hardware Installation and Maintenance Guide Model 106...
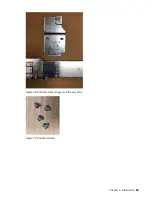
Страница 53: ...Figure 28 CMA attachment aligned with outer slide Figure 29 Panhead screws Chapter 4 Installation 35...
Страница 84: ...66 IBM ESS expansion Hardware Installation and Maintenance Guide Model 106...
Страница 100: ...82 IBM ESS expansion Hardware Installation and Maintenance Guide Model 106...
Страница 108: ...90 IBM ESS expansion Hardware Installation and Maintenance Guide Model 106...
Страница 119: ......
Страница 120: ...IBM SC27921101...

