background image

7

Fork Setup Information

Read this first for a general under-
standing of fork set-up or skip straight 
to the air pressure charts if you just 
want to go ride.

Positive Pressure

This is the main air spring that sup-
ports your weight. Adjust the air 
pressure so that you come close to 
using all the travel on a typical ride. 
Usually you can mimic your maximum 
impacts by grabbing the front brake 
and pushing down HARD on the bars. 
If you are getting 80–90% of the 
fork’s travel doing this, your positive 
air spring is in the right range. Actual 
riding will often push the fork a little 
further than this test.

Low Speed Compression Damping

Low speed compression damping is 
used to reduced unwanted movement 
and over travel due to low speed 
changes like out of the saddle pedal-
ing and subtle variations in the trail 
that can cause wallowing etc. Adjust 
to your preference.

Lockout

As the name implies this turns the fork 
rigid (or close to it) for out of the sad-
dle efforts or riding on the road. Most 
forks have a “blowoff” so that the fork 
will move if a large enough impact is 
felt. The threshold or “blowoff” when 
the lockout lets the fork start to move 
is often adjustable. It’s called 

Gate


in Rock Shox parlance and 

Blowoff 

Threshold 

in Fox’s language. Usually 

the goal is to have the lockout at the 
minimum setting needed to stop the 
fork movement while pedaling out of 
the saddle, but allowing it to still move 
fairly easily when an impact is felt.

High Speed Compression Damping

If your fork has a high speed com-
pression damping control, this would 
usually be used to slow things down 
during big hits to avoid bottoming. 
It would usually be set at the lowest 
level needed to avoid bottoming out.

Rebound

Adjust the rebound so that the front 
end does not bounce off the ground 

after a drop off or large bump.  
If adjusted too slow, the fork may 
“pack down” and feel sluggish.  
In order to conserve momentum and 
remain compliant the suspension 
needs to recover fairly quickly and 
push off the back side of bumps and 
holes. If the rebound is adjusted too 
slow, rolling energy is lost to damping 
and vibration. If it is adjusted too fast 
the bike will bounce after bumps and 
drops. Adjust to your preference.

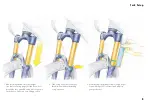
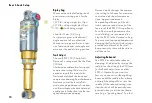
Fox Float CTD

For 2013 Fox added features to 
their line of Float forks and shocks to 
make it easier for the user to adjust to 
changing trail conditions. It’s called 
CTD (Climb Trail Descend) and is 
changed by the lever at the top of the 
right fork leg. As with prior Fox forks, 
cranking the blue lever clockwise 
increases the amount of force it takes 
to make the fork move. Just think of 
‘Righty Tighty, Lefty Loosie’ (same 
goes for the shock).

Fork Setup

Содержание Ripley

Страница 1: ...Instruction Manual Notes on Tuning and Maintenance of Ibis Bicycles Rev C Ripley Edition Reprinting Permitted if Source Quoted...

Страница 2: ...that they will be located in the middle of the tube when the cable is installed in the frame to do this pull the housing out of the top tube and through the top of the head tube about 2 feet then inst...

Страница 3: ...3 Bike Set Up Tips and Tricks Ripley Routing...

Страница 4: ...4 Ripley Routing Cable Routing Bike Set Up Tips and Tricks...

Страница 5: ...sets see our webstore for the offerings If you ve already got a perfectly usable fork with a traditional 11 8 steerer tube that you d like to use simply install an adapter that will make your fork wor...

Страница 6: ...7 5 67 67 n a n a n a n a n a Mojo SL Mojo HD140 Mojo HD 160 66 n a n a 68 5 Bike Set Up Tips and Tricks Head Angle Chart 6 140mm Fork 150mm Fork 160mm Fork 180mm Fork n a Ripley Low Speed Tight And T...

Страница 7: ...hreshold in Fox s language Usually the goal is to have the lockout at the minimum setting needed to stop the fork movement while pedaling out of the saddle but allowing it to still move fairly easily...

Страница 8: ...ounce up and down a bit to overcome stock stiction Settle into your riding position 2 Slide o ring until it rests on wiper then dismount without disturbing o ring s position 3 Measure sag the distance...

Страница 9: ...e changing between soft medium and firm settings on the outer dial enable you to further fine tune the low speed compression damping If on Trail mode we usually prefer the soft setting Fox recommends...

Страница 10: ...low speed compression damping Descend mode changes the compres sion setting to full open for maximum control and plush performance on steep aggressive descents The pedaling efficiency of the dw link s...

Страница 11: ...lue lever at the top of the shock You can run the shock open or engage the ProPedal settings on any of the shocks On the Fly RP23 ProPedal controls Position 1 blue lever towards the drive side shock o...

Страница 12: ...12 Maintenance...
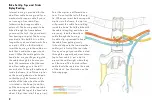
Страница 13: ...tructions will be included in the next version of this guide Ripley Bearing Specs Eccentric Core Inner Bearings 6806 2RS 30 x 42 x 7 These are the same size as BB30 bearings Lower outer bearings 608 R...

Страница 14: ...m 12 ft lbs for Geared Riding 20 N m 15 ft lbs for Single Speed Riding 3 4 N m Ripley Upper And Lower Eccentric Core Bolts M8 w 5mm Hex 8 N m 5 N m 5 N m 6 N m Use with Loctite 242 Use with Loctite 24...

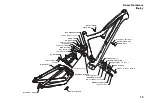
Страница 15: ...clevis clevis reducer o ring m6x18 fhcs derailleur hanger chainsuck plate lower left ecc core 42x30x7 bearing rear shock nut bearing spacer 42x30x7 bearing lower right ecc core e 608 bearing asym low...

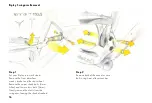
Страница 16: ...emove the front derailleur cranks brakes and the rear wheel Remove the upper shock bolts 4mm Allen and lower clevis bolts 5mm Gently remove the clevis from the swingarm leaving the shock attached Step...

Страница 17: ...bolt from each eccentric core cap You might need to use a 12mm open end wrench to prevent the eccentric from rotating Do not use a crescent wrench cave man Step 4 Gently remove the cap and then you w...

Страница 18: ...he bearings using a special Ibis manufactured tool will be added to this instruction book at a later date To reinstall the swingarm work in the reverse order Add grease to the core when reinstalling a...

Страница 19: ...hori zontal and at the 9 o clock position when the frame is parallel with the ground Gently slide the swingarm onto the ec centrics Insert the swingarm bolts lower bolt from the non drive side upper f...

Отзывы: