background image

TRU 650 ACCESS CONTROL SYSTEM USERS GUIDE 


Copyrighted by Integrated Biometrics Inc., 2008 

- 27 -


3.0   Menu Selection “Tools” 


3.1   Monitoring 


Click on Menu Selection “Tools.” Select “Monitoring” from the Drop Down Menu. There are two 
tabs at the top of this window. 


3.1.1   Logs tab 


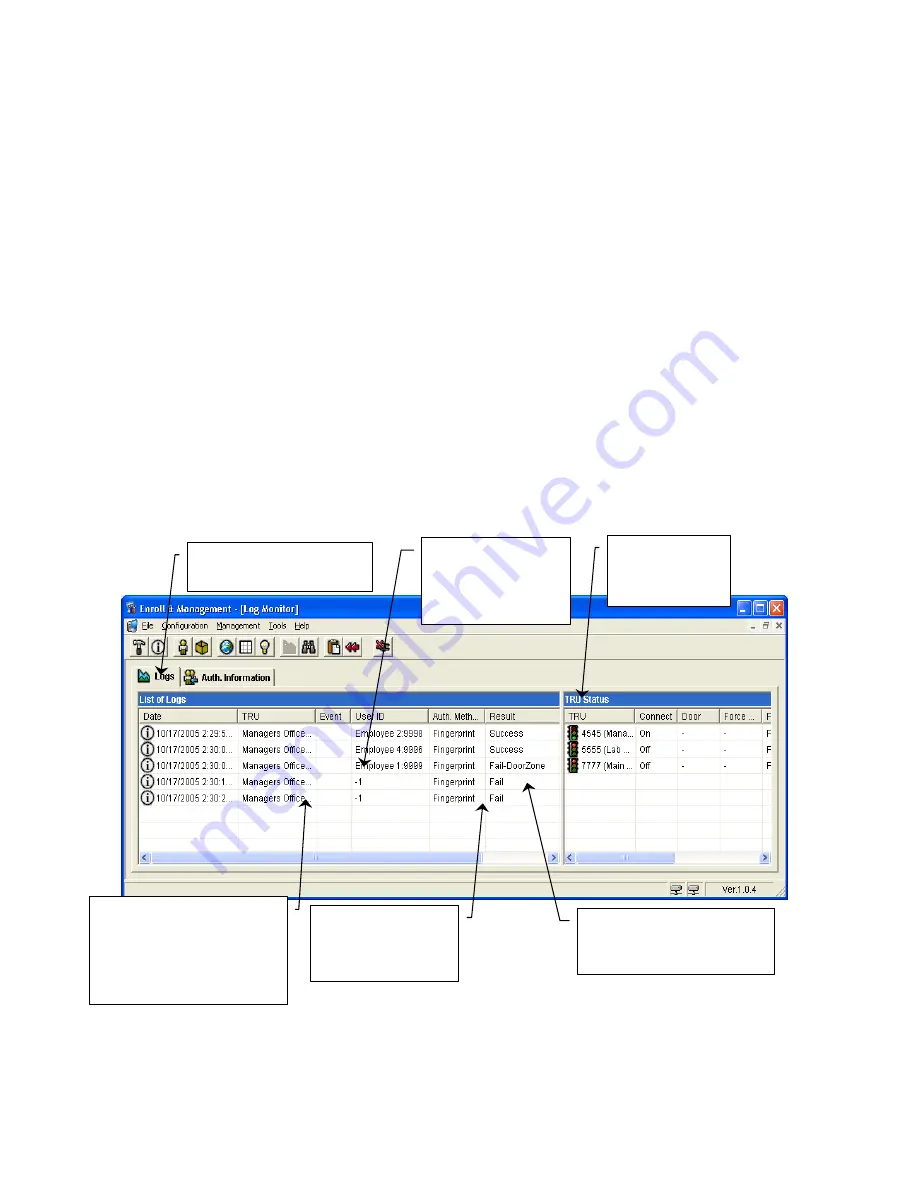
Click on the “Logs” tab.  The window shown below will appear. 


3.1.1.1   This is a real-time capture of transactions as they happen. When someone attempts access 
by a TRU while this window is displayed, the information shown below appears in the “List of 
Logs” section. 
 
3.1.1.2   Note the results column in the example below. It shows when successful access is granted. 
It also shows when access fails, and the reason, such as “Fail-DoorZone.” 
 
3.1.1.3   The section on the right, “TRU Status,” lists all approved TRU’s and whether “On” or 
“Off” etc. 


Click on the Logs tab to 
display this window 

Each attempted access 
while this window is 
displayed will generate an 
information line in the 
List of Logs 

Results column will show 
result and also reason for 
failure if not successful

If the fingerprint is 
not identified 
“Fail” is the result. 

Notice Employee 1 
was recognized but 
did not have 
access to this door

List of TRU’s 
and Status 

Содержание TRU 650

Страница 1: ...IDE Copyrighted by Integrated Biometrics Inc 2008 1 TRU 650 Fingerprint Reader Unit Access Control System USER S GUIDE Rev 2 1 xc IBKorea Ltd 818 Woolim Lions Valley 311 3 Sangdaewon dong Jungwon gu S...

Страница 2: ...up 20 1 11 Group Access Time Setup 23 1 12 TRU Group Access Time Setup 25 2 0 CHECKS TO CONFIRM SET UP AND ACCESS PRIVILEGES FOR A USER 25 2 1 Confirm TRU 25 2 2 Confirm Access Times assigned to Group...

Страница 3: ...fault ID is 1111 and the default Password is 1111 Enter these in the appropriate boxes and Click Login 1 1 4 The Identified window should appear and read User Admin Type Administrator Click OK You sho...

Страница 4: ...c is to click on an active line which will highlight it Then right click which will display a menu box with selections such as Modify Delete Detach etc See example below 1 2 4 Attaching Users and Acce...

Страница 5: ...window that appears should read Database Connections Succeeded This confirms the Database Connection Click Yes to save 1 3 1 2 Test the Authentication Server Connection Click on the Test E button in t...

Страница 6: ...n The Division Setup box shown below will appear Fill in a unique Div ID number and a Div Name Click Save The new entry will show in the List of Divisions 1 3 2 4 Next click on the Title Setup tab Go...

Страница 7: ...operations of the access control system They are for descriptive purposes only and have no effect on the granting of access privileges Division Setup Tab Add Icon List of Divisions that have been add...

Страница 8: ...e drop down menus beside Division Title and Group to assign these Note Division and Title are used for descriptive purposes only and are not required for access system use Note A User must be assigned...

Страница 9: ...n choose the user by double clicking on their line or right clicking and choosing modify 1 4 2 3 To Enroll a Fingerprint first choose which finger to enroll by clicking on that finger Example R2 is ri...

Страница 10: ...fter successful enrollment the section on the right of this screen List of Finger Prints will list all enrolled fingers for this User There are two functions that can be set in this section 1 4 2 8 Th...

Страница 11: ...ar Click on the finger to be enrolled Prompt Field will read Scan your finger then Remove your finger three times Then it will prompt fingerprint capture Succeeded or Failed Click on Add Icon Highligh...

Страница 12: ...lect User Group 1 5 1 1 In the lower left section List of Groups click on the Add Icon 1 5 1 2 This will bring up the Groups window Fill in a unique name 1 5 1 3 Helpful hint When naming Groups it can...

Страница 13: ...light and hold the desired User in the top left List of Users section Drag and Drop on the desired Group in the bottom right section User Allocation to Groups Click on desired User to highlight and ho...

Страница 14: ...RU for Approval 1 6 1 Approved TRU Tab 1 6 1 1 We will describe the Approve TRU tab first Click on the Approve TRU tab and the window shown below will appear 1 6 1 2 There are three sections in this w...

Страница 15: ...re by clicking on and highlighting a TRU then clicking on the Modify or Delete Icons You can also Right Click to get the same options 1 6 1 5 This section shows a list of programmed forced controls wi...

Страница 16: ...hed to them In the example shown below you will see that both TRU s have Christmas Holliday and Open House attached One is programmed to Force Open while the other is programmed to Force Closed Enter...

Страница 17: ...TRU you would like to Update and then click the Update Button at the bottom of the screen This will apply the force control to the TRU List of programmed Forced Controls List of Approved TRU s Visual...

Страница 18: ...covered These two sections perform exactly the same in this window and we will not address them here 1 8 5 When a TRU is configured in the TermIPConfig program covered later in this manual This windo...

Страница 19: ...for Single Token Access or Multi Token Access If you leave this check box blank the TRU will be Single Token Either Biometric or Prox Card will allow Access 1 8 13 If Multi Token identification for ac...

Страница 20: ...of Access Times section List of Holidays section In this example First shift Access Times are highlighted Access Time Details section First Shift Access Times are highlighted above Access Time Details...

Страница 21: ...l days with the same times example 0800 to 1700 simply fill in any day Monday through Friday select that day example Monday from the drop down menu at the bottom left of this window and click the Appl...

Страница 22: ...or 3 in the Group blank from the drop down menu This will match the Date to the programmed Access Times for Holliday 1 2 or 3 as set up in the Access Times window shown above 1 10 1 4 As many Holidays...

Страница 23: ...ay assign a Group different Access Times to different TRU s different times to different doors areas in the TRU Group Access Time Setup window In the example shown below the Sales Group has been assig...

Страница 24: ...ws the Access Times this group has been assigned in Bar Graph form 1 11 6 The bottom middle section List of Access Times highlights the set of Access Times that have been assigned to this group 1 11 7...

Страница 25: ...p 1 12 5 The bottom left section Access Time Details shows in Bar Graph form the Access Times assigned this group 1 12 6 If you click on a TRU in the top right section the bottom right section Informa...

Страница 26: ...left section List of Groups and Access Times All users assigned this Group will display in the middle left of this window in the section List of Users You may also note that the Access times are show...

Страница 27: ...low appears in the List of Logs section 3 1 1 2 Note the results column in the example below It shows when successful access is granted It also shows when access fails and the reason such as Fail Door...

Страница 28: ...th Information tab Click on the Auth Information tab The window shown below will appear 3 1 2 1 This window gives Success or Failure information in real time 3 1 2 2 If a picture is enrolled with a Us...

Страница 29: ...to be searched This is the only required entry before clicking Search 3 2 2 There are many Filter Criteria to narrow the search In the example below only the TRU was checked as a Filter Criteria Clic...

Страница 30: ...o view the image from this screen simply right click on the desired search line and choose Image View and the window shown below will appear Enter Dates to be searched here Many Filter Criteria in thi...

Страница 31: ...arch Results Caution This will delete ALL the results of the search you just performed 3 2 6 To program the length of time logs are saved right click on the Server Manager Icon in the bottom right tas...

Страница 32: ...tements to extract data from the database 3 3 2 Enter query statements in the upper left window and press the Query button to execute the statements 3 4 TRU Update Click on the Menu Selection Tools an...

Страница 33: ...ory in case the Network connection is lost Check the box next to the TRU to be updated Click the Update button at the bottom of this window The finger enrollments designated to be downloaded will down...

Страница 34: ...RS GUIDE Copyrighted by Integrated Biometrics Inc 2008 34 4 0 Backing up Data To backup user data that has been accumulating on the system go to start All Programs Integrated Biometrics LLC Bio I ACS...

Страница 35: ...iometrics Inc 2008 35 4 1 1 You will see as below picture after click the button 4 1 2 If you select the folder from above A new folder will be created with the date of the DB Then click the Backup bu...

Страница 36: ...650 ACCESS CONTROL SYSTEM USERS GUIDE Copyrighted by Integrated Biometrics Inc 2008 36 4 1 3 Back up will be done into one file for each database table The type back up file is tbu 4 2 Database Resto...

Страница 37: ...d Biometrics Inc 2008 37 4 2 1 Select the method from the Method for Restoration and click the Restoration button Restoration Completed 4 3 Log data Back up 4 3 1 As shown in the picture above select...

Страница 38: ...YSTEM USERS GUIDE Copyrighted by Integrated Biometrics Inc 2008 38 4 4 Log Restore 4 4 1 Select the Method for restoration and then select the file on folder Log data restoration will be completed by...

Страница 39: ...ia Access Control address a hardware address that uniquely identifies each node of a network This address is physically part of the device and can not be changed 5 9 MSDE Microsoft s Database Engine i...

Страница 40: ...se limits are designed to provide reasonable protection against harmful interference in a residential installation This equipment generates uses and can radiate radio frequency energy and if not insta...

Отзывы: