background image

INSTALLATION & OPERATION MANUAL


L500 Series 

Содержание L500 SERIES

Страница 1: ...INSTALLATION OPERATION MANUAL L500 Series...

Страница 2: ...TRAINER CLEANING STRAINER FILTER AUTOMATIC DRAIN VALVE SEAWATER PUMP CHECKING SEAWATER PUMP IMPELLER ENGINE COOLANT FLOW ENGINE COOLANT SUPPLEMENTAL ENGINE COOLANT DRAINING COOLANT REMOVING AIR BUBBLE...

Страница 3: ...UGE USER INTERFACE EOI FUNCTION LCD INFORMATION WARNING LAMP SWITCHES PTO MODE IDLE SETTING MODE EOI BOX INSIDE CUT OUT FOR EOI SYSTEM EOI PIN ASSIGNMENT G SCAN G SCAN CONNECTIONS DTC DIAGNOSIS TROUBL...

Страница 4: ...ONS AND OPERATION GUIDELINES MAY LEAD TO PERSONAL INJURY OR DEATH TO OPERATORS AND NEARBY PERSONNEL CAUTION DEVIATION FROM INSTALLATION INSTRUCTIONS AND OPERATION GUIDELINES MAY LEAD TO IMPROPER OPERA...

Страница 5: ...n cause damage to the engine control systems The ECU and related electronic devices must be disconnected and removed if unavoidable welding is needed Read and understand this operator s manual as well...

Страница 6: ...ext 10 hours occasional operating at full throttle 5 minutes at a time maximum is permissible AVOID full throttle accelerations from neutral position DO NOT operate at all full throttle until engine r...

Страница 7: ...si PRESSURE psi 0 068 Bar MPa 145 psi psi 0 0068 MPa Pa 0 102 mmWc mmWc 9 807 Pa Pa 0 004 inWc inWc 249 098 Pa KPa 4 inWc inWc 0 249 KPa mWg 39 37 inWc inWc 0 025 mWg TORQUE Nm 0 738 lbf ft TORQUE lbf...

Страница 8: ...ries 7 CHAPTER 1 ENGINE OVERVIEW ENGINE COMPONENTS FUEL FILTER ENGINE MOUNTING BRACKETS JUNCTION BOX OIL FILTER SEAWATER PUMP BYPASS OIL FILTER ECU WATER PUMP WATER SEPARATOR EXPANSION TANK OIL EXTRAC...

Страница 9: ...L500 Series INTERCOOLER COOLANT PIPE HEAT EXCHANGER OUTLET DRY EXHAUST PIPE STARTER MOTOR TURBO CHARGER OUTLET PIPE ENGINE MOUNTING BRACKET LIFTING EYES HEAT EXCHANGER AIR FILTER EXHAUST MANIFOLD AIR...

Страница 10: ...njection system EUI Diesel fuel at least CN 51 as per DIN EN 590 Intake air pressure abs bar speed rpm 2 7 1800 Coolant quantity liter 52 Coolant cap opening pressure bar 0 7 Engine oil liter 42 Engin...

Страница 11: ...INSTALLATION OPERATION MANUAL L500 Series 10 PERFORMANCE CURVES...

Страница 12: ...INSTALLATION OPERATION MANUAL L500 Series ENGINE IDENTIFICATION SERIAL NUMBER ON THE ENGINE BLOCK Engine identification is affixed to the engine block See figure ENGINE NAME PLATE FORMAT D6CEXXXXXX 11...

Страница 13: ...lifting chains or belts do not hit or touch surrounding parts during engine lifting Keep the engine horizontal when you install or remove the engine from the engine room by using correct installation...

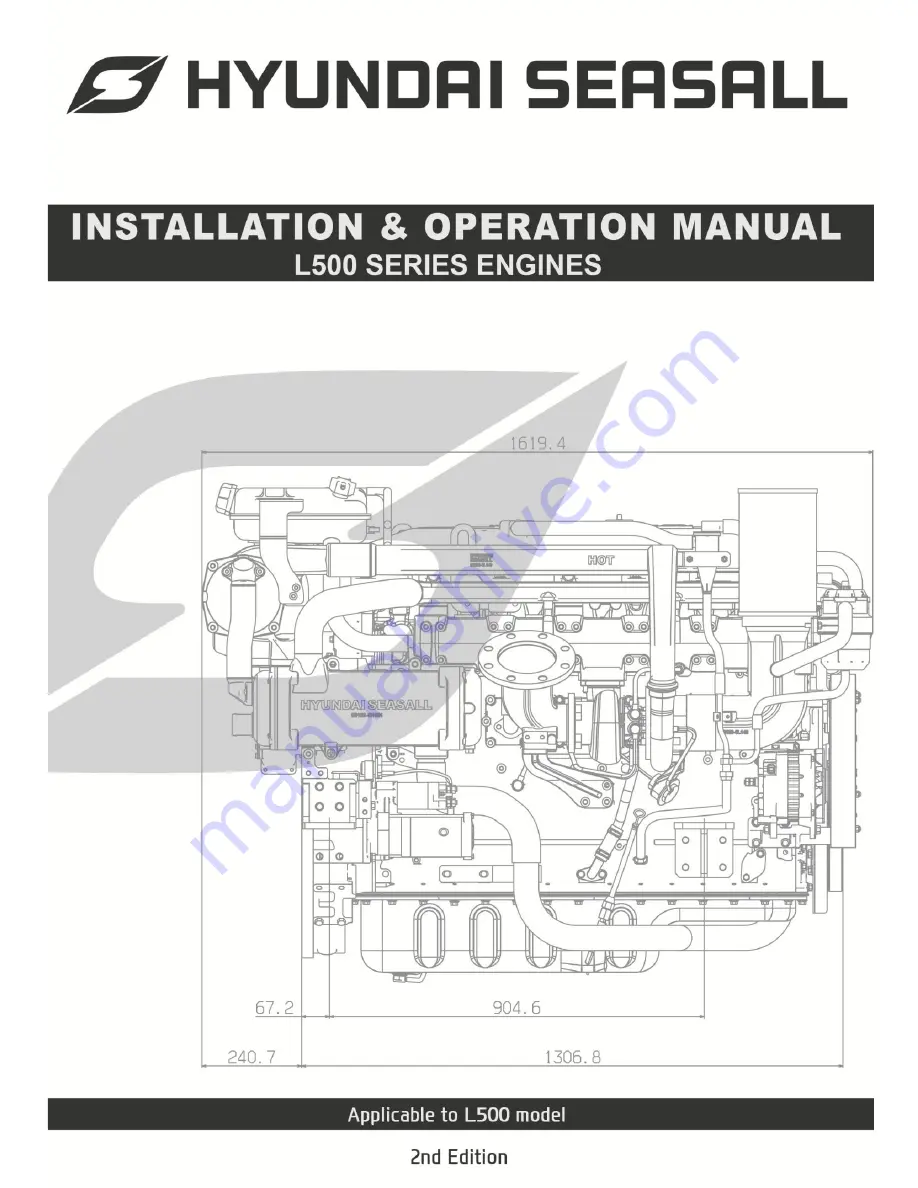
Страница 14: ...INSTALLATION OPERATION MANUAL L500 Series 13 ENGINE DIMENSIONS Top Side Front...

Страница 15: ...L500 Series 14 CRANK PULLEY T M ASSEMBLY BOLT PATTERN BELL HOUSING SAE 1 FLYWHEEL SAE 14 BELT INSTALLATION MODEL L500 AN ALTERNATOR DP DRIVE PULLEY IP IDLER PULLEY TP TENSIONER PULLEY WP WATER PUMP PU...

Страница 16: ...the key immediately to prevent damage to the starter motor Avoid maximum rpm and WOT Wide Open Throttle before the cold engine is fully warmed up 40 When cold starting it may take a few more seconds t...

Страница 17: ...o avoid unexpected engine starting during maintenance You can use this switch in any emergency situation When turning the start switch ON the coolant temperature sensor senses the engine coolant tempe...

Страница 18: ...TEM SCHEMATIC DIAGRAM OF ENGINE COOLING CIRCUIT INTAKE MANIFOLD Pc COOLANT PUMP HEAT EXCHANGER INTERCOOLER TURBOCHARGER AIRFILTER SEA WATER PUMP SEAWATER INTAKE AIR EXHAUST GAS COOLANT HEATER CONNECTO...

Страница 19: ...e inner diameter of the inlet of the seawater pump If not it may inhibit the supply of sufficient water and cause the engine to overheat CAUTION IF THE SEAWATER STRAINER IS NOT PROPERLY ASSEMBLED AIR...

Страница 20: ...ap Remove the filter element flush it thoroughly with clean water or compressed air Insert the cleaned filter element and screw on the filter cap Check the cap and the gasket for correct seating and s...

Страница 21: ...ain Valve from the intercooler Removing procedure Remove the Snap Ring Remove the Plunger Remove the Spring Clean the inside of the Automatic Drain Valve with a cloth or by brushing Installation is in...

Страница 22: ...l wire reinforced material The seawater pump impeller must be checked periodically and replaced if necessary CAUTION IF THE WATERPUMP IS NOT PROPERLY ASSEMBLED AIR CAN BE SUCKED INTO THE COOLING CIRCU...

Страница 23: ...PUMP REASSEMBLY CAUTION DO NOT INSTALL ADDITIONAL DEVICES WHICH COULD OBSTRUCT THE FLOW OF SEAWATER THIS CAN CAUSE THE ENGINE TO OVERHEAT Stop the engine and close the water valve Remove the impeller...

Страница 24: ...ld As the engine temperature increases the pressure inside the cooling system increases to 0 7 bar or more To maintain proper pressure of the engine cooling system water may be ejected from the expans...

Страница 25: ...d by an ethylene glycol based coolant to prevent corrosion and freezing DO NOT USE alcohol or methanol coolant or mix them with the specified coolant DO NOT USE a solution that contains more than 60 a...

Страница 26: ...all the expansion tank cap Check the level of the expansion tank regularly CABIN HEATER CONNECTION In order to use a cabin heater an extra coolant circulation pump is needed After connecting cabin hea...

Страница 27: ...illustration The pumping element A generates the fuel pressure as the force from the cam drives the plunger via the rocker arm The controlling component B controls the operation of the spill valve an...

Страница 28: ...lines a fuel filter an overflow valve a fuel tank etc Fuel from the fuel filter is supplied into the fuel gallery in the cylinder head After fuel is injected by six unit injectors it passes through th...

Страница 29: ...TORS ETC CAN BE ATTRIBUTED TO THE USE OF UNQUALIFIED FUELS IF WATER ACCUMULATED IN THE FUEL FILTER IS NOT DRAINED AT PROPER TIMES DAMAGE TO MAJOR ENGINE PARTS MAY OCCUR WHEN REPLACING THE FUEL FILTER...

Страница 30: ...t 2 Apply oil to gasket and tighten it sufficiently by hand 3 Tightening torque regulation 43 1 2Nm 4 4 0 2 kgf m 31 8 1 4 lb ft 29 Pump until fuel drains from air vent using priming pump Pumping time...

Страница 31: ...t gas to increase the output of the engine by supplying compressed air to the combustion chamber Engines with turbo charger air inlet systems require much more pumped and cool air Maximum air consumpt...

Страница 32: ...the procedure below Do not clean the filter element with gasoline or other solvents Remove the air filter from engine Put the air filter on a flat surface and shake dust out Liberally spray K N Air Fi...

Страница 33: ...m for the best performance of the engine Be sure that rain does not fall into the exhaust pipe The exhaust pipe can be rotated per the installation requirements Tighten the exhaust pipe to the support...

Страница 34: ...LATION OPERATION MANUAL L500 Series 33 CHAPTER 6 LUBRICATION SYSTEM LUBRICATION COMPONENTS 1 Cylinder block 2 Gasket 3 Oil pump assembly 4 Oil fan 5 Plate 6 Oil cooler assembly 7 Oil filter 8 Bypass f...

Страница 35: ...ting temperature Turn the engine off and wait about 5 minutes until the oil has returned to the oil pan Pull the dipstick out wipe it clean and re insert it fully Pull the dipstick out again and check...

Страница 36: ...il flow from the lubricant system by stopping the engine or using the valve Loosen the rotor cover nut and remove the rotor cover from the rotor body Using the spatula remove the accumulated sediments...

Страница 37: ...CHANGED BY YOUR NEAREST HYUNDAI SEASALL SERVICE DEALER CHECKING OIL FILTER Remove the drain plug at the lower part of oil filter and drain the engine oil Remove the bolt holding the oil filter canist...

Страница 38: ...res 4 Connect the battery cable to the starter motor 5 Connect the battery cable to system ground engine block 6 Battery cables should be clean and tightly connected 37 CHAPTER 7 ELECTRICAL SYSTEM CAU...

Страница 39: ...eleased to the idle position and fully pulled to the full load position The swing distance of lever between idle and full load position is 40mm Idle position setting Make sure that the position value...

Страница 40: ...CORROSIVE ACID AND MUST BE HANDLED WITH CARE IF SPILLED ON ANY PART OF THE BODY FLUSH IMMEDIATELY WITH WATER LOAD TEST If the battery has been charged remove the surface charge by connecting a 300 amp...

Страница 41: ...r auxiliary 5 Amp Fuel heater 20 Amp FUSES An engine s electrical system is protected from electrical overload damage by fuses If a fuse has blown the element inside the fuse will be melted If the ele...

Страница 42: ...to terminal 85 by supply 24V to terminal 86 Check for continuity between terminals 30 and 87 Always replace a damaged relay with one of the same rating Terminal Continuity 30 87 NO 30 87a YES 85 86 YE...

Страница 43: ...n the engine starts normally all the lamps turn off If there is a problem the specific lamp will come on In this case contact your Hyundai SeasAll dealer and have the engine checked as soon as possibl...

Страница 44: ...le position Battery voltage Percent load LB 3s or RB 3s LB RB 3s Reset In order to move Previous page LB Next page RB Boost pressure Oil pressure Dimmer control Total and trip hour counter 1 Sensor 10...

Страница 45: ...ormation 3 G scan terminal port 9 Function switch 4 Check engine lamp 10 PTO IDLE Change switch 5 Charging warning lamp 11 PTO IDLE RPM Up Down switch 6 Oil pressure warning lamp 1 Total engine full t...

Страница 46: ...the engine immediately and check with the nearest Hyundai SeasAll dealer immediately It can be harmful to drive your engine with this lamp on CHECK ENGINE This lamp informs you that the engine has a s...

Страница 47: ...value in the range of 600 RPM to 500 RPM the value can be changed using the G SCAN Contact your Hyundai SeasAll dealer 1 Function switch use to change the information display on the LCD 2 PTO IDLE ch...

Страница 48: ...H DRAW OVER 1 AMPERE THE E O I WILL BE DAMAGED BY OVERLOAD Connection Plug CN1 Engine Main Connector Connection Plug CN2 Inspect Terminal Connection Plug CN3 Key Switch Connection Plug CN4 RPM Gauge M...

Страница 49: ...START SWITCH 17 CHARGE WARNING LAMP 18 PTO SWITCH 19 PTO RES DEC 20 CHECK LAMP 21 PTO SEC INC 22 TANK LEVEL 23 HIGH COOLANT TEMP LAMP 24 NOT USED 1 GROUND 2 IDLE SWITCH 3 PTO LAMP 4 OIL PRESSURE SEND...

Страница 50: ...1 KEY SWITCH 2 START SWITCH 3 BATTERY CN3 KEY SWITCH 1 BATTERY 2 NOT USED 3 GROUND 4 KEY SWITCH 5 DIMMER 6 CAN 1 H 7 CAN 1 L 8 NOT USED CN4 RPM Gauge Main CN5 RPM Gauge Aux 1 NOT USED 2 BUZZER 3 OIL...

Страница 51: ...c tool which can perform the functions of DTC analysis fault code searching data analysis and ECU upgrading G SCAN CONNECTIONS The G scan can be connected to the diagnostic connector of the EOI 1 as w...

Страница 52: ...it High P0542 7 Intake Air Heater A Circuit Open P0543 8 Intake Air Heater System Performance P2609 9 Alternator Charging System Voltage High P2504 Fixed to Engine Idle RPM 10 Ambient air Pressure Bar...

Страница 53: ...t Low P1653 Lamp not working 35 High Coolant Temperature Lamp P1656 Lamp not working 36 Injector Injector Needle 1 High side circuit Low Cylinder 1 P1201 No Injection 37 Injector Needle 1 High side ci...

Страница 54: ...ector Needle 2 4 6 High side circuit High Cylinder 4 5 6 P1228 64 Injector Spill 1 High side circuit Low Cylinder 1 P1229 No Injection 65 Injector Spill 1 High side circuit High Cylinder 1 P1230 66 In...

Страница 55: ...High Cylinder 1 2 3 P1254 90 Injector Spill 2 4 6 High side circuit Low Cylinder 4 5 6 P1255 91 Injector Spill 2 4 6 High side circuit High Cylinder 4 5 6 P1256 92 Intake Temperature Intake Air Tempe...

Страница 56: ...ater regular inspection is required It is strongly recommended to replace the sacrificial anode at the start of each season ANODE CAUTION DO NOT OPERATE ENGINE WITHOUT ANODES IT IS HARMFUL TO YOUR ENG...

Страница 57: ...uld be followed to prepare your engine for out of season storage or prolonged storage two months or longer and or winter storage CHECK LIST Visual inspection for leaks and damage Change engine oil and...

Страница 58: ...eawater out of the system Fill the cooling system seawater side with a 30 50 solution of anti freeze Circulate into the seawater system by running the engine WINTER STORAGE COOLING SYSTEM IF the seawa...

Страница 59: ...operly Boat drain plug in place Check before putting boat in water Fuel oil coolant water and fluid no leaks Oil and fluid levels Propeller nut torque Steering operation throughout full range Forward...

Страница 60: ...leaks Check for Fuel system leaks Check the engine oil level and check for leaks Check the battery operating voltage Check the oil level and check the steering system for leaks Check transmission lubr...

Страница 61: ...FILTER CATRIDGE FUEL 1 31945 7L002 ELEMENT WATER SEPARATOR 1 00500 6L170 AIR FILTER 1 00400 6L160 SEAWATER PUMP ASSEMBLY 1 00400 6L290 IMPELLER KIT 1 00400 6L298 MINOR KIT SEAWATER PUMP 1 00400 6L299...

Страница 62: ...INSTALLATION OPERATION MANUAL L500 Series 61 MAINTENANCE LOG DATE MAINTENANCE PERFORMED ENGINE HOURS...

Страница 63: ...ing Incorrect starting procedure Fuel is not reaching the engine Faulty fuel filter or electric fuel pump Bad fuel quality or water in fuel Faulty fuse Faulty injector Engine starts with difficulty or...

Страница 64: ...igh pressure fuel circuit Injector needle stuck Engine stops Possible Causes Out of fuel Crank signals missing Fuel feed line not connected Fuel pressure regulator valve contaminated stuck jammed Leak...

Страница 65: ...full power APPLICATION OF WARRANTY COVERAGE Warranty coverage is available only to retail customers who purchase from a dealer authorized by Hyundai SeasAll to distribute the product in the country in...

Страница 66: ...nifold Fresh Water Pump Housing and Oil Pan Cylinder Liner or Cylinder Bore scratches are not included in extended major part warranty coverage Warranty period is limited by Years or Hours whichever o...

Страница 67: ...er etc If the Warranty Registration Card and Pre Delivery Inspection Card are not approved or not submitted to Hyundai SeasAll within 30 days from Warranty Starting Date Hyundai SeasAll reserves the r...

Страница 68: ...es to the factory in a timely manner so that they can be quickly resolved HOW TO OBTAIN WARRANTY COVERAGE The customer must provide Hyundai SeasAll with a reasonable opportunity to repair the engine a...

Страница 69: ...warranty repairs Participating in or preparing for racing or other competitive activity Water entering the engine via the air inlet filter or exhaust system or submersion Water in the starter motor F...

Страница 70: ...al Planning Semi Disp Displacement REPOWER Month Day Year WARRANTY REGISTRATION CARD This card is essential for registration of the customer s warranty Please fill out the following registration card...

Страница 71: ...INSTALLATION OPERATION MANUAL L500 Series...

Отзывы: