background image

Abrasive Regulator II


Instruction

 Manual 809030

29

Preventive maintenance

Preventive mainte

na

n

ce

7.

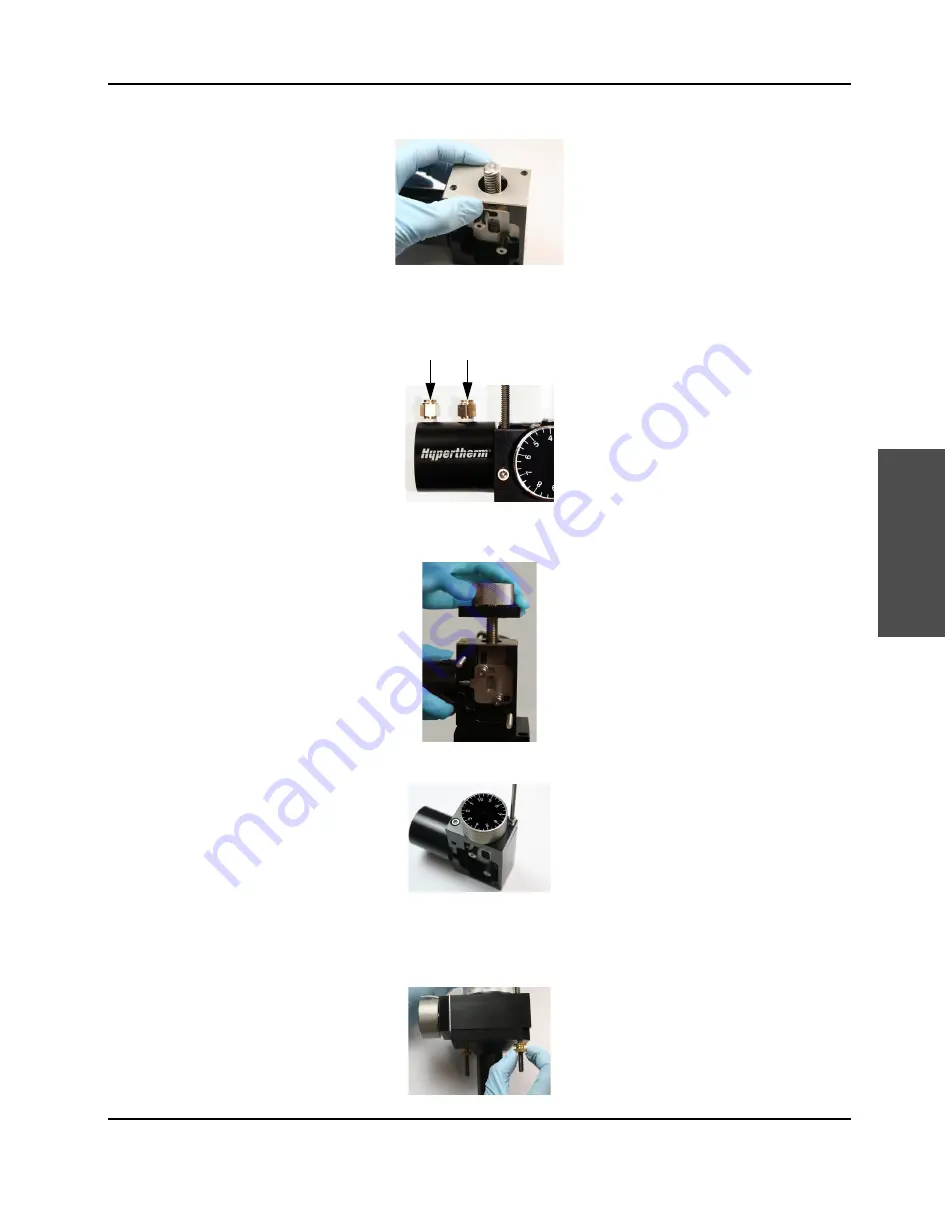
Put the divider on the side of the housing base.

Make sure that the beveled side of the divider faces out.

8.

Blow compressed air into 1 air cylinder fitting to make sure that the gate slides back and forth. Repeat this
procedure on the other air cylinder fitting.

9.

Put the control knob mounting plate onto the divider so that the holes line up. Turn the control knob clockwise
until it is tight on the regulator base.

10.

Install the socket-head cap screws. Tighten the screws.

11.

Put the regulator base on the threaded rods.

12.

Reassemble the thumb nuts on the threaded rods. Hand tighten the thumb nuts with the knurled side toward the
end of the threaded rod.

Содержание Abrasive Regulator II

Страница 1: ...Abrasive Regulator II Instruction Manual 809030 Revision 0 English ...

Страница 2: ...58 Fax Australia and New Zealand 61 0 7 3103 1695 61 0 4 3760 6995 Mobile 61 0 7 3219 9012 Fax Europe Middle East and Africa Technical service 00 800 4973 7843 Toll free 31 0 165 596900 31 0 165 596906 Fax TechnicalService HyperthermEurope Hypertherm com Customer service 00 800 3324 9737 Toll free 31 0 165 526156 00 800 4973 7329 Toll free fax 31 0 165 596948 Fax Return materials 31 0 165 596936 3...

Страница 3: ...Abrasive Regulator II Instruction Manual 809030 Revision 0 English Original Instructions October 2015 Hypertherm Inc Hanover NH 03755 USA www hypertherm com ...

Страница 4: ......

Страница 5: ...e operation 19 Operate the regulator 19 Adjust the regulator for a new abrasive 21 4 Preventive maintenance 23 Safety 24 Replace worn plates 25 Recalibrate the control knob 30 5 Parts lists 31 Replacement parts 32 Other parts 32 Complete list of preventive maintenance parts tools and materials 33 6 Troubleshooting 35 7 Installation 37 Safety 37 Buyer obligations 37 Requirements 38 Attach the abras...

Страница 6: ...6 Abrasive Regulator II Instruction Manual 809030 Contents ...

Страница 7: ... or 24 months from the date of proven installation or 4 000 hours whichever occurs first Bulk abrasive hoppers 15 months from the ship date or 12 months from the date of proven installation whichever occurs first Abrasive metering devices 15 months from the ship date or 12 months from the date of proven installation whichever occurs first On off valve air actuators 15 months from the ship date or ...

Страница 8: ...SC 8 Safety and compliance Warranty Warranty ...

Страница 9: ...ocal laws For more information go to www hypertherm com weee In other countries check national and local laws Consult with legal or other compliance experts when applicable Particle emission and wastewater quality Hypertherm does not manufacture or supply the materials that are cut and has no knowledge whether the particles released from materials that are cut will pose a physical hazard or health...

Страница 10: ...SC 10 Safety and compliance Environmental stewardship Environmental stewardship ...

Страница 11: ... instructions near the equipment This manual is intended to familiarize the user with the equipment and its parts operation and maintenance All people who operate or are exposed to this equipment must know this information Applicable safety standards The use limitations and care of personal protective equipment The location of the written hazard communication program and safety data sheets User qu...

Страница 12: ...SC 12 Safety and compliance Safety Safety ...

Страница 13: ...death High pressure water can cause eye injuries Wear approved eye protection when operating or working near this equipment Prolonged exposure to noise can cause permanent hearing loss Wear approved ear protection and control exposure time when operating or working near this equipment High pressure water can cause severe cuts or lacerations abrasions and punctures Wear approved hand protection whe...

Страница 14: ...SC 14 Safety and compliance Symbols and marks Symbols and marks ...

Страница 15: ...rasive flow rate to the cutting head fitting A coupling valve or gauge that stops regulates or directs the flow of water in a hose or a tube flow rate Measured in grams per minute 1 g min 0 0022 lb min or pounds per minute 1 lb min 453 6 g min high pressure water Water that has been pressurized by the intensifier for cutting or piercing hose A flexible hollow cylinder dimensions are based on its i...

Страница 16: ...nder psi Pound force per square inch is a unit of pressure 1 psi equals 0 07 bar or 7 kPa or 6 894 N m2 regulator The abrasive regulator SAE SAE International is a professional association of engineers and technical experts that coordinates the development of technical standards based on best practices in the aerospace commercial vehicle and automotive engineering SAE Code 61 fittings are designed...

Страница 17: ...abrasive pot The abrasive moves from the pot through a feed hose to the regulator Abrasive collects in the acrylic tube and then it moves through the metering aperture which permits abrasive to go to the cutting head The control knob changes the flow rate of abrasive to the cutting head The control knob is marked from 1 to 10 The flow rate is adjustable during cutting 6 2 3 4 5 7 8 9 1 1 Vent fitt...

Страница 18: ...18 Abrasive Regulator II Instruction Manual 809030 Product description Product description ...

Страница 19: ...cally supplied by a 4 way 2 position solenoid valve Refer to the diagram on page 40 Open the regulator When air enters the cylinder s outer connection the gate opens to permit abrasive to flow to the cutting head The air leaves the regulator through the inner connection to a vent Close the regulator When air enters the cylinder s inner connection the gate closes and the abrasive stops flowing The ...

Страница 20: ...nds per minute lb min Grams per minute g min 1 3 0 0 5 1 3 0 65 295 2 3 0 025 11 5 2 3 0 72 327 1 0 075 34 6 0 8 363 1 1 3 0 1 45 6 1 3 0 88 399 1 2 3 0 125 57 6 2 3 0 95 431 2 0 15 68 7 1 05 476 2 1 3 0 18 82 7 1 3 1 15 522 2 2 3 0 2 91 7 2 3 1 25 567 3 0 25 113 8 1 38 626 3 1 3 0 3 136 8 1 3 1 5 680 3 2 3 0 35 159 8 2 3 1 62 735 4 0 4 181 9 1 7 771 4 1 3 0 45 204 9 1 3 1 8 816 4 2 3 0 5 227 9 2 ...

Страница 21: ...n the regulator 5 Point the stream of abrasive into a container for 1 minute 6 Weigh the filled container 7 Subtract the weight of the empty container from the weight of the filled container 8 Use this chart to convert grams or ounces to pounds 9 Turn the control knob clockwise to increase the flow rate Turn the control knob anticlockwise to decrease the flow rate 10 Repeat this procedure until th...

Страница 22: ...e Regulator II Instruction Manual 809030 Operation Operation Use this table to record calibration details for other abrasives Abrasive material Pounds per minute lb min Grams per minute g min Control knob setting ...

Страница 23: ...ends preventive and scheduled maintenance for all equipment High quality equipment that is serviced on a schedule lasts longer than equipment that is not regularly maintained This maintenance includes but is not limited to adjustments cleaning lubrication repairs and replacement of parts Benefits of preventive maintenance Improves reliability Finds potential problems before they cause unplanned do...

Страница 24: ...otocols for recycling or disposal of parts and materials Refer to Recycling and end of product life on page 42 Refer to the instruction manual Read and understand all of the safety guidelines in this manual Follow all safety requirements and applicable safety laws and regulations Coordinate preventive maintenance and repair activities with operations and safety staff Examine and clean the equipmen...

Страница 25: ... 11411 Exit plate 11318 Sandwich plate 5 64 inch hex wrench 7 64 inch hex wrench 1 8 inch hex wrench 5 32 inch hex wrench 3 16 inch hex wrench Air supply Recommended materials Alignment tool such as a dowel Disassemble the regulator 1 Remove the thumb nuts from the bottoms of the threaded rods 2 Remove the regulator base 3 Remove the 2 socket head cap screws from the control knob mounting plate ...

Страница 26: ...e until it separates from the regulator body 5 Remove the divider 6 Remove the shoulder bolts from the housing base 7 Remove the 4 socket head cap screws from the air cylinder 8 Remove the aperture plate the sandwich plate and the exit plate The gate stays in place 1 2 3 4 1 Gate 2 Sandwich plate 3 Aperture plate 4 Exit plate ...

Страница 27: ...he gate Put the face with THIS SIDE UP toward the housing base Put the end with THIS END TOWARDS KNOB toward the knob on the housing base 2 Put the aperture plate between the exit plate and the gate Before reassembling the regulator clean the parts with compressed air to remove dirt and other contaminants 1 2 3 4 1 Gate 2 Sandwich plate 3 Aperture plate 4 Exit plate 2 1 1 Gate 2 Exit plate 2 1 1 G...

Страница 28: ... toward the housing base Put the end reading THIS END TOWARDS KNOB toward the knob on the housing base 4 Align the holes in the aperture assembly with an alignment tool such as a dowel 5 Install the washers springs and shoulder bolts in the aperture assembly holes Tighten the bolts Put the washer in with the flat side down 6 Install the socket head cap screws in the air cylinder body Tighten the s...

Страница 29: ...e gate slides back and forth Repeat this procedure on the other air cylinder fitting 9 Put the control knob mounting plate onto the divider so that the holes line up Turn the control knob clockwise until it is tight on the regulator base 10 Install the socket head cap screws Tighten the screws 11 Put the regulator base on the threaded rods 12 Reassemble the thumb nuts on the threaded rods Hand tig...

Страница 30: ... the control knob clockwise until it stops This puts the aperture in its fully open position 2 Hold the gauge pin in the wider end of the metering aperture and turn the control knob anticlockwise until the metering aperture is open just enough to pull the gauge pin out 3 Remove the dial label from the control knob 4 Put a new dial label on the control knob so that the pointer lines up with the 1 M...

Страница 31: ...acement parts for this pump The Hypertherm warranty might not cover damage caused by using nongenuine Hypertherm parts To order parts contact the original equipment manufacturer OEM or Hypertherm Inc with the part numbers and quantities Hypertherm Waterjet 305 2nd Street NW Suite 115 New Brighton MN 55112 USA 1 866 566 7099 1 651 294 8620 fax ...

Страница 32: ...14 Aperture assembly 12251 Acrylic tube 11751 Thumb nut 12255 Shoulder bolt 12256 Spring 12257 Washer 12075 1 4 inch 3 8 inch delivery tube fitting 13128 1 2 inch NPT 3 4 inch hose barb fitting 12736 1 8 inch NPT 1 4 inch air tube fitting 13615 3 8 inch OD 1 4 inch ID polyurethane delivery tube 9 53 mm OD 6 35 mm ID tube 11485 Dial label 13727 Coned rubber splash guard ...

Страница 33: ...dwich plate 11411 Exit plate 11485 Dial label Tools All wrenches and sockets are SAE 5 64 inch hex wrench 7 64 inch hex wrench 1 8 inch hex wrench 5 32 inch hex wrench 3 16 inch hex wrench or 5 mm wrench Compressed air source 0 038 inch diameter gauge pin Alignment tool such as a dowel recommended Materials Scale Stopwatch Container for measuring abrasive ...

Страница 34: ...34 Abrasive Regulator II Instruction Manual 809030 Parts lists Parts lists ...

Страница 35: ...e abrasive does not flow check for moisture in the abrasive or too much air in the feed hose Moisture in the abrasive Prevent humidity in the abrasive with an air dryer on the supply air Refer to the instruction manual Read and understand all of the safety guidelines in this manual 1 2 3 1 Vent hole 2 Regulator base 3 Delivery tube ...

Страница 36: ...o stop abrasive delivery to the regulator 2 Disconnect the delivery tube from the cutting head 3 Loosen the 2 thumb nuts on the regulator base 4 Lower and turn the base 5 Dry the delivery tube and the regulator base with compressed air 6 Dry the aperture assembly with compressed air 7 Wipe out the acrylic tube with a lint free towel or blow it dry with compressed air 8 Reassemble the regulator 9 R...

Страница 37: ...ding the installation operation maintenance and repair of this equipment Buyer obligations The buyer is responsible for these obligations Cooperate with Hypertherm and the Hypertherm original equipment manufacturer OEM regarding the installation of the equipment Research and comply with all local codes Make all connections to the equipment Refer to the instruction manual Read and understand all of...

Страница 38: ... rate Air The recommended air pressure is 4 bar to 5 5 bar or 441 kPa to 552 kPa 60 psi to 80 psi Attach the abrasive regulator to the cutting table Required tools materials and parts Drill 7 drill bit 5 mm drill bit 1 4 20 tap M6 1 tap 3 16 inch hex wrench 5 mm wrench Two 1 4 20 socket head cap screws M6 socket head cap screws 13615 3 8 inch OD 1 4 inch ID polyurethane delivery tube 9 53 mm OD 6 ...

Страница 39: ...ttom of the threaded rods to remove the regulator base from the regulator Turn the threaded rods upward to get them out of the way for the mounting cap screw 6 Mount the regulator to the mounting surface above the cutting head using 2 socket head cap screws 7 If the thumb nuts and threaded rods were moved adjust the threaded rod so that about 2 5 cm 1 inch of rod shows on each end Hand tighten the...

Страница 40: ...ay solenoid valve other solenoid valves can be used 1 Do a functional test of the abrasive regulator 2 Make the connections to the solenoid valve The diagram shows a 2 position 4 way solenoid valve in the typical position Refer to the solenoid valve manufacturer s instructions to connect the solenoid valve to the abrasive regulator 3 Make sure that the abrasive regulator operates properly 1 2 1 2 ...

Страница 41: ...that the abrasive regulator is installed correctly and that all of the feed hose connections are tight 2 Set up and fill the abrasive pot according to the manufacturer s instructions 3 Make sure that the abrasive regulator is closed 4 Permit the regulator to fill with abrasive It can take as much as 15 minutes to remove the air from the hose and to fill the regulator Abrasive can feed from the pot...

Страница 42: ...d of the life of the product or its parts recycle or dispose of relevant materials and parts using an environmentally satisfactory method and in accordance with local regulations If the product contains substances that are harmful to the environment remove and dispose of them in accordance with current local regulations ...

Страница 43: ...recision and Hypertherm are trademarks of Hypertherm Inc and may be registered in the United States and other countries All other trademarks are the property of their respective holders 2015 Hypertherm Inc ...

Отзывы: