background image

NH-2700T                                                                                                                        5. Operator Function   

5- 121

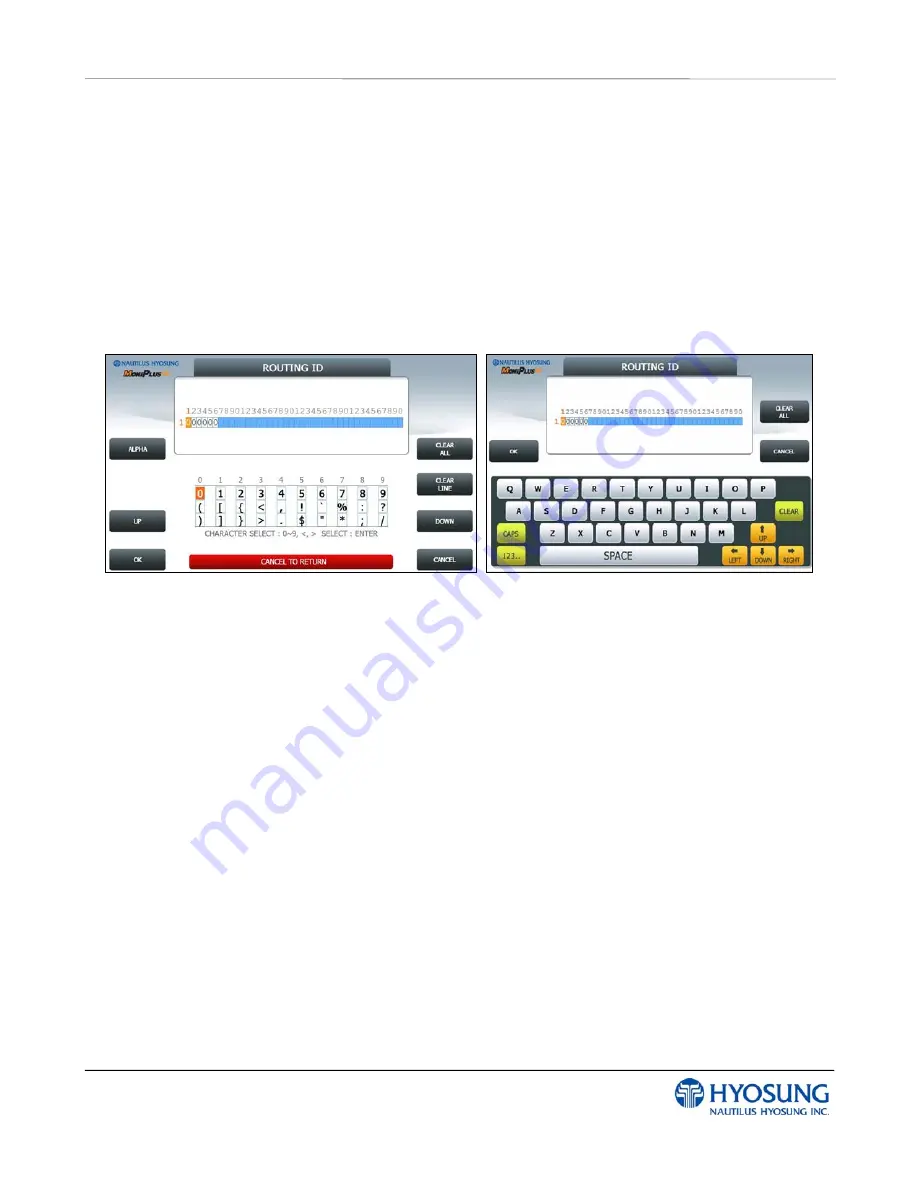
5.9.7 ROUTING ID 

The 

ROUTING  ID

  function  is  used  to  edit  the  Routing  ID  Number  of  ATM.  Routing  ID  refers  to  the 

Bank ID. This field is contained to STANDARD 1, STANDARD 2 and EPS format. 
   
Please  input  the  routing  id  in  the  field  and  select 

OK

  button.  If  it  succeeded, 

“OPERATION 

SUCCESSFUL!”

 displays. 

 
To go back to the previous screen, press the 

CANCEL

 key in pinpad. 


[Function Key Type]                                                        [Touch Type] 


Содержание NH-2700T

Страница 1: ...NH 2700T Operator Manual Copyright 2011 Nautilus Hyosung Inc All right reserved...

Страница 2: ...NH 2700T G Revision Record Date Page Version Description of Change April 2011 All 1 0 New Publication...

Страница 3: ...autions pour la s curit French 2 1 Sommaire 2 2 2 2 Description des symboles de pr caution 2 3 3 Hardware Specifications 3 1 Dimensions 3 2 3 2 Fascia Features 3 4 3 3 Devices of NH 2700T 3 6 3 4 Oper...

Страница 4: ...eplenish 5 126 5 13 Quick Configuration 5 129 6 Installation 6 1 Installation Information 6 2 6 2 System Installation 6 9 7 Appendix 7 1 Error Code Table 7 2 7 2 Installation Guide 7 36 7 3 Transactio...

Страница 5: ...NH 2700T 1 Introduction 1 1 Chapter 1 Introduction...

Страница 6: ...f the model NH 2700T machine is highlighted in the following list Main Controller CPU S5PC100 834MHz ARM Cortex A8 SDRAM 256MB Flash Memory 256MB Memory NV RAM N A Operating System WinCE 6 0 Serial Po...

Страница 7: ...Type Thermal Line Printing Printing Width 80mm Max Paper Setting Method Semi Automatic Type Thermal Roll Paper Width Max 80mm Paper Specification Outer Diameter Max 180 Journal Electronic Journal Supp...

Страница 8: ...uding the portion where the customer transacts business Module refers to a plug in device that can be serviced or replaced Note s and bill s refer to the individual documents loaded into and dispensed...

Страница 9: ...fer Systems 19 JPR Journal Printer 20 LCD Liquid Crystal Display 21 MCU Magnetic Card Unit 22 OPL Operation Panel for Customers to Operate 23 OSD board On Screen Display Board 24 P S Power Supply 25 P...

Страница 10: ...NH 2700T 2 Precautions for Safety 1 2 Chapter 2 Precautions for Safety English...

Страница 11: ...s using the methods outlined in this manual please refer to contact information listed in the manual 5 Any change or modifications in construction of this device which are not expressly approved by th...

Страница 12: ...a away from any combustible materials The equipment may catch on fire from overheating or short circuit of the power supply unit Disassembly Do not disassemble or modify the equipment unless you are a...

Страница 13: ...N LINE CORD 2 RISK OF EXPLOSION IF BATTERY IS REPLACED BY AN INCORRECT TYPE DISPOSED OF USED BATTERIES ACCORDING TO THE INSTRUCTIONS 3 FOR PLUGGABLE EQUIPMENT THE SOCKET OUTLET SHALL BE INSTALLED NEAR...

Страница 14: ...NH 2700T 2 Pr cautions pour la s curit 1 2 Chapitre 2 Pr cautions pour la s curit French...

Страница 15: ...m thodes d crites dans ce manuel veuillez se r f rer aux informations de contact figurant dans le manuel s il vous pla t Certain changement ou des modifications dans la construction de ce dispositif q...

Страница 16: ...cer l quipement seul Vous pouvez tre bless s par la chute de l quipement lourd Risque d incendie Placer l quipement dans une zone loign e de tous les mat riaux combustibles L quipement peut s enflamme...

Страница 17: ...voquer un choc lectrique AVERTISSEMENT 1 POUR R DUIRE LES RISQUES D INCENDIE UTILISEZ UNIQUEMENT AWG n 26 OU LA LIGNES DE TELECOMMUNICATION PLUS GROSSE 2 RISQUE D EXPLOSION SI LA BATTERIE EST REMPLACE...

Страница 18: ...NH 2700T 3 Hardware Specifications 3 1 Chapter 3 Hardware Specifications...

Страница 19: ...re Specifications 3 2 3 Hardware Specifications 3 1 Dimensions Below figures show the overall physical dimensions of the NH 2700T NOTE All the units in the dimension is mm and is inch scale 1 Dimensio...

Страница 20: ...NH 2700T 3 Hardware Specifications 3 3 2 Dimensions on side cross sectional view...

Страница 21: ...s available on NH 2700T system all devices might not be included in your ATM 1 Liquid Crystal Display Consumer Display 4 Function Keys 10 2 IR Touch Option 2 Receipt Printer Slot 5 Card Reader Slot Di...

Страница 22: ...dispenser shutter in the lower fascia Consumer keypad Encryption Pin Pad During the transaction sequence the ATM prompts the consumer to use the consumer keypad to enter transaction information The 16...

Страница 23: ...encryption PIN pad technology to secure the information entered by the customer at the keypad The function keypads are made up of four keys mounted on each side of the customer display The customer se...

Страница 24: ...Dispenser Unit Capacity of 2 000 new notes 40 notes 1 transaction Capacity of 2 000 6 000 3CSTx2 000 new notes optional Reject bin with capacity of 200 notes Note by note reject 3 3 3 Receipt Printer...

Страница 25: ...ard entry slot and then removes the card to begin the transaction The dip card reader can read magnetic stripe cards and memory chip cards The dip card reader cannot retract capture or retain cards Ba...

Страница 26: ...IP Selectable 3 4 Operating Environment Power Requirements 100W Free Voltage 90 264VAC Power Connections The NH 2700T ATM must be connected to a dedicated power circuit This circuit must consist of L...

Страница 27: ...NH 2700T 4 Operating Instructions 4 1 Chapter 4 Operating Instructions...

Страница 28: ...1 How to open the security door 1 Unlock the dial lock referring to 4 1 2 How to open the dial lock 2 Turn the security door handle counterclockwise then pull the security door to open it 3 Use the re...

Страница 29: ...erclockwise for more than four times and set to 50 2 Turn to the clockwise and stop at 25 at the third times 3 Turn to the counterclockwise and stop at 50 at the second times 4 Turn to the clockwise u...

Страница 30: ...terclockwise for more than four times and set to 50 at left scale indicator as shown in the Fig 4 1 4 Turn to the clockwise and stop at 25 at the third time as shown in the Fig 4 2 5 Turn to the count...

Страница 31: ...than four times and position at left scale indicator to 10 target number to change 8 Turn to the clockwise for three times and position the scale to 50 target number to change 9 Turn to the counterclo...

Страница 32: ...re than a couple of times while the door is open to see if the door is opened or not Make sure to run the open close test for at least two or three times 12 When all setting is completed inform the pa...

Страница 33: ...the electronic combination lock Default setting value 1 2 3 4 5 6 Valid Code Entry Double signal after valid six 6 digit code is entered Invalid Code Entry Triple signal and invalid six 6 digit code...

Страница 34: ...OPEN 1 Enter 0 0 0 0 0 0 six 6 zeros into the Electronic Lock keypad 2 Enter in the old combination existing six 6 digit code once 3 Enter in the new combination twice Combinations must be six digits...

Страница 35: ...immediate replacement Uses one 1 9 Volt Alkaline Battery Hyosung recommends the use of Duracell or Eveready Alkaline batteries If battery is depleted and will not allow lock to open simply follow the...

Страница 36: ...onnector is easily removed by unsnapping it from the two terminals on the top of the battery Never Pull on the Battery Leads Connect a new 9 Volt Alkaline battery to the battery clip Push the battery...

Страница 37: ...ck is shelved Instead the Shelved Mode combination is used to open the lock without any Smart Key The default Factory Combination is set to 50 25 50 Practice opening the lock in shelved mode with the...

Страница 38: ...y pressing those six buttons The LCD will display these number as they are entered 3 When the combination has been correctly entered the LCD will read OPr meaning Open right 4 Turn the dial right CW u...

Страница 39: ...was pressed on the keypad you may clear the entire operation and start again by pressing the star key This allows you to return to the EC prompt without getting a wrong try error lightning bolt Cautio...

Страница 40: ...e Once a lock is activated in any mode the Shelved Mode combination returns to the Factory Default of 50 25 50 To change the Shelved Mode Combination 1 Power Lock EC Turn the Dial to the left CCW unti...

Страница 41: ...ation 6 Extend Bolt Turn the Dial to the left CCW to extend the bolt 7 Power Lock Turn the dial to the left CCW until the Change Key symbol along with Enter Combination is displayed 8 Press 8 EcF Pres...

Страница 42: ...rn the dial to the left CCW until EC Enter Combination is displayed 14 EC Enter New Shelved Mode Combination OPr Enter the new shelved mode combination by pressing those digits on the lock s keypad Th...

Страница 43: ...4 2 1 1 Acceptable condition 1 Bill which is very clean and can readily be recognized as a true bill 2 Bill has sufficient life or sizing to be handled easily 3 Bill which can be manually held straig...

Страница 44: ...g Instructions 4 18 4 2 1 2 Unacceptable condition 1 Bill having serious wrinkles torn or broken section wherein paper fiber is broken and separation begins 9 Wrinkle 9 Torn 9 Broken section Wrinkle T...

Страница 45: ...or sizing but stained seriously 3 Bill with holes Perforated bill 4 Bill ragged and cannot be held straightly when one end is supported by a hand Stained Hole 20mm 35mm When the bill is held by 20mm...

Страница 46: ...NH 2700T 4 Operating Instructions 4 20 5 Bill with cellophane tape scotch tape etc 6 Bill with folds 7 Gradually curved bill bills tied by hand seal etc Tape Fold Band seal...

Страница 47: ...ase 2 9 Case 3 Bill distortion should not exceed 10 mm Prior to replenishing the cash cassette with the notes 1 Fan the notes so that the notes are not sticking together 2 Remove all notes with holes...

Страница 48: ...andle and the other hand supporting the cash cassette from bottom pull it up and out carefully 2 Place the cash cassette on a flat level platform and turn the cassette key clockwise to unlock the cass...

Страница 49: ...4 Replenish the cassette Take note as below PRECAUTION Do NOT replenish more cash than recommended capacity It means that it should be replenished less than 2 000 bills per cassette for new bills Make...

Страница 50: ...ette key counter clock wise until it is locked Remove the key when it is locked 7 With one hand holding the cassette handle and the other hand supporting the cassette from the bottom place the cassett...

Страница 51: ...y and turn it clockwise 2 Open the lid of reject box 3 Take bills from the reject box and close the box with key PRECAUTION Do NOT recycle any bill in reject box into cassette Doing so will cause not...

Страница 52: ...4 2 4 How to Clear Notes Jam 1 Pull the rail of CDU outward while pressing the green button on the CDU 2 Turn the pulley located in left upper in order to move jammed note into a well removed positio...

Страница 53: ...aper 4 3 1 1 Specifications Item Specifications Remark Paper Type Thermal Roll Paper Paper detects heat Paper Width 79 5 0 5mm Paper Exterior 180 Paper basis Weight 55 3 g Paper Thickness 58 4 Print C...

Страница 54: ...t sunlight or leave it under the fluorescent lamp for a long time 3 Keep it away form the organic solvents Paper color may change if the paper comes in contact with organic solvents or glues containin...

Страница 55: ...l out the rail outward completely with hands 2 Pull the receipt printer unit forward while pressing the highlighted green button 3 Prepare the new paper roll Please see the NOTE described below NOTE P...

Страница 56: ...unded with paper to reduce the tension during feeding 7 Insert the leading edge of paper between lower guide and upper guide of the receipt printer slowly When the machine is initialized the paper is...

Страница 57: ...NH 2700T 4 Operating Instructions 4 31 NOTE THE BASIC MECHANISM OF RECEIPT PRINTER...

Страница 58: ...tward completely with hands To remove a jammed paper inside transport path press down the green lever or the green button to release the lower roller assembly 2 To take out a jammed paper in front of...

Страница 59: ...xit OSD menus 3 button To move a submenu under OSD menu to the right side or to increase the selected value 4 button To move a submenu under OSD menu to the left side or to decrease the selected value...

Страница 60: ...NH 2700T 5 Operator Function 5 1 Chapter 5 Operator Function...

Страница 61: ...Function Key on ATM Main Screen on SPL of Rear Type Machine To enter Supervisor mode press the ENTER CLEAR CANCEL 1 2 and 3 keys in order In case of Rear Type Machine press the IN SUPERVISOR button Th...

Страница 62: ...ing CANCEL key goes to in service mode Depending on authority there are three kinds of default password like below table Please make sure that default password should be changed to different password...

Страница 63: ...AY TOTAL O O O TRIAL DAY TOTAL O O O CASSETTE TOTAL O O O 1 SETTLEMENT TRIAL CASSETTE TOTAL O O O CLEAR JOURNAL O O O CLEAR TRANS SEQUENCE NO O O O PREV O O O NEXT O O O PREV 50 O O O NEXT 50 O O O MO...

Страница 64: ...O O PREV O O O ERROR SUMMARY NEXT O O O PRINT O O O REJECT ANALYSIS CLEAR O O O INITIALIZE O O X RECEIPT PRINTER O O X CASH DISPENSER O O X MODEM DIAL UP O O X TCP IP TCP IP O O X CARD SCAN O O X CDU...

Страница 65: ...IST DELETE ALL O O X MOD 10 CHECK EN DISABLE O O X EN DISABLE O O X BALANCE AT START CONTINUE EN DISABLE O O X ACCOUNTS CREDIT CARD EN DISABLE O O X SELECT RECEIPT EN DIABLE O O X EN DISABLE O O X AFT...

Страница 66: ...REEN 2 EN DISABLE O O X SCREEN 3 EN DISABLE O O X SCREEN 4 EN DISABLE O O X SCREEN 5 EN DISABLE O O X CHANGE BACKGROUND SCREEN 6 EN DISABLE O O X EN DISABLE O O X TITLE O O X SCREEN SERVICES NOTICE ME...

Страница 67: ...O O X SCREEN 2 EN DISABLE O O X SCREEN 3 EN DISABLE O O X SCREEN 4 EN DISABLE O O X SCREEN 5 EN DISABLE O O X WELCOME ADVERTISEMENT SCREEN 6 EN DISABLE O O X TIMER O O X SCREEN 1 EN DISABLE O O X SCR...

Страница 68: ...E O X X DIALUP O X X COMMUNICATION TCP IP O X X GENERAL O X X EOT OPTIONAL O X X NO EOT REQUIRED O X X EOT ENQ OPTION NO ENQ REQUIRED O X X STANDARD 1 O X X STANDARD 2 O X X STANDARD 3 O X X MESSAGE F...

Страница 69: ...ATEWAY O O X DNS O O X TERMINAL IP TCP IP DHCP EN DISABLE O O X DEFAULT LANGUAGE O O O ENGLISH EN DISABLE O O O SPANISH EN DISABLE O O O LANGUAGE EN DISABLE FRENCH EN DISABLE O O O OPERATOR PASSWORD O...

Страница 70: ...EN DISABLE O O X SOFTWARE UPDATE O O O REBOOT O O O BACKUP ALL JOURNAL TO USB O O O FROM O O O TO O O O BACKUP JOURNAL BY DATE TO USB SEARCH O O O BACKUP LOG TO USB O O O CLEAR ALL O X X CLEAR SETTING...

Страница 71: ...SERIAL NUMBER O X X HOST PHONE 1 O X X TELEPHONE NUMBER DIAL UP HOST PHONE 2 O X X URL EN DISABLE O X X HOST ADDRESS 1 O X X PORT NUMBER 1 O X X HOST ADDRESS 2 O X X HOST ADDRESS TCP IP PORT NUMBER 2...

Страница 72: ...O X RMS LISTENING PORT TCP IP O O X RMS PASSWORD O O X ROUTING ID O X X EN DISABLE O O O TOTAL TYPE O O O HOUR O O O AUTO DAY TOTAL MINUTE O O O DISPENSE LIMIT O O X LB 0 O O X LB 1 O O X LB 2 O O X R...

Страница 73: ...NH 2700T 5 Operator Function 5 14 Working Management Function CE Authority No Main Sub1 Sub2 Sub3 Sub4 Sub5 M S O 10 SITE MAP O O O 11 QUICK REPLENISH O O O 12 QUICK CONFIGURATION O X X...

Страница 74: ...LIZE button if the error is caused by a device so it can be cleared by initializing Press OPERATOR FUNCTION button if you have to set up any information to clear the error And set up the information w...

Страница 75: ...KeyPad Default KeyPad Character Table Screen Shift Status 0 1 2 3 4 5 6 7 8 9 NUMBER 0 1 2 3 4 5 6 7 8 9 UPPER Space Q Z A B C D E F G H I J K L M N O P R S T U V W X Y ALPHA LOWER Space q z a b c d e...

Страница 76: ...ey 1 is pressed once it is SPACE pressed twice it is Q pressed third time it is Z in case of the Alpha mode When the desired character is selected press ENTER F keys move the cursor position in the AL...

Страница 77: ...You can use this KeyPad in same way as a computer keyboard Default KeyPad Character Table Screen Key Character Table ABC Q W E R T Y U I O P A S D F G H J K L Z X C V B N M CAPS q w e r t y u i o p a...

Страница 78: ...st Cassette 8 The Media Status of 2nd Cassette 9 The Media Status of 3rd Cassette 10 The Media Status of 4th Cassette 11 1st Cassette Remaining notes Denomination e g if 1000 notes of 20 1000 20 12 2n...

Страница 79: ...NFIGURATION F1 SETTLEMENT F2 CUSTOMER SETUP F3 JOURNAL F4 SYSTEM SETUP F5 REPORT F6 HOST SETUP F7 DIAGNOSTICS F8 TRANSACTION SETUP In order to move to the in service mode press the 1 or CANCEL key in...

Страница 80: ...05 LINE TYPE TCP IP DIAL UP MESSAGE FORMAT STANDARD1 STANDARD2 STANDARD3 EPS TERMINAL ID NH2700 ERROR CODE 00000 00 STATUS CST1 Remaining Notes BILLS COUNT 1047 10 N A CST2 Remaining Notes BILLS COUNT...

Страница 81: ...700T 5 Operator Function 5 22 CST3 Media Status MISSING NORMAL LOW EMPTY FULL CST4 Media Status N A REJECT REJECT COUNT CDU 0 Card OK ERROR Pinpad OK ERROR Cash Dispenser OK ERROR Receipt Printer OK E...

Страница 82: ...operate the related function To go back to the previous screen press the CANCEL key in pinpad 1 ADD CASH Go to the next screen 2 DAY TOTAL Do settlement with host After settlement clear transaction in...

Страница 83: ...t Cassette numbers are designated from top to bottom Input the note count you want to add and press the ENTER key in the pinpad If you completed the all cassettes you have to press APPLY button to eff...

Страница 84: ...SEQUENCE NO This function will reset the journal sequence number to 0000 This may be useful if you switch processing or switch Terminal ID numbers and want to keep new records 3 PRINT JOURNAL The PRIN...

Страница 85: ...urnal record will be displayed on the screen Use PREV or NEXT button to show just one data before or after and PREV 50 or NEXT 50 button are for data before 50 or after 50 EA If you use MOVE FIRST or...

Страница 86: ...he index is valid 5 4 2 PRINT LAST X The PRINT LAST X function is used to print out recent journal data If you want to print recent journal data enter the count of data you want on JOURNAL main screen...

Страница 87: ...rt menu consists of 5 sub menus ERROR CODE ERROR SUMMARY SW VERSION PRINT ALL SETUP and REJECT ANALYSIS You can print out all information regarding each device as well as system value set up If you wa...

Страница 88: ...PREV NEXT buttons are to navigate previous and next error codes one by one and PREV 10 NEXT 10 are to do by 10 EA MOVE FIRST MOVE LAST buttons are to go to the first error code and the last one PRINT...

Страница 89: ...ROR CODE You can search a specific error code if that exists In order to use the function please input the specific error code in the field and select OK button If there is no result in database INVAL...

Страница 90: ...NH 2700T 5 Operator Function 5 31 5 5 2 SW VERSION This menu shows each software version Each versions will be displayed APPLICATION CDU EP CDU SP SPR EP SPR SP MCU EP MCU SP and etc...

Страница 91: ...URRENT BILLS SERIAL NUMBER SPEAKER VOLUME HOST MODEM INITIAL STRING RMS MODEM INITIALI STRING 8 SYSTEM SETUP LANGUAGE MODE WELCOME MESSAGE INFO RECEIPT HEADER TAIL INFO RECEIPT ADDRESS PHONE INFO OPTI...

Страница 92: ...E REJECT CURRENT BILLS SERIAL NUMBER SPEAKER VOLUME ATM IP OPTION 9 SYSTEM SETUP LANGUAGE MODE WELCOME MESSAGE INFO RECEIPT HEADER TAIL INFO RECEIPT ADDRESS PHONE INFO OPTIONAL FUNCTION 1 INFO OPTIONA...

Страница 93: ...of times they occurred You can print these errors PREV NEXT buttons are to navigate previous and next pages and PRINT button prints all of error code history CLEAR button erases the history stacked in...

Страница 94: ...the rejects by the number of times or note counts they occurred You can print these rejects PRINT button prints the reject analysis information CLEAR button erases the reject analysis information and...

Страница 95: ...enus INITIALIZE RECEIPT PRINTER CASH DISPENSER MODEM or TCP IP CARD SCAN AUXILIARY UNIT and AGING Please press each button on this menu to go to next screen or to operate the related function To go ba...

Страница 96: ...IPT PRINTER CASH DISPENSER and MODEM CASE 1 If you input test count 0 the test count will be UNLIMIT 2 If you input test count 10 the test will perform 10 times 3 If you cancel a test and then perform...

Страница 97: ...ror code Confirm the detailed error description in the ERROR CODE of REPORT MENU Accessing the RECEIPT PRINTER 1 Select DIAGNOSTICS in the OPERATOR FUNCTION 2 Select the RECEIPT PRINTER in the DIAGNOS...

Страница 98: ...dem for any errors Input the desired PHONE NUMBER then press ENTER Key for TEST DIAL This function is used to check the function of the modem dial Accessing the MODEM 1 Select DIAGNOSTICS in the OPERA...

Страница 99: ...ors Input the desired HOST ADDRESS HOST PORT SSL OPTION and SSL VERSION then select CONNECT for line test This function is used to check the function of the TCP IP Accessing the TCP IP 1 Select DIAGNO...

Страница 100: ...on of testing the magnetic stripe reader and the card itself Accessing the CARD SCAN 1 Select DIAGNOSTICS in the OPERATOR FUNCTION 2 Select CARD SCAN in the DIAGNOSTICS menu And if the display is read...

Страница 101: ...ator Function 5 42 5 6 6 AUXILIARY UNIT This AUXILIARY UNIT contains SENSOR and FLICKER Please press each button on this menu to go to the next screen To go back to the previous screen press the CANCE...

Страница 102: ...as the function of testing if all the sensors are in proper working condition The sensors are tested by turning the sensors on and off Accessing the SENSOR 1 Select DIAGNOSTICS in the OPERATOR FUNCTIO...

Страница 103: ...r is normal the sensor will be displayed as GREEN COLOR And if any sensor detects an object or is abnormal the sensor will be displayed as RED COLOR Moreover if any sensor doesn t exist the sensor wil...

Страница 104: ...r is normal the sensor will be displayed as GREEN COLOR And if any sensor detects an object or is abnormal the sensor will be displayed as RED COLOR Moreover if any sensor doesn t exist the sensor wil...

Страница 105: ...Accessing the SENSOR 1 Select DIAGNOSTICS in the OPERATOR FUNCTION 2 Select AUXILIARY UNIT in the DIAGNOSTICS menu and then select FLICKER in the AUXILIARY menu 3 Select any button to test EPP CDU SPR...

Страница 106: ...DE ADVERTISEMENT STANDARD3 OPTION and SELECT PROCESSOR Please press each button on this menu to go to the next screen To go back to the previous screen press the CANCEL key in pinpad STANDARD 3 NOTE S...

Страница 107: ...u press the RECEIPT HEADER button the current display will be changed into the RECEIPT HEADER And you can set the receipt header message in the RECEIPT If you press the RECEIPT TAIL button the current...

Страница 108: ...tion 5 49 Refer to figure of the Sample Receipt below for the location of the messages The default receipt format will not include any messages Spanish transactions will be printed in English Location...

Страница 109: ...50 5 7 1 1 WELCOME MESSAGE The WELCOME MESSAGE function is used to edit the welcome text Please input the welcome message in the field and select OK button If it succeeded OPERATION SUCCESSFUL display...

Страница 110: ...eipt header in the field and select OK button If it succeeded OPERATION SUCCESSFUL displays Function Key Type Touch Type 5 7 1 3 RECEIPT TAIL The RECEIPT TAIL function is used to edit the message at t...

Страница 111: ...BER The RECEIPT ADDRESS PHONE NUMBER function is used to edit the message at the address phone number of receipt Please input the receipt address phone number in the field and select OK button If it s...

Страница 112: ...the given BIN code ATM doesn t request any additional fee However it is necessary to confirm the connected host because host will decide whether it uses or not You can input and edit it by using such...

Страница 113: ...w the BIN LIST This function support additional 3 000 BIN LIST exclusive of the basic 20 BIN LIST Use PREV or NEXT button to show BIN LIST before or after You can change EXTENDED BIN LIST via FILE UPD...

Страница 114: ...T START CHECK CASHING ACCOUNTS SELECT RECEIPT and PRE DIALING Please press each button on this menu to go to next screen To go back to the previous screen press the CANCEL Key in pinpad NOTE 1 CHECK C...

Страница 115: ...NH 2700T 5 Operator Function 5 56 5 7 3 1 MOD 10 CHECK MOD 10 CHECK is to check the card data s validation Please press EN DISABLE button to set up MOD 10 CHECK...

Страница 116: ...s enabled the screen with which a customer can check his her balance will be inserted into the normal transaction flow Please press EN DISABLE button to set up BALANCE AT START and CONTINUE EN DISABLE...

Страница 117: ...s one of the options of the Value Added Service which exchanges checks for cash To use the function you should call technical support The certification screen will appear if you didn t certified CERTI...

Страница 118: ...CCOUNTS is to set up the accounts which is used on transaction You can see CHECKING ACCOUNT SAVINGS ACCOUNT and CREDIT CARD ACCOUNT however only CREDIT CARD ACCOUNT can be set up Please press CREDIT C...

Страница 119: ...s ENABLED the ATM MACHINE will show the screen which a customer can select whether printing the receipt after a transaction or not Please press EN DISABLE button to set up SELECT RECEIPT If SELECT REC...

Страница 120: ...mprove the performance speed of transaction by making a connection to the host server earlier than normal Please press EN DISABLE button to set up PRE DIALING and one of three buttons AFTER CARD ATER...

Страница 121: ...NH 2700T 5 Operator Function 5 62 5 7 4 OPTIONAL FUNCTION2 OPTIONAL FUNCTION2 menu contains DEVICE OPTION and SCREEN SERVICES To go back to the previous screen press the CANCEL Key in pinpad...

Страница 122: ...TION Please press each button on this menu to set up items To go back to the previous screen press the CANCEL Key in pinpad 5 7 4 2 SCREEN SERVICES SCREEN SERVICES menu contains CHANGE BACKGROUND and...

Страница 123: ...screens Please press EN DISABLE button on this menu to set up for CHANGE BACKGROUND To go back to the previous screen press the CANCEL Key in pinpad DISABLED ENABLED The change background image can b...

Страница 124: ...n Please press SCREEN n EN DISABLE button to set up SCREEN n 5 7 4 2 2 DEFAULT SCREEN DEFAULT SCREEN function provides SIX different Background screens You can set up only one screen on the six scree...

Страница 125: ...Function 5 66 5 7 4 2 3 NOTICE NOTICE menu contains TITLE and MESSAGE You can set up TITLE 1 line 30 column and MESSAGE 3 line 40 column If you set up NOTICE ENABLE ATM will be displayed notice inform...

Страница 126: ...e swiped card data contains BIN number that was entered during installation the surcharge warning message will not be displayed When the SURCHARGE MODE is enabled the SURCHARGE OWNER AMOUNT and SURCHA...

Страница 127: ...8 5 7 5 1 SURCHARGE OWNER The SURCHARGE OWNER function is used to edit the surcharge owner Please input the surcharge owner in the field and select OK button If it succeeded OPERATION SUCCESSFUL displ...

Страница 128: ...MODE 2 PERCENTAGE Set PERCENTAGE 3 WARNING MANNER Set whether to use maximum value or minimum value between PERCENTAGE and SURCHARGE AMOUNT GREATER Maximum value LESSER Minimum value 4 LOCATION Set s...

Страница 129: ...2700T 5 Operator Function 5 70 5 7 6 ADVERTISEMENT ADVERTISEMENT function provides COUPON WELCOIME ADVERTISEMENT and TRANSACTION ADVERTISEMENT Please press each button on this menu to go to next scre...

Страница 130: ...ANCED COUPON If you set the BASIC COUPON and select COUPON SETTING button BASIC COUPON setting screen will be displayed BASIC COUPON supports 2line 39column ENHANCED COUPON supports 16line 39column If...

Страница 131: ...ASIC COUPON SETTING Please press each button on this menu to go to next screen 5 7 6 1 1 2 BASIC COUPON n Please press BASIC COUPON n EN DISABLE button to set up BASIC COUPON n Please press COUPON n T...

Страница 132: ...73 5 7 6 1 1 3 COUPON n TEXT The COUPON n TEXT function is used to edit the coupon n text Please input the welcome message in the field and select OK button If it succeeded OPERATION SUCCESSFUL displa...

Страница 133: ...r NOT USE Please press each button on this menu to go to next screen 5 7 6 1 2 2 ENHANCED COUPON n Please press ENHANCED COUPON n OPTION button to set up NOT USE ALWAYS and USE TIME START TIME and END...

Страница 134: ...7 6 1 2 3 ENHANCED COUPON n TEXT The ENHANCED COUPON n TEXT function is used to edit the coupon n text Please input the welcome message in the field and select OK button If it succeeded OPERATION SUC...

Страница 135: ...NH 2700T 5 Operator Function 5 76 Touch Type...

Страница 136: ...press the TIMER button you can change the advertisement display timer and the range is between 5 and 30 in welcome screen Please press each button on this menu to go to next screen The welcome adverti...

Страница 137: ...on provides SIX different screens If you press the TIMER button you can change the advertisement display timer and the range is between 5 and 30 in welcome screen Please press each button on this menu...

Страница 138: ...NH 2700T 5 Operator Function 5 79 5 7 6 3 1 SCREEN n Please press SCREEN n EN DISABLE button to set up SCREEN n...

Страница 139: ...information when Triton message is selected 1 STATUS MONITORING function is to decide whether status monitoring field in message is sent or not 2 COMMUNICATION HEADER function is to decide whether co...

Страница 140: ...5 7 7 1 COMMUNICATION ID The COMMUNICATION ID function is used to edit the communication id Please input the communication id in the field and select OK button If it succeeded OPERATION SUCCESSFUL dis...

Страница 141: ...is used to get the additional information when Triton message is selected 1 TERMINAL STATUS function is to decide whether terminal status field in message is sent or not 2 HOST ERROR function is to de...

Страница 142: ...SELECTHOST menu contains COMMUNICATION MESSAGE FORMAT EOT ENQ OPTION TCP IP TYPE and REVERSAL RETRY COUNT NOTE 1 EOT ENQ OPTION is displayed only if the Network is Dial up or TCP IP Type is VISA FRAM...

Страница 143: ...Host Select DIALUP or TCP IP In case of setting up DIALUP communicate with host using modem And in case of setting up TCP IP communicate with host using LAN NOTE In case of selecting IN SERVICE on OP...

Страница 144: ...NH 2700T 5 Operator Function 5 85 5 7 9 2 EOT ENQ OPTION EOT ENQ OPTION contains GENERAL EOT OPTIONAL NO EOT REQUIRED and NO ENQ REQUIRED functions You can select one of these options...

Страница 145: ...ype to communicate with a data processing company or bank in this menu STANDARD1 STANDARD2 STANDARD3 and EPS If STANDARD3 is selected STANDARD3 OPTION button is displayed on the CUSTOMER SETUP Screen...

Страница 146: ...function setting up communication flow to use when communicating with host In this menu you can change TCP IP TYPE and can decide whether ENABLE or DISABLE about SSL OPTION There are three kind of TCP...

Страница 147: ...et the try count of reversal transaction CURRENT REVERSAL RETRY COUNT displays count of current setting value You can enter the count and then press ENTER or CONFIRM if you want to change try count of...

Страница 148: ...ODEM PARAMETERS TERMINAL IP DEVICE SETUP LANGUAGE EN DISABLE and SYSTEM CONTROL Please press each button on this menu to go to next screen To go back to the previous screen press the CANCEL key in pin...

Страница 149: ...ess each menu the cursor will be positioned and you can change the value This value is saved by pressing APPLY key on the other hand to go back to the previous screen press the CANCEL key in pinpad 5...

Страница 150: ...to DISABLE or DISABLE to ENABLE In case of DHCP is disabled IP ADDRESS SUBNET MASK GATEWAY and DNS buttons will be displayed If DHCP value is ENABLE ATM uses DYNAMIC IP to connect to host Otherwise AT...

Страница 151: ...isplayed in screen There are three types of language ENGLISH SPANISH FRENCH You can change default language pressing DEFAULT LANGUAGE SELECT button If you press each EN DISABLE button one of ENABLE DI...

Страница 152: ...three passwords OPERATOR PASSWORD SERVICE PASSWORD and MASTER PASSWORD 5 8 5 1 OPERATOR PASSWORD This menu enables you to change current operator password as new one To change the current password yo...

Страница 153: ...word you should input the proper one in current password field The factory default value of service password is 222222 5 8 5 3 MASTER PASSWORD This menu enables you to change current master password a...

Страница 154: ...ST INITIAL STRING and RMS INITIAL STRING functions are used to edit the modem initial string when the special circumstance is required by a nonstandard modem initial string Before editing the initial...

Страница 155: ...al string in the field and select OK button If it succeeded OPERATION SUCCESSFUL displays Function Key Type Touch Type 5 8 6 2 RMS INITIAL STRING The RMS INITIAL STRING function is used to edit the rm...

Страница 156: ...r Function 5 97 5 8 7 DEVICE SETUP This DEVICE SETUP menu contains CDU SETUP Please press the CDU SETUP button on this menu to go to next screen NOTE When you change CDU Setup Information contact the...

Страница 157: ...ttons COUNTRY CDU TYPE and CASSETTE VOLUME Then the CDU SETUP INFORMATION will be changed If you changed the information correctly press the EXECUTE button to APPLY 1 COUNTRY USA CANADA KOREA CHINA JA...

Страница 158: ...USB slot before pressing the button When BACKUP ALL JOURNALS TO USB BACKUP JOURNAL BY DATE TO USB or BACKUP LOG TO USB button is selected this data will be sent into USB flash drive When SOFTWARE UPD...

Страница 159: ...you press the YES button the ATM will restart 5 8 8 2 BACKUP JOURNAL BY DATE TO USB Input the START DATE and END DATE using FROM and TO buttons And press the SEARCH button Then the journal date betwe...

Страница 160: ...2 CLEAR SETTING This will delete all programmed parameters and make all information including passwords to the default settings This does NOT include the master keys which are stored in EPP denominat...

Страница 161: ...nd AUTO DAY TOTAL TCP IP This host setup menu contains KEY MANAGEMENT HOST ADDRESS TERMINAL ID HEALTH CHECK MESSAGE REMOTE MONITOR ROUTING ID and AUTO DAY TOTAL Pressing function key beside menu butto...

Страница 162: ...START SCREEN Enter the PASSWORD 1 and PASSWORD 2 to execute KEY MANAGEMENT Default PASSWORD 1 is 000000 And default PASSWPRD 2 is 000000 as well If you enter PASSWORD 1 and PASSWORD 2 correctly the m...

Страница 163: ...elect the KEY MANAGEMENT in the HOST SETUP menu 3 Select the KEY MODE in the KEY MANAGEMENT menu Change the KEY MODE 5 9 1 2 KEY INDEX The KEY INDEX function is used to set the KEY INDEX The range is...

Страница 164: ...____ means it is in empty state The authorized people can verify the injected key s with this menu after key injection Accessing the CHECK MASTER KEY 1 Select the HOST SETUP in the OPERATOR FUNCTION m...

Страница 165: ...6 5 9 1 4 EDIT KEY The EDIT KEY function is used to enter the Master Key Unique Key and Mac Key The authorized people by bank or DP will enter the Key s with this menu KEY MODE DES TDES DUAL MASTER KE...

Страница 166: ...MODE UNIQUE KEY DES UNIQUE KEY TDES KEY MODE UNIQUE KEY MAC Accessing the EDIT KEY 1 Select the HOST SETUP in the OPERATOR FUNCTION menu 2 Select the KEY MANAGEMENT in the HOST SETUP menu 3 Select th...

Страница 167: ...after confirming the check sum NOTE You have to input the SAME KEY INDEX for MASTER KEY PART A and MASTER KEY PART B B HOW TO EDIT UNIQUE KEY 1 Press UNIQUE KEY PART A button 2 Enter the UNIQUE KEY I...

Страница 168: ...C KEY PART A the CHECK SUM will be displayed Press ENTER after confirming the check sum 6 Press MAC KEY PART B button 7 Enter the MAC KEY INDEX 8 Enter the MAC KEY PART B 9 Verify the MAC KEY PART B 1...

Страница 169: ...ion is used to insert the ATM machine number for RMS Accessing the SET MASTER KEY SERIAL NUMBER 1 Select the HOST SETUP in the OPERATOR FUNCTION menu 2 Select the KEY MANAGEMENT in the HOST SETUP menu...

Страница 170: ...one number of host can be input You can input character number and special symbol up to 1 20 digits by using or This function is used to enter the primary phone number and the back up phone number of...

Страница 171: ...NUMBER 1 HOST ADDRESS 2 and PORT NUMBER 2 Press PORT NUMBER 1 and PORT NUMBER 2 buttons and then the values can be input on this screen These values can be saved by pressing ENTER key HOST ADDRESS 1 a...

Страница 172: ...ddress 1 in the field and select OK button If it succeeded OPERATION SUCCESSFUL displays Function Key Type Touch Type 5 9 3 2 HOST ADDRESS 2 The HOST ADDRESS 2 function is used to edit the host addres...

Страница 173: ...he terminal id number of ATM Please input the terminal id in the field and select OK button If it succeeded OPERATION SUCCESSFUL displays Host will identify ATM by looking at terminal ID Terminal ID w...

Страница 174: ...either ENABLE or DISABLE can be selected ATM sends its status periodically to the host when HOST SEND is set up to Enable The interval is dependent on SEND INTERVAL If you press SEND INTERVAL button...

Страница 175: ...ent System RMS 1 RMS EN DISABLE function is used to connect to the RMS mode to enable or to disable The default option is ENABLE 2 RMS STATUS SEND EN DISABLE function is used to send the status messag...

Страница 176: ...6 1 RMS EN DISABLE DIALUP Display which is to set the RMS RING COUNT for the reception on standby of the ATM TCP IP Display which is to set the RMS LISTENING PORT for the reception on standby of the...

Страница 177: ...D Display whether RMS STATUS SEND function is ENABLE or DISABLE Set the value using EN DISABLE button 2 INTERVAL Display RMS STATUS SEND cycle unit hours Set the value using INTERVAL button Input the...

Страница 178: ...the number from 1 to 24 3 URL EN DISABLE Display whether to use URL or IP ADDRESS If the value is ENABLE that means the ATM uses URL ADDRESS Set the value using URL EN DISABLE button 4 RMS ADDRESS Di...

Страница 179: ...on 5 120 5 9 6 2 1 RMS ADDRESS The RMS ADDRESS function is used to edit the rms address Please input the rms address in the field and select OK button If it succeeded OPERATION SUCCESSFUL displays Fun...

Страница 180: ...ber of ATM Routing ID refers to the Bank ID This field is contained to STANDARD 1 STANDARD 2 and EPS format Please input the routing id in the field and select OK button If it succeeded OPERATION SUCC...

Страница 181: ...e same time your day s balance should match the host This information will appear as a journal record so you will need to access your journal to print or view the totals 1 EN DISABLE Display whether A...

Страница 182: ...used to set the maximum amount of notes that can be dispensed per transaction The amount must be a multiple of denomination And the maximum dispensed count a transaction must not be over a total of 4...

Страница 183: ...set the cash amount which is to be displayed on the FAST CASH screen The maximum amount must be less than the DISPENSE LIMIT You can set 6 kinds of values which are frequently requested by customer us...

Страница 184: ...n of note to be set in the cassette Pressing function key beside menu button selects the cassette to set the denomination of note Input the note value you want and press the ENTER key in the pinpad If...

Страница 185: ...f you press each menu SETTLEMENT JOURNAL REPORT DIAGNOSTICS CUSTOMER SETUP SYSTEM SETUP HOST SETUP or TRANSACTION SETUP then it will enter each sub menu 5 12 QUICK REPLENISH This menu provides conveni...

Страница 186: ...ction 5 127 5 12 1 DAY TOTAL CASSETTE TOTAL It will perform DAY TOTAL and CASSETTE TOTAL first 1 DAY TOTAL Do settlement with host After settlement clear transaction information 2 CASSETTE TOTAL Clear...

Страница 187: ...ount Cassette numbers are designated from top to bottom Input the note count you want to add and press the ENTER key in the pinpad If you completed the all cassettes you have to press APPLY button to...

Страница 188: ...u consists of NETWORK SETUP MESSAGE FORMAT SETUP TERMINAL ID SETUP PASSWORD SETUP and RESULT CONFIGURATION 5 13 1 TCP IP This chapter shows how to configure for TCP IP Setup Information 5 13 1 1 COMMU...

Страница 189: ...this menu you can change TCP IP TYPE and can decide whether ENABLE or DISABLE about SSL OPTION There are three kind of TCP IP type in this TCP IP COMMUNICATION menu STANDARD TCP IP VISA FRAMED TCP IP...

Страница 190: ...can select one of these options 5 13 1 4 HOST ADDRESS HOST ADDRESS contains URL EN DISABLE HOST ADDRESS 1 and PORT NUMBER 1 Press PORT NUMBER 1 button and then the values can be input on this screen...

Страница 191: ...DHCP value to DISABLE and press NEXT it goes to TERMINAL IP SETUP Screen NOTE When you press NEXT button if you configured DHCP to DISABLE then it goes to Section No 5 13 1 6 If not then it goes to Se...

Страница 192: ...rocessing company or bank in this menu STANDARD1 STANDARD2 STANDARD3 and EPS STANDARD 1 is a HYOSUNG message type and STANDARD 2 is a CSP200 message type STANDARD 3 is Triton 9600 message type and EPS...

Страница 193: ...8 ROUTING ID The ROUTING ID function is used to edit the Routing ID Number of ATM Routing ID refers to the Bank ID This field is contained to STANDARD 1 STANDARD 2 and EPS format NOTE When you press N...

Страница 194: ...l information when Triton message is selected 1 STATUS MONITORING function is to decide whether status monitoring field in message is sent or not 2 COMMUNICATION HEADER function is to decide whether c...

Страница 195: ...looking at terminal ID Terminal ID will be included in host message and will be printed on the receipt 5 13 1 11 PASSWORD SETUP MASTER PASSWORD This menu enables you to change current master password...

Страница 196: ...NH 2700T 5 Operator Function 5 137 5 13 1 12 RESULT After performing QUICK CONFIGURATION the result will be shown as below...

Страница 197: ...on 5 13 2 1 COMMUNICATION This is to set up a type of line to communicate with Host Select DIALUP In case of setting up DIALUP communicate with host using modem 5 13 2 2 EOT ENQ OPTION EOT ENQ OPTION...

Страница 198: ...during communicating with Host You can select one of message type to communicate with a data processing company or bank in this menu STANDARD1 STANDARD2 STANDARD3 and EPS STANDARD 1 is a HYOSUNG mess...

Страница 199: ...5 ROUTING ID The ROUTING ID function is used to edit the Routing ID Number of ATM Routing ID refers to the Bank ID This field is contained to STANDARD 1 STANDARD 2 and EPS format NOTE When you press N...

Страница 200: ...l information when Triton message is selected 1 STATUS MONITORING function is to decide whether status monitoring field in message is sent or not 2 COMMUNICATION HEADER function is to decide whether c...

Страница 201: ...looking at terminal ID Terminal ID will be included in host message and will be printed on the receipt 5 13 2 8 PASSWORD SETUP MASTER PASSWORD This menu enables you to change current master password a...

Страница 202: ...NH 2700T 5 Operator Function 5 143 5 13 2 9 RESULT After performing QUICK CONFIGURATION the result will be shown as below...

Страница 203: ...NH 2700T 6 Installation 6 1 Chapter 6 Installation...

Страница 204: ...lected off the LCD screen Avoid locations where strong static electricity can occur The floor must allow easy wheelchair access from the front or the side Space required for servicing the machine shou...

Страница 205: ...ction view as below figure is describing wall mount position of NH 2700T NH 2700T ATM can be installed through 100mm of wall thickness maximum and can not exceed NOTE All of the dimensions are in mill...

Страница 206: ...NH 2700T 6 Installation 6 4 Terminal Dimensions on Front View The following diagrams are description system dimensions for NH 2700T...

Страница 207: ...ion and Service Clearance Following diagram is describing the areas required for installing and servicing the NH 2700T To service Cash dispenser Module we recommend secure enough space to open securit...

Страница 208: ...6 6 Following diagram is describing the minimum areas required for installing and servicing the NH 2700T To service Cash dispenser Module we recommend secure enough space to open security door Full a...

Страница 209: ...all this machine should not exceed 100mm Height shown in the figure is the minimum Dimensions for equipment installation are based on the floor area used by the customers outside the building 5mm 0 2i...

Страница 210: ...PRODUCTION INFORMATION NH 2700T ATM machine is the heavy equipment and can cause injuries if not handled with caution Firmly close the vault door and lock the door by turning the knob completely GOnl...

Страница 211: ...oved lift the whole machine from the bottom and set it aside Physical Installation To install the Model NH 2700T ATM perform the following steps 1 Place the Anchor bolts locate sheet at the place wher...

Страница 212: ...osition equipment through the opening in the wall and adjust its position PRODUCTION INFORMATION Check the location of the opening in the wall to estimate whether the collar can be installed Gw G G G...

Страница 213: ...NH 2700T 6 Installation 6 11 G G G 1 Front edge 0mm 0 0 inch 2 Side edge 10 2mm 0 4 inch 3 Upper edge 5 0mm 0 2 inch 4 Lower edge 15 5mm 0 61 inch G...

Страница 214: ...NH 2700T 6 Installation 6 12 Anchor Diagram Gw G G G G G G G G G Gh tU Inserting the collar 1 Disassemble the lower base of the collar adapter assembly...

Страница 215: ...dy of the system by extending the collar adapter assembly and bringing it down from top to bottom 3 Match the guide holes of the left and right of the collar adapter assembly with the holes of upper b...

Страница 216: ...y with the holes of upper body Match the guide holes of collar adapter assembly with the holes of safety Ffasten the screws of the top and bottom 4ea PH M4X8 Fasten the screws on both sides of the eav...

Страница 217: ...ation 6 15 6 Turn the cover captive screw on the rear of the machine and open the cover 7 Push the collar lock bracket in the arrow direction and fasten the captive screw of the collar lock bracket Th...

Страница 218: ...NH 2700T 7 Appendix 7 1 Chapter 7 Appendix...

Страница 219: ...ve jammed paper between printer head and rollers 2010400 Receipt paper empty 1 Replenish receipt paper 2 Check the status of sensor and its connector 2010500 Receipt paper setting error 1 Check the st...

Страница 220: ...heck the Cutter module 2 Check if printer head lever is properly close 2080900 No sensing black mark dark sensor 1 Check the status of Black mark sensor 2 Check if Dip switch 6 is correctly set Dip sw...

Страница 221: ...executing command Check for and remove any jammed paper A080100 Open lever detected while executing command Remove any jammed paper A080200 Receipt printer head overheated while printing Check the the...

Страница 222: ...2700T 7 Appendix 7 5 Error Code Description Trouble shooting ADN1300 No response detected after 5 retries because of timeout between STX BCC interval Check cable and connection between the CE and prin...

Страница 223: ...Call your attendant 97923XX DEV_MCU FATALERROR WARNING 1 Reboot ATM 2 Call your attendant 9799301 MCU RETRACT OVER Clear the count of retracted card at OP mode 90001 Card Read Error 1 Check Magnetic C...

Страница 224: ...RTED Check your card D001 4 Invalid Card Number Check your account D005 4 Expire Card Check your card D005 7 Transaction not Permitted Card Check your card IDN0 X DIP MCR connection failure 1 Power Of...

Страница 225: ...efore CDU dispenses Sensor is located along the delivery path right before the reject bin Remove note from the CDU delivery path 21A1500 CS1A sensor detects note in delivery path before CDU dispenses...

Страница 226: ...ter CDU dispenses 1 Remove note from the CDU delivery path 2 Clean CS4B 4001900 CS2 or CS4B sensor detects note in delivery path before after CDU dispenses 1 Remove note from the CDU delivery path 2 C...

Страница 227: ...CS13 4002A Detect CS13 CS1B after initialization Detect CS13 CS1B before dispensing 4002A00 CS1B or CS13 sensor detects note in delivery path before after CDU dispenses 1 Remove note from the CDU del...

Страница 228: ...r Command 4003800 Error in checking SRAM 40039 INITIAL DISPENSE Solenoid Operation Error before motor activation 4003900 Gate operation sensor CS3 LS8 error before initial recovery 1 Initialize after...

Страница 229: ...if total reject is more than 20 sheets 1 Check notes in Reject Box 2 Rearrange notes in Cassette 3 Remove dust in CS1AB CS15AB CS31AB CS41AB Sensor 4 Check dust in existence CS5 Sensor Guide 5 Check...

Страница 230: ...es in cassette 3 Check Index of notes 4 Check foreign objects in the main motor encoder slit 5 Replace the CS8 encoder slit sensor 4004C00 In case the number of notes detected outlet sensor CS13 LS2 i...

Страница 231: ...box and remount the reject box 3 Check if the CS3 LS8 sensor bracket is bended 4 Check if the CS3 LS8 sensor cable is Disconnected CN10 9 10 5 Exchange a sensor after abnormal operating CS3 LS8 Gate...

Страница 232: ...Something is detected on CS41AB sensor before dispensing bills from fourth cassette 4007200 Something is detected on CS41AB sensor during dispensing bills 4007300 Bills is remained in CS41AB sensor af...

Страница 233: ...ail 40094 0xC2 Command Execution Error Certification Fail 4009A00 CS31AB CS13 Time out Jam during dispensing from 3rd cassette 4009D00 Trying to dispense bills from 3rd cassette but the 3rd cassette d...

Страница 234: ...3 Cassette 2 Replace 3 cassette box when multiple errors occur 400C400 Cassette Jam during dispense operation 4 CST Encoder Error 1 Remove a jammed note in 4 Cassette 2 Replace 4 cassette box when mul...

Страница 235: ...ailed to create file 1 Reboot ATM 2 Reinstall software 3 Replace hard disk drive 9712100 Failed to read file 1 Reboot ATM 2 Reinstall software 3 Replace hard disk drive 9712200 Failed to write file 1...

Страница 236: ...currency at supervisor mode 971A200 CASSETTE OFF POSITION Not dispensable 1 Reconfigure denomination 2 Reconfigure currency 971A300 In case the number of bills dispensed exceeds the maximum dispensing...

Страница 237: ...ng CS4B Dark Error code 400FF00 is subdivided by location of sensor 9742100 When sensing CS21A B Dark Error code 400FF00 is subdivided by location of sensor 9742800 When sensing CS13 Dark Error code 4...

Страница 238: ...Check bill jam or no note in cassette 2 2 Check cash dispenser 97914XX DEV_Cash Dispenser Time over Error Code 1 Reboot ATM 2 Call your attendant 97924XX DEV_Cash Dispenser FATAL ERROR WARNING 1 Reboo...

Страница 239: ...s on the specified address are currently in use 1 Check modem cable 2 Contact to technician support team D030400 The disable address parameter contains dialing control characters that are not processe...

Страница 240: ...701031 Failed to read Register of EPP Reboot ATM 9701040 Failed to produce Thread of EPP Reboot ATM 9701060 Failed to create buffer Reboot ATM 9701111 BCC error of EPP Check BCC logic of EPP 9701151 E...

Страница 241: ...1D6 Invalid Media Area size is larger than media size 1 Reboot ATM 2 Call your attendant 97221D7 Invalid Media Size of Media Name is exceeded to 2048 bytes totally 1 Reboot ATM 2 Call your attendant 9...

Страница 242: ...OR WARNING 1 Reboot ATM 2 Call your attendant 97926XX DEV_PBM FATALERROR WARNING 1 Reboot ATM 2 Call your attendant 97928XX DEV_PIN FATALERROR WARNING 1 Reboot ATM 2 Call your attendant 9792AXX DEV_FN...

Страница 243: ...nied by host D000700 INSUFFICIENT FUNDS Transaction was denied by host D000800 INELIGIBLE TRANSACTION Transaction was denied by host D000900 INELIGIBLE ACCOUNT Transaction was denied by host D001000 D...

Страница 244: ...on from the host and try again Try Balance Inquiry D005200 No Checking Account Check the transaction from the host and try again D005300 No Savings Account Check the transaction from the host and try...

Страница 245: ...inal ID mismatch Check the terminal setting from the host D009700 Response Type mismatch Reversal Check the terminal setting from the host D009800 Response Type mismatch Day Close Check the terminal s...

Страница 246: ...al setting from the host D00A700 FS out after total surcharge amount Check the terminal setting from the host D00A800 FS out after config surcharge amount Check the terminal setting from the host D00A...

Страница 247: ...phone company D120000 Transmission error Failed to receive the whole data within 5 seconds after requesting the modem to send the data 1 Check modem and modem cable connection 2 Contact telephone comp...

Страница 248: ...onse from host for 60 seconds 1 Check modem and modem cable connection 2 Contact telephone company D160100 Disconnected by Bad Address 1 Check modem and modem cable connection 2 Contact telephone comp...

Страница 249: ...EOT from HOST Check telephone line connection Test Modem Check host D230000 No response from Host Dialing time out to Host Check telephone line connection Test Modem Check phone number D250000 Cannot...

Страница 250: ...roperly set Surcharge Amount Enter surcharge amount required F000400 Parameter is not properly set Adver Text refreshing timer Enter Ad text refresh timer F000500 Parameter is not properly set Adverti...

Страница 251: ...umber required F001600 Default master password was not changed F001F00 Machine serial number is not set Check serial number 2 Set serial number F002F00 Host type is not set Check host type 2 Set host...

Страница 252: ...shooting POWERAB UPS ABNORMAL Check UPS POWERAC POWER OUT OR AC OFF Check AC power status and environment POWERBA BATTERY LOW 1 Check AC power status and environment 2 Check UPS SDN0100 Service Panel...

Страница 253: ...n sending message from ATM to Host procedure number is 3 4 5 When receiving transaction success message from Host procedure number is 5 5 6 After confirming notes during withdrawal procedure number is...

Страница 254: ...he NVRAM such as journal and configuration data To clear all of configuration and journal data to the initial status clear NVRAM after S W installation If you upgrade ATM machine operating in the fiel...

Страница 255: ...NH 2700T 7 Appendix 7 38 2 Select SYSTEM SETUP menu 3 Select SYSTEM CONTROL menu...

Страница 256: ...NH 2700T 7 Appendix 7 39 4 Select CLEAR ALL menu 5 Confirm and select Yes menu 6 All NVRAM data will be cleared and ATM will be automatically rebooted...

Страница 257: ...NH 2700T 7 Appendix 7 40 7 2 2 Installation Guide for NH 2700T z DIAL UP INITIAL SETTING 1 DIAL UP SETTING 1 Input Master password to enter main screen 2 Select HOST SETUP menu...

Страница 258: ...e sure to input the telephone numbers both in the HOST PHONE 1 and in the HOST PHONE 2 after selecting HOST PHONE 1 and HOST PHONE 2 menu and click ENTER on the pinpad 5 After above procedures press I...

Страница 259: ...NH 2700T 7 Appendix 7 42 z TCP IP INITIAL SETTING 1 TCP IP SETTING 1 Input Master password to enter main screen 2 Select CUSTOMER SETUP menu...

Страница 260: ...43 3 Select SELECT PROCESSOR menu 4 Select COMMUNICATION menu 5 Select TCP IP menu and message in the COMMUNICATION box will be changed from DIALUP to TCP IP 6 Click CANCEL button and SELECT PROCESSO...

Страница 261: ...NH 2700T 7 Appendix 7 44 7 Select MESSAGE FORMAT menu in the SELECT PROCESSOR screen 8 Select STANDARD1 menu in the MESSAGE FORMAT screen Click CANCEL button to go SELECT PROCESSOR screen...

Страница 262: ...in the TCP IP TYPE menu and set DISABLE in the SSL OPTION menu Click CANCEL button to go SELECT PROCESSOR screen 11 Click CANCEL button and CUSTOMER SETUP screen will be shown Click CANCEL button onc...

Страница 263: ...LE as DISABLE to activate buttons related with STATIC IP 14 Select IP ADDRESS GATEWAY SUBNET MASK and DNS and set the input values individually 15 Select HOST SETUP menu in the OP MAIN screen 16 Selec...

Страница 264: ...T ADDRESS 1 PORT NUMBER 1 HOST ADDRESS 2 PORT NUMBER 2 in the HOST ADDRESS screen and set input values individually 19 After finishing all setting up press IN SERVICE button 1 or CANCEL key on the pin...

Страница 265: ...7 3 1 TRANSACTION PROCESS ENGLISH 7 3 1 1 AP MAIN This is a main AP screen and the customer can start to do transaction by inserting and quickly removing the card on card reader 7 3 1 2 SELECT LANGUAG...

Страница 266: ...screen is to enter PIN of customer s card 7 3 1 4 SELECT TRANSACTION This screen is to select transaction type the customer wants to transact such as withdrawal balance inquiry and transfer is select...

Страница 267: ...TICE This screen is to show a customer the information of surcharge Function Key Type Touch Type 7 3 1 4 2 WITHDRAWAL SELECT RECEIPT PRINTING OR NOT This screen is to ask a customer if he she wants to...

Страница 268: ...0T 7 Appendix 7 51 7 3 1 4 3 WITHDRAWAL SELECT ACCOUNT Checking Saving Credit Card This screen is to ask a customer where he she wants to withdraw in checking saving credit card Function Key Type Touc...

Страница 269: ...This screen is to select the amount of withdrawal If there is not any amount to withdraw please select the OTHER key and can input the amount the customer would like to withdraw 1 Amount Selection Fu...

Страница 270: ...NH 2700T 7 Appendix 7 53 7 3 1 4 5 WITHDRAWAL CONNECTING HOST This screen is to show the customer that the transaction is in progress...

Страница 271: ...2700T 7 Appendix 7 54 7 3 1 4 6 WITHDRAWAL DISPENSING MONEY AND TAKE MONEY This screen is to show the customer that his her request amount is dispensing and to notify the customer to take his her mon...

Страница 272: ...T 7 Appendix 7 55 7 3 1 4 7 WITHDRAWAL PRINTING TRANSACTION AND TAKE RECEIPT This screen is to show the customer that his her transaction record is printing and to notify the customer to take his her...

Страница 273: ...NH 2700T 7 Appendix 7 56 7 3 1 4 8 WITHDRAWAL THANK YOU This screen is to show the customer that the transaction has been successfully completed...

Страница 274: ...This screen is to ask a customer if he she gets the receipt or not Function Key Type Touch Type 7 3 1 4 10 TRANSFER SELECT ACCOUNT TO TRANSFER FROM This screen is to ask a customer where he she wants...

Страница 275: ...TO TRANSFER TO This screen is to ask a customer where he she wants to transfer to checking saving credit card Function Key Type Touch Type 7 3 1 4 12 TRANSFER ENTER TRANSFER AMOUNT This screen is to...

Страница 276: ...NH 2700T 7 Appendix 7 59 7 3 1 4 13 TRANSFER CONNECTING HOST This screen is to show the customer that the transaction is in progress...

Страница 277: ...T 7 Appendix 7 60 7 3 1 4 14 TRANSFER PRINTING TRANSACTION AND TAKE RECEIPT This screen is to show the customer that his her transaction record is printing and to notify the customer to take his her r...

Страница 278: ...NH 2700T 7 Appendix 7 61 7 3 1 4 15 TRANSFER THANK YOU This screen is to show the customer that the transaction has been successfully completed...

Страница 279: ...NTING OR NOT This screen is to ask a customer if he she wants to get the receipt or not Function Key Type Touch Type 7 3 1 4 17 INQUIRY SELECT ACCOUNT TO INQUIRE This screen is to ask a customer which...

Страница 280: ...NH 2700T 7 Appendix 7 63 7 3 1 4 18 INQUIRY CONNECTING HOST This screen is to show the customer that the transaction is in progress...

Страница 281: ...0T 7 Appendix 7 64 7 3 1 4 19 INQUIRY PRINTING TRANSACTION AND TAKE RECEIPT This screen is to show the customer that his her transaction record is printing and to notify the customer to take his her r...

Страница 282: ...NH 2700T 7 Appendix 7 65 7 3 1 4 20 INQUIRY THANK YOU This screen is to show the customer that the transaction has been successfully completed...

Страница 283: ...MAIN This is a main AP screen and the customer can start to do transaction by inserting and quickly removing the card on card reader 7 3 2 2 SELECT LANGUAGE Language a customer would like to use in tr...

Страница 284: ...screen is to enter PIN of customer s card 7 3 2 4 SELECT TRANSACTION This screen is to select transaction type the customer wants to transact such as withdrawal balance inquiry and transfer is select...

Страница 285: ...TICE This screen is to show a customer the information of surcharge Function Key Type Touch Type 7 3 2 4 2 WITHDRAWAL SELECT RECEIPT PRINTING OR NOT This screen is to ask a customer if he she wants to...

Страница 286: ...0T 7 Appendix 7 69 7 3 2 4 3 WITHDRAWAL SELECT ACCOUNT Checking Saving Credit Card This screen is to ask a customer where he she wants to withdraw in checking saving credit card Function Key Type Touc...

Страница 287: ...This screen is to select the amount of withdrawal If there is not any amount to withdraw please select the OTHER key and can input the amount the customer would like to withdraw 1 Amount Selection Fu...

Страница 288: ...NH 2700T 7 Appendix 7 71 7 3 2 4 5 WITHDRAWAL CONNECTING HOST This screen is to show the customer that the transaction is in progress...

Страница 289: ...2700T 7 Appendix 7 72 7 3 2 4 6 WITHDRAWAL DISPENSING MONEY AND TAKE MONEY This screen is to show the customer that his her request amount is dispensing and to notify the customer to take his her mon...

Страница 290: ...T 7 Appendix 7 73 7 3 2 4 7 WITHDRAWAL PRINTING TRANSACTION AND TAKE RECEIPT This screen is to show the customer that his her transaction record is printing and to notify the customer to take his her...

Страница 291: ...NH 2700T 7 Appendix 7 74 7 3 2 4 8 WITHDRAWAL THANK YOU This screen is to show the customer that the transaction has been successfully completed...

Страница 292: ...This screen is to ask a customer if he she gets the receipt or not Function Key Type Touch Type 7 3 2 4 10 TRANSFER SELECT ACCOUNT TO TRANSFER FROM This screen is to ask a customer where he she wants...

Страница 293: ...TO TRANSFER TO This screen is to ask a customer where he she wants to transfer to checking saving credit card Function Key Type Touch Type 7 3 2 4 12 TRANSFER ENTER TRANSFER AMOUNT This screen is to...

Страница 294: ...NH 2700T 7 Appendix 7 77 7 3 2 4 13 TRANSFER CONNECTING HOST This screen is to show the customer that the transaction is in progress...

Страница 295: ...T 7 Appendix 7 78 7 3 2 4 14 TRANSFER PRINTING TRANSACTION AND TAKE RECEIPT This screen is to show the customer that his her transaction record is printing and to notify the customer to take his her r...

Страница 296: ...NH 2700T 7 Appendix 7 79 7 3 2 4 15 TRANSFER THANK YOU This screen is to show the customer that the transaction has been successfully completed...

Страница 297: ...NTING OR NOT This screen is to ask a customer if he she wants to get the receipt or not Function Key Type Touch Type 7 3 2 4 17 INQUIRY SELECT ACCOUNT TO INQUIRE This screen is to ask a customer which...

Страница 298: ...NH 2700T 7 Appendix 7 81 7 3 2 4 18 INQUIRY CONNECTING HOST This screen is to show the customer that the transaction is in progress...

Страница 299: ...0T 7 Appendix 7 82 7 3 2 4 19 INQUIRY PRINTING TRANSACTION AND TAKE RECEIPT This screen is to show the customer that his her transaction record is printing and to notify the customer to take his her r...

Страница 300: ...NH 2700T 7 Appendix 7 83 7 3 2 4 20 INQUIRY THANK YOU This screen is to show the customer that the transaction has been successfully completed...

Страница 301: ...MAIN This is a main AP screen and the customer can start to do transaction by inserting and quickly removing the card on card reader 7 3 3 2 SELECT LANGUAGE Language a customer would like to use in tr...

Страница 302: ...screen is to enter PIN of customer s card 7 3 3 4 SELECT TRANSACTION This screen is to select transaction type the customer wants to transact such as withdrawal balance inquiry and transfer is select...

Страница 303: ...TICE This screen is to show a customer the information of surcharge Function Key Type Touch Type 7 3 3 4 2 WITHDRAWAL SELECT RECEIPT PRINTING OR NOT This screen is to ask a customer if he she wants to...

Страница 304: ...0T 7 Appendix 7 87 7 3 3 4 3 WITHDRAWAL SELECT ACCOUNT Checking Saving Credit Card This screen is to ask a customer where he she wants to withdraw in checking saving credit card Function Key Type Touc...

Страница 305: ...This screen is to select the amount of withdrawal If there is not any amount to withdraw please select the OTHER key and can input the amount the customer would like to withdraw 1 Amount Selection Fu...

Страница 306: ...NH 2700T 7 Appendix 7 89 7 3 3 4 5 WITHDRAWAL CONNECTING HOST This screen is to show the customer that the transaction is in progress...

Страница 307: ...2700T 7 Appendix 7 90 7 3 3 4 6 WITHDRAWAL DISPENSING MONEY AND TAKE MONEY This screen is to show the customer that his her request amount is dispensing and to notify the customer to take his her mon...

Страница 308: ...T 7 Appendix 7 91 7 3 3 4 7 WITHDRAWAL PRINTING TRANSACTION AND TAKE RECEIPT This screen is to show the customer that his her transaction record is printing and to notify the customer to take his her...

Страница 309: ...NH 2700T 7 Appendix 7 92 7 3 3 4 8 WITHDRAWAL THANK YOU This screen is to show the customer that the transaction has been successfully completed...

Страница 310: ...This screen is to ask a customer if he she gets the receipt or not Function Key Type Touch Type 7 3 3 4 10 TRANSFER SELECT ACCOUNT TO TRANSFER FROM This screen is to ask a customer where he she wants...

Страница 311: ...TO TRANSFER TO This screen is to ask a customer where he she wants to transfer to checking saving credit card Function Key Type Touch Type 7 3 3 4 12 TRANSFER ENTER TRANSFER AMOUNT This screen is to...

Страница 312: ...NH 2700T 7 Appendix 7 95 7 3 3 4 13 TRANSFER CONNECTING HOST This screen is to show the customer that the transaction is in progress...

Страница 313: ...T 7 Appendix 7 96 7 3 3 4 14 TRANSFER PRINTING TRANSACTION AND TAKE RECEIPT This screen is to show the customer that his her transaction record is printing and to notify the customer to take his her r...

Страница 314: ...NH 2700T 7 Appendix 7 97 7 3 3 4 15 TRANSFER THANK YOU This screen is to show the customer that the transaction has been successfully completed...

Страница 315: ...NTING OR NOT This screen is to ask a customer if he she wants to get the receipt or not Function Key Type Touch Type 7 3 3 4 17 INQUIRY SELECT ACCOUNT TO INQUIRE This screen is to ask a customer which...

Страница 316: ...NH 2700T 7 Appendix 7 99 7 3 3 4 18 INQUIRY CONNECTING HOST This screen is to show the customer that the transaction is in progress...

Страница 317: ...T 7 Appendix 7 100 7 3 3 4 19 INQUIRY PRINTING TRANSACTION AND TAKE RECEIPT This screen is to show the customer that his her transaction record is printing and to notify the customer to take his her r...

Страница 318: ...NH 2700T 7 Appendix 7 101 7 3 3 4 20 INQUIRY THANK YOU This screen is to show the customer that the transaction has been successfully completed...

Страница 319: ...2MB 4 pq1 VID 0x3538 USB Mass Storage Device PID 0x0042 512MB 5 LEXAR Media VID 0x05DC JD FIREFLY PID 0A560 1GB 6 LG VID 0x090C USB Driver PID 0x1000 1GB 7 Memorex VID 0x12F7 TD Classic 003B PID 0x1A0...

Страница 320: ...Genesys Logics inc 0x0606 2 INLAND Inland USB2 0 HUB 0x0409 NEC Corporation 0x005A 3 VAKO International Inc USB 2 0 Aluminum HUB 0x05E3 Genesys Logics inc 0x0606 4 PPA Int l I Connector PPA 4Port HUB...

Страница 321: ...e following table describe the file name and path of advertisement images The path in blow table indicates image size is 1024 X 600 Welcome Advertisement File Name Path Screen 1 Adv_01 jpg ATM Adverti...

Страница 322: ...re update program While updating program proceeds a line of message shows up in the main screen If you want to change the message just edit UpdateInfo dat The message length is up to 40 characters A s...

Страница 323: ...SD Card 2 Make NH2700CE folder in the UPDATE folder 3 Make PATCH folder in the NH2700CE folder 4 Copy UpdateInfo dat to under PATCH folder Optional 5 Make ADVERTISEMENT folder in the PATCH folder 6 Ma...

Страница 324: ...107 The following picture describes the layout of the USB Drive or SD Card If you have the master media which get from Nautilus Hyosung you can see the same layout except Patch folder Patch folder is...

Страница 325: ...ges can be installed or updated by Software Update tool in supervisor menu You can update advertisement images by software downloading with MoinView server Please refer to the MoinView manual for the...

Страница 326: ...B drive in USB slot and press left top function key SOFTWARE UPDATE 4 Press left function key YES When YES button is selected new software in USB drive is transferred to a dedicated directory ATM and...

Страница 327: ...NH 2700T 7 Appendix 7 110 7 5 2 2 Enable Welcome Advertisement You can enable or disable Welcomoe Advertisement in the supervisor menu 1 Press CUSTOMER SETUP button...

Страница 328: ...NH 2700T 7 Appendix 7 111 2 Press WELCOME ADVERTISEMENT button 3 Press WELCOME ADVERTISEMENT button...

Страница 329: ...NH 2700T 7 Appendix 7 112 4 You can enable or disable Advertisement images to view by pressing SCREEN Key...

Страница 330: ...NH 2700T 7 Appendix 7 113 7 5 2 3 Enable Transaction Advertisement You can enable or disable Transaction Advertisement in the supervisor menu 1 Press CUSTOMER SETUP button...

Страница 331: ...NH 2700T 7 Appendix 7 114 2 Press ADVERTISEMENT button 3 Press TRANSACTION ADVERTISEMENT button...

Страница 332: ...2700T 7 Appendix 7 115 4 You can enable or disable welcome dvertisement images to view by pressing SCREEN Key 5 You can enable or disable transaction dvertisement images to view by pressing SCREEN Ke...

Страница 333: ...orted Image Format 1 Make PATCH folder 2 Copy UpdateInfo dat to under PATCH folder Optional 3 Make ADVERTISEMENT folder in the PATCH folder 4 Make 1024_600 folder in ADVERTISEMENT folder 5 Copy all im...

Страница 334: ...of Zip file UpdateInfo dat PATCH ZIP ADVERTISEMENT 1024_600 Adv_01 jpg Adv_02 jpg Adv_03 jpg Adv_04 jpg Adv_05 jpg Adv_06 jpg TranAdv_01 jpg TranAdv_02 jpg TranAdv_03 jpg TranAdv_04 jpg TranAdv_05 jp...

Страница 335: ...mages The path in blow table indicates image size is 1024 X 600 Background File Name Path Screen 1 Back_1 jpg ATM Screen Backs 1024_600 Function F K ATM Screen Backs 1024_600 Touch Touch Screen 2 Back...

Страница 336: ...e update program While updating program proceeds a line of message shows up in the main screen If you want to change the message just edit UpdateInfo dat The message length is up to 40 characters A sa...

Страница 337: ...6 Make Backs folder in SCREEN folder 7 Make 1024_600 folder in Backs folder 8 If ATM is function type make Function folder in 1024_600 folder 9 If ATM is touch type make Touch folder in 1024_600 folde...

Страница 338: ...ges can be installed or updated by Software Update tool in supervisor menu You can update advertisement images by software downloading with MoinView server Please refer to the MoinView manual for the...

Страница 339: ...B drive in USB slot and press left top function key SOFTWARE UPDATE 4 Press left function key YES When YES button is selected new software in USB drive is transferred to a dedicated directory ATM and...

Страница 340: ...NH 2700T 7 Appendix 7 123 7 6 2 2 Setup change background You can set up change background option in the supervisor menu 1 Press CUSTOMER SETUP button...

Страница 341: ...NH 2700T 7 Appendix 7 124 2 Press OPTIONAL FUNCTION 2 button 3 Press SCREEN SERVICES button...

Страница 342: ...NH 2700T 7 Appendix 7 125 4 Press CHANGE BACKGROUND button 5 You can set up change background images to view by pressing SCREEN Key or DEFAULT SCREEN...

Страница 343: ...der 6 If ATM is function type make Function folder in 1024_600 folder 7 If ATM is touch type make Touch folder in 1024_600 folder 8 Copy all image files to under Function or Touch folder check the fil...

Страница 344: ...that will display weather information Weather information set up and updated only by MoniView ATM displaying weather information for today and tomorrow that gives How to register and update detailed w...

Отзывы: