background image

22 – 

English

SAFETY INSTRUCTIONS

The machine’s position on the loading platform

Position the machine against the front edge of the 
platform in order to reduce the risk of it sliding forward if 
the vehicle brakes.

Manoeuvre the arm system so that it is resting against the 
platform, positioned as low as possible. Extend the 
outriggers without lifting the machine.

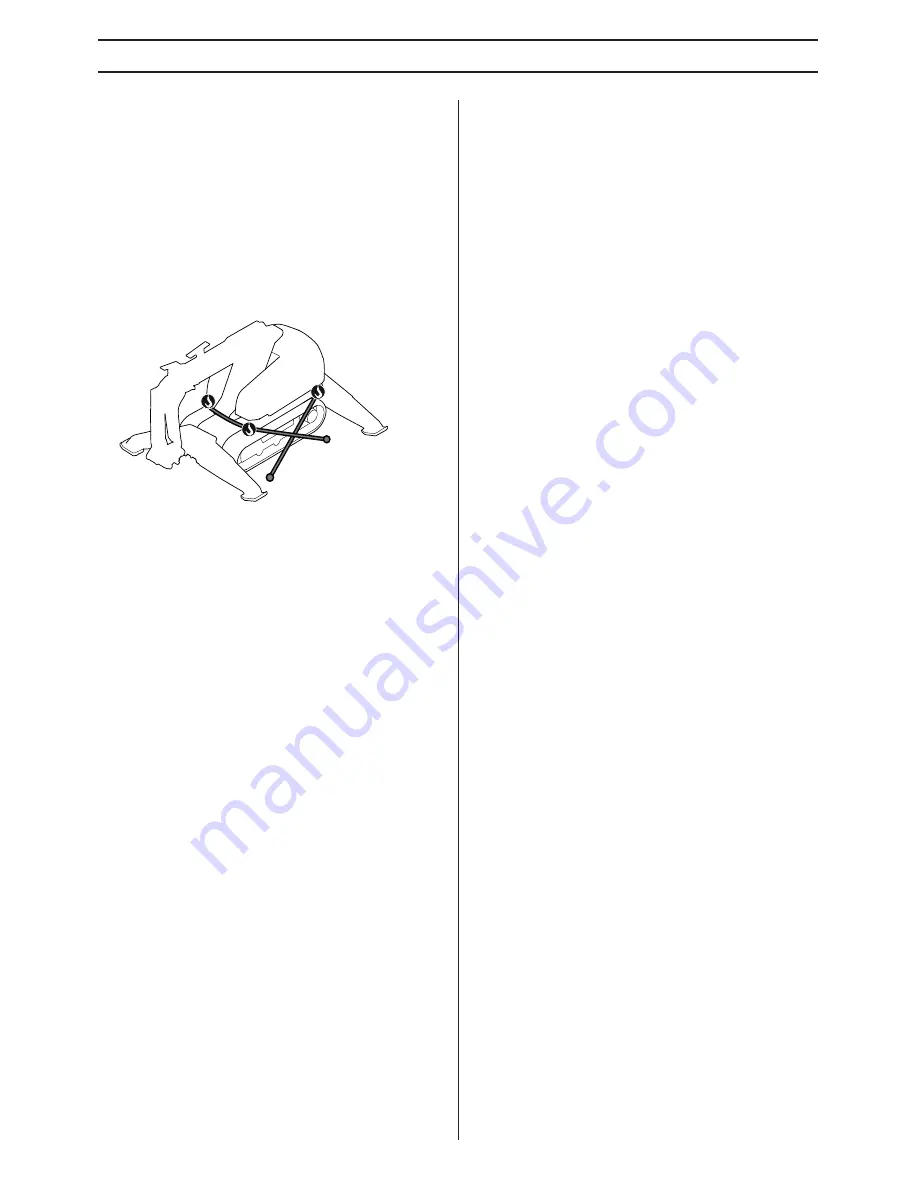
Securing the load

Secure the machine with approved tightening straps. 
Ensure that no part of the machine are squashed or 
damaged by the tightening straps. It is a good idea to 
cover the machine.

Tools and other equipment must be secured with separate 
tightening straps.

Regularly check that the load is secure during 
transportation.

Storage

Remove the tool from the machine.

Retract the arm system to attain a centre of gravity that is 
as low as possible and to save space.

Store the equipment in a lockable area so that it is out of 
reach of children and unauthorized persons.

Store the machine and its equipment in a dry and frost 
proof place.

The main switch on the machine can be locked with a 
padlock to prevent unauthorised persons from starting the 
machine.

Towing

The machine is not designed to be towed. When the machine 
is depressurized, the drive motor’s parking brakes are 
activated and the caterpillar tracks cannot rotate. Only tow the 
machine if its position constitutes a risk and there is no other 
solution. Tow it for the shortest possible distance.

If possible, retract the outriggers before towing the 
machine in order to reduce the risk of them getting stuck 
and being damaged.

To minimize the load on the towing device and mechanical 
components, reduce the friction by preparing the route 
that the machine is going to be towed.

If possible tow in the direction of the tracks.

Use a towing device intended for the particular load.

Parts can loosen during towing.  Keep your distance!

Maintenance and service

Most accidents involving machines occur during trouble 
shooting, service and maintenance as staff have to locate 
themselves within the machine’s risk area. Prevent accidents 
by being alert and by planning and preparing the work. You 
can also refer to 'Preparations for maintenance and service” 
in the 'Maintenance and service” section.

Never carry out repairs without having the necessary 
expertise.

The user must only carry out the maintenance and service 
work described in this Operator's Manual. More extensive 
work must be carried out by an authorized service 
workshop.

Use personal protective equipment as well as equipment 
to mechanically secure machine components during 
maintenance and service.

Only trained service personnel are permitted to intervene 
in the electrical or hydraulic systems.

Set out clear signs to inform persons in the vicinity that 
maintenance work is in progress. 

If service operations or trouble shooting does not require 
the machine to be switched on, the power cable must be 
removed and positioned so that it cannot be connected by 
mistake.

Ensure there is no current to the machine by removing the 
power cable before opening or removing the electric 
cabinet or any other component that contains electrical 
current.

Pipe and hose couplings can remain pressurized despite 
the motor being switched off and the power cable 
disconnected. It must always be assumed that hydraulic 
hoses are pressurized and they must be opened with 
great care. Relieve the pressure on the arm system by 
resting it on the ground and turn off the electric motor 
before undoing the hoses.

Never try to stop hydraulic oil leaking from a broken hose 
by hand. Finely dispersed hydraulic oil at high pressure 
can permeate under the skin and cause very severe 
injuries.

When dismantling machine parts, heavy components can 
start moving or fall down. Secure moving parts 
mechanically before loosening screw joints or hydraulic 
hoses.

Use an approved lifting device to secure and lift heavy 
machine parts.

Several components heat up during work with the 
machine. Do not commence any servicing or 
maintenance tasks until the machine has cooled.

Keep work area clean and well lit.

 Cluttered or dark 

areas invite accidents.

The machine’s movements can be defective if a terminal, 
cable or hose is incorrectly assembled.  Exercise caution 
during test runs and be prepared to turn off the machine 
immediately in the event of a fault.

Содержание DXR300

Страница 1: ... G G GB B B B E E E En n n ng g g gl l l li i i is s s sh h h h DXR300 Operator s manual Please read the operator s manual carefully and make sure you understand the instructions before using the machine ...

Страница 2: ...e while the work is in progress Ensure that the underlying surface has satisfactory bearing capacity Inspections and or maintenance must be carried out with the motor switched off and the power cord disconnected Always connect the machine through an ground fault circuit interrupter with personal protection i e an ground fault circuit interrupter that trips at an ground fault of 30 mA Ensure that t...

Страница 3: ...y or death for the operator or damage to the surroundings if the instructions in the manual are not followed CAUTION Used if there is a risk of injury to the operator or damage to the surroundings if the instructions in the manual are not followed NOTICE Used if there is a risk of damage to materials or the machine if the instructions in the manual are not followed ...

Страница 4: ...HINE S SAFETY EQUIPMENT General 15 SAFETY INSTRUCTIONS Protective equipment 17 General safety warnings 17 General working instructions 18 External environmental factors 23 STARTING AND STOPPING Before starting 24 Starting 24 Stopping 24 Inspection after work 24 OPERATION Operating modes 25 TOOLS General 28 Work mode 28 Changing tools 29 Storage 29 SETTINGS Track widener 30 Menu overview 31 Operati...

Страница 5: ...e machine s equipment Operation on a public highway Use as a towing vehicle means of transport or lifting device Use in environments where there is danger for the operator or the life and health of people in the vicinity Use in applications or environments that are not compatible with the recommendations in this Operator s Manual User responsibility It is the owner s employer s responsibility that...

Страница 6: ...perating the caterpillar tracks at different speeds Operating the tracks in different directions enables the machine to make tight manoeuvres When the drive function is not activated the passive brakes lock the drive motors In transport mode the caterpillar tracks and tower can be manoeuvred simultaneously The function can be used for example when the machine is being operated in confined spaces O...

Страница 7: ...1 Gear ring 12 Tensioning wheel 13 Screws for widening track 14 Support wheel 15 Drive motor 16 Outrigger foot 17 Outriggers 18 Counter weight 19 Electrical cabinet 20 Control module 21 Cable arm 22 Warning light 23 Communication cable socket 24 Horn 25 Base plate 26 Lifting eye bolts 27 Electric motor 28 Radio module 29 Track unit 30 Hydraulic pump 31 Chassis beam 32 Cylinder guard 33 Inspection ...

Страница 8: ...eby the speed of the functions Direction control valves direct the hydraulic oil to the machine s different functions The hydraulic pump is of the variable displacement type and delivers a flow of 0 65 l min 0 17 gal min Main pressure The hydraulic system has different pressure levels Track tension and outriggers up 200 bar Hydraulic hammer 165 Bar 22 kW Standard pressure is 200 Bar Increased main...

Страница 9: ... 5 Cylinder 1 6 Cylinder 4 7 Cylinder 3 8 Cylinder 2 9 Valve block 1 10 Slew motor 11 Valve block 2 12 Cylinders for outriggers 13 Sight gauge 14 Valve release track tension 15 Accumulator track tension 16 Drive motor 17 Support wheel 18 Cylinders for track tensioning 19 Tensioning wheel 20 Hydraulic pump 21 Swivel 22 Hose for oil filling 23 Filling pump 24 Intermediate piece 25 Cooler ...

Страница 10: ...h of the power cable and the area of the power cable s conductor The table Guide values for mains connection in the Technical data section shows which fuse is required for the electric motor The machine is equipped with Softstart and can be started with most types of fuses If a fuse keeps blowing there is a fault in the electrical system or in the machine that is connected to it Before restarting ...

Страница 11: ...ystem 2 13 11 7 8 9 8 10 5 6 4 3 1 12 1 Aerial 2 Electrical cabinet 3 Pressure switch 4 Temperature sensor 5 Warning light 6 Power cable 7 Electric motor 8 Control module 9 Radio module 10 Working lights 11 Pressure sensor 12 Main switch 13 Emergency stop ...

Страница 12: ...able shuts off the wireless communication When the machine is controlled by means of cables the ID code is suppressed and the same remote control can be used for different machines if these have the same control system version Battery The battery is a Li ion type Operating time is about 8 10 hours per charge Extreme cold impairs the battery s capacity and operating time Operating time is also affe...

Страница 13: ...stick right button 4 Menu buttons 5 Display 6 Right joystick left button 7 Right joystick right button 8 Right joystick 9 Pressure flow to hydraulic tool hammer cutter 10 Flow to machine movement speed 11 Stop button motor 12 Main switch 13 Machine stop 14 Start button motor 15 Light emitting diode joysticks active ...

Страница 14: ...l flow to the tool 12 Sticker adjustable flow to the tool 13 Arm 3 down 14 Left caterpillar track backwards 15 Caterpillar tracks backwards 16 Rear front left outrigger down 17 Rotate tower anticlockwise 18 Left outrigger down 19 Caterpillar tracks forward 20 Left caterpillar track forward 21 Arm 3 up 22 Left outrigger up 23 Rotate tower clockwise 24 Rear front left outrigger up 25 Sticker open cl...

Страница 15: ...to the remote control and the machine Press the horn to see which machine is connected to the remote control The machine will beep and flash three times Do not activate the remote control before you have ensured that the correct machine is being operated When steering the machine using cables the ID code is suppressed and the same remote control can be used for different machines if these have the...

Страница 16: ...e all functions can be used again The machine s softstarter is fitted with a motor cut out that trips if the current is too high for too long a period The machine s functions return to normal position after approximately three minutes Fuses Fuses are used to protect the following components as well as to prevent fire in conjunction with faults or if electrical components are overloaded Pressure re...

Страница 17: ...responsibility of the management and the operator to confirm National and local laws regulations and other directions are followed This might concern protective equipment limit levels for noise barriers etc The operator has the relevant training and experience to be able to perform the work safely Unauthorized persons are not permitted to enter areas where there is a risk of accidents Nobody is pe...

Страница 18: ...chine until the working area has been cleared of obstacles Be on the alert when working in environments where there is a substantial risk of slipping due to unevenness loose material oil ice or suchlike Inspect ground conditions load bearing structures etc to prevent materials machines and staff falling and deal with any risks there might be before starting work When working at a height for instan...

Страница 19: ...e that occur immediately Prevent the machine from being used before the fault has been rectified If the machine becomes unoperable turn off the motor before approaching the machine The machine has been tested and approved solely with equipment supplied and recommended by the manufacturer Under no circumstances should you modify the original design of the machine without approval from the manufactu...

Страница 20: ...Keep your distance The machine is most stable when working directly forwards or backwards When the machine s upper part rotates to the side the outriggers should be down and the arm system manoeuvred so that it is as close to the ground as possible In some cases it can be difficult to predict the direction of rotation Operate the turning motion carefully until you have apprehended the direction of...

Страница 21: ...lways position yourself above the machine when driving on a slope There is a risk of the machine tipping Anchor the machine if there is a risk of the machine starting to move involuntary Check that there is sufficient bearing capacity when driving on ramps and stairs Proximity to ducts and pipes Always check and mark where electricity cables and pipelines are routed Ensure that electricity cables ...

Страница 22: ...cidents by being alert and by planning and preparing the work You can also refer to Preparations for maintenance and service in the Maintenance and service section Never carry out repairs without having the necessary expertise The user must only carry out the maintenance and service work described in this Operator s Manual More extensive work must be carried out by an authorized service workshop U...

Страница 23: ...han 10 C 50 F Allow the machine to warm up slowly Warm up the lower section by running the caterpillar tracks first slowly and then more quickly with the outriggers extended Move the upper section back and forth and operate all cylinders in the arm system without load The machine is ready for use when its temperature hydraulic fluid has risen to around 40 C 104 F Moisture When working in damp envi...

Страница 24: ...shes with a longer interval the machine is in standby mode If a function is not working or needs attention an error message appears on the display in conjunction with start up Refer to Error messages in the Trouble shooting section Starting the electric motor The electric motor is started by pressing the start button If several machines are used at the same workplace there is a risk of mixing up t...

Страница 25: ... outriggers Transport mode In this mode you can operate the caterpillar tracks and some arm functions If no controls have been used for 3 seconds the machine will go to circulating pump mode In this mode the hydraulic oil is pumped to the tank and there will be no pressure in the cylinders Key to commands 1 Right and left button on left joystick 2 Right and left button on right joystick 3 Directio...

Страница 26: ... hydraulic tool hammer cutter Cutters open close The function works even if the right button on the right joystick is depressed This can be useful if you simultaneously want to run arm 1 and 2 in parallel The button that opens closes the cutters varies depending on which type of cutters are being used Extra function For activation see instructions in the Settings section under the heading Extra fe...

Страница 27: ... right outrigger up Left outrigger down Left outrigger up Rear left outrigger down Rear left outrigger up Front left outrigger down Front left outrigger up Transport mode Right track forward left track backward Right track backwards left track forward Rotate tower clockwise Rotate tower anticlockwise Caterpillar tracks forward Caterpillar tracks backwards All outriggers up All outriggers down Arm ...

Страница 28: ...rnal tool is activated from the service menu See instructions in the section Settings Work mode In the work menu you can choose to work with either a breaker or a concrete crusher Other tools can be activated from the Work menu under the tab Adjustable See instructions in the section Settings CAUTION Please read the operator s manual carefully and make sure you understand the instructions before u...

Страница 29: ...king pin Connect the hydraulic hoses and any hoses for hammer lubrication when fitting the hammer Viewed from the rear the tool s return hose must first be connected to the right side A port and then the delivery hose to the left side B port The hydraulic hoses are equipped with quick couplings with decompression This facilitates fitting the hoses even though pressure is trapped To dismantle follo...

Страница 30: ...hut off the machine Disconnect the power cable and place it so that it cannot be connected by mistake Loosen screws A and B Slide washer C to one side Pull the side of the tracks out a sufficient distance to enable the track widener to be fitted The holes of the track widener must be facing the machine Move the side of the track towards the machine Tighten the screws M24 500Nm M10 47Nm To dismantl...

Страница 31: ...r in the chosen language on the product display Operational settings WORK BREAKER Select this when you want to work with a breaker Press the selection key to confirm the choice CRUSHER Select this when you want to work with a crusher Press the selection key to confirm the choice WORK BREAKER WORK CRUSHER ...

Страница 32: ...CK TENSION Hold the selection key down to activate the track tension OIL REFIL The oil level is read through the sight gauge on the hydraulic tank Refilling is needed if the level is more than 1 cm below the max mark Hold the selection key down to refill oil Use the sight gauge to check the oil level when refilling NOTICE Can not be shut off during operation Adjustable tool Oil press A B 200 bar 3...

Страница 33: ...nd oil flow can be adjusted from port A to B Select which setting you would like to change with the selection keys Use the arrow keys to change the value HOUR METER The operating hours for the machine the time when the motor is on are saved in the control modules and can be read in the terminal When the remote control terminal is connected to the machine can the operating hours be read in online m...

Страница 34: ...hey are active All warnings are sorted according to the hour meter registers when they occured The newest warning is showed first and the oldest is last 1 Warning code Identifies the kind of warning that has been registered 2 The number of times the warning has been present in the system 3 Registered working time when the warning last occured 4 Previous warning in the warning log 5 Exit the warnin...

Страница 35: ... 200 bar to 150 bar The pressure changes with 5 bar intervals Machine types Indicates which machine type the remote control is linked to This setting must be made when updating the software or replacing the control module etc Press the selection key to confirm the choice Languages Setting for which language should be shown in the display Press the selection key to confirm the choice To return to t...

Страница 36: ...ntaining the track unit discharge the pressure in the accumulator Refer to the directions under Functional inspection in the Maintenance and service section Discharge pressure in the hydraulic system Discharge pressure in the hydraulic cylinders by taking the load off the arm system by resting it on the ground Undo the air filter so that the overpressure in the tank is discharged Wait until the pr...

Страница 37: ...allel with the fins Keep a distance of at least 40 cm between the cooler and the nozzle Electrical components Clean electric motor electric cabinet terminals and other electrical components with a cloth or with compressed air Do not spray water at electrical components Dry the remote control with a damp cloth Never use high pressure washing Blow clean internally using compressed air After washing ...

Страница 38: ... arm system and tool attachment Tools Cylinders and shafts in lower part and outriggers Cylinders and shafts in arm system and tool attachment Tools Cylinders and shafts in lower part and outriggers Cylinders and shafts in arm system and tool attachment Tools Hydraulic fluid Hammer lubrication Cylinders and shafts in arm system and tool attachment Visible hoses arm system outriggers etc Power cabl...

Страница 39: ...lower part and outriggers Grease nipples 29 Gear ring Arm system Bolt fasteners shafts support leg bracket and track sides Drive track sides and track tensioning Power unit motor fan Cylinders and shafts in lower part and outriggers Drive track sides and track tensioning Hoses Hoses Other hydraulic components Drive track sides and track tensioning Cooler Slew motor Hammer lubrication Emergency sto...

Страница 40: ...edule before you perform the 500 hours service Change 1 000 hours service Carry out the 500 hours service as per the service schedule before you perform the 1 000 hours service Change Oil gearbox slew motor Contact your service agent Oil gearbox drive motor Contact your service agent Drive motor Slew motor Gear ring Slew motor Drive motor Drive motor Slew motor Gear ring Hydraulic pump checking of...

Страница 41: ...ngs and cogs To ensure that the grease is evenly distributed it should be applied followed by rotation and then applied again Apply the grease gun and lubricate the nipple with 2 3 pumps Stand at a safe distance start the machine rotate the upper part by 90 and then turn off the motor Repeat three times so that the gear ring s bearings and cogs are lubricated in four places WARNING Ensure that nob...

Страница 42: ...d mounting Shafts The design of the expanding shafts ensures that there is not too much play provided that they are tightened regularly New expanding shafts must be tightened frequently until they have bedded in Wear damage on the expanding shaft s sleeve is a typical sign that they have not been tightened correctly or sufficiently often If an expanding shaft has slipped out of position it is impo...

Страница 43: ...anding sleeve it indicates that it has not been sufficiently tightened Swing joints must be kept lubricated in order to be able to press out dirt and water that enters and to reduce wear on shafts and bearings Wear to rubber components Check that caterpillar tracks and outrigger feet are intact If they are so worn that the metal is visible they should be replaced Wear to hydraulic hoses Do not use...

Страница 44: ... braked and remain stationary Check the slew brake s function by rotating the arm on a slope Release the joysticks The arm should then be braked and stop gently Cooler Overheating has a negative effect on the service life of the machine s components Clean the cooler when necessary Refer to Cleaning the machine in the Maintenance and service section Cylinders Checking cylinder tubes and piston rods...

Страница 45: ...racks Pull out the valve and rotate it a quarter turn to lock it in open position Operate the outriggers up and down Hydraulic fluid is then pumped around and cleans the non return valve Rotate and release the valve back into position Operate the outriggers up and down to tension the track Hammer lubrication Make sure grease is reaching the hammer by detaching the lubrication hose from the hammer ...

Страница 46: ...remove air that might have entered the hydraulic system while refilling Oil filter Undo the air filter so that the overpressure in the tank is discharged Thoroughly clean the outside of the filter and the surrounding parts Remove the filter cover Lift up the sealing ring the spring and the filter holder together with the filter cartridge Remove the filter cartridge from the filter holder Check whe...

Страница 47: ...ng terminal start up Check joystick value in test menu terminal diagnostics Restart terminal Right joystick button on left joystick activated during power up Button has been disabled Left joystick button on right joystick activated during power up Button has been disabled Right joystick button on right joystick activated during power up Button has been disabled Up Down movement on left joystick ac...

Страница 48: ...arter Check the input voltage and the soft starter settings Phase error Please check Incoming phases Incoming voltages Machine speed has been reduced and tool is disabled Phase error in incoming 3 phase and the motor temperature is too high Check the voltage level of the incoming phases or if a phase has been lost Motor temperature too high Machine speed has been reduced and tool is disabled High ...

Страница 49: ...unctions Communication error Machine type could not be uploaded to terminal Please restart terminal Communication error List of available machine types could not be uploaded to terminal Please try again Communication error Machine type may not have been selected correctly in machine Machine type disabled in terminal Please make selection again Communication error No new machine type has been downl...

Страница 50: ... without being active All warnings associated with are disabled Use machine with caution All supervision using the sensor is disabled Sensor is faulty Check the sensor and cables to the sensor Cable error Cylinder 1 valve Cylinder 2 valve Cylinder 3 valve Cylinder 4 valve Cylinder 5 valve Outrigger proportional valve Left caterpillar track valve Right caterpillar track valve Rotation valve Tool va...

Страница 51: ...and aerial cable on the machine are properly secured Test run the machine using cable control Fuses for the mains connection blow when starting The machine s fuses have too low a rating Check that the mains voltage is compatible with the machine and that the correct fuses are used Electric motor blown Contact your service agent The hydraulic pump has cut out Contact your service agent The motor ru...

Страница 52: ...be damaged Defective valve Contact your service agent Faulty counter balance valve Contact your service agent Overheating in the hydraulic system Cooler blocked or obstructed Clean the cooler Too high ambient temperature Use forced cooling Maximum pressure or standby pressure set too high in the pump Contact your service agent Defective hose or coupling Replace faulty component Restriction in main...

Страница 53: ...t Setting thermal overload relay Max cable length V V mm2 A kW A m 400 380 6 90 50 Hz 22 0 41 177 400 380 10 90 22 0 41 296 400 380 16 90 22 0 41 473 460 440 6 90 60 Hz 24 5 39 187 460 440 10 90 24 5 39 311 460 440 16 90 24 5 39 498 Type of pressure Pressure Bar PSI Pump pressure The pressure in the pipes between pump and main stop valve The pressure varies between standby pressure and max pressur...

Страница 54: ...wer noise level General Rotation speed rpm 6 Transport speed max km h mph 3 1 9 Angle of inclination max 30 Hydraulic system Volume hydraulic system l gal 50 13 Pump type Load sensing axial piston pump with variable displacement Pump flow max l min gal min 65 17 Electric motor Type Siemens 1LE1001 1DB73 Power kW 22 50 Hz 24 5 60 Hz Speed rpm 1475 50 Hz 1775 60 Hz Voltage V 380 420 50 Hz 440 480 60...

Страница 55: ...English 55 TECHNICAL DATA 4868 192 2368 93 5231 206 1818 72 ...

Страница 56: ...56 English TECHNICAL DATA 1367 54 1035 41 1509 59 2057 81 2442 96 2079 82 1598 63 1489 59 2066 81 2238 88 1993 78 141 6 ...

Страница 57: ...pment 2006 95 EC of May 8 2000 relating to the noise emissions in the environment 2000 14 EC of June 08 2011 on the restriction of use of certain hazardous substances 2011 65 EU For information relating to noise emissions see the Technical data chapter Notified body 0404 SMP Svensk Maskinprovning AB Box 7035 SE 750 07 Uppsala has issued reports regarding the assessment of conformity according to a...

Страница 58: ......

Страница 59: ......

Страница 60: ... z X16 6y 2013 09 25 z X16 6y 1156172 26 GB Original instructions ...

Отзывы: