background image

4

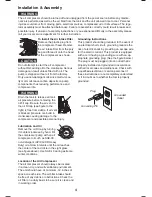
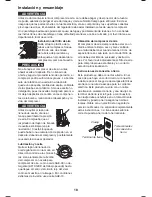
To Install the Air Intake Filter

Remove the plastic plug from 
the compressor head. Remove 
the air intake 

fi

 lter from the poly 

bag and thread it onto the head 
of the compressor as shown.

CAUTION

Do not attempt to start the air compressor 
without 

fi

 rst adding oil to the crankcase. Serious 

damage can result unless 

fi

 lled with oil. The 

pump is shipped without oil from the factory. 
Only use non-detergent oils since multi-viscos-
ity motor oils leave carbon deposits on pump 
components, thus reducing performance and 
compressor life.

WARNING

Drain the tank to release all tank 
air pressure before removing the 
oil 

fi

 ll cap. Be sure the air vent in 

the oil 

fi

 ll cap (see 

fi

 gure to the 

right) is free from debris. If air vent 
is blocked, pressure can build in 
crankcase causing damage to the 
compressor and possible personal injury.  

Lubrication and Oil

Remove the oil 

fi

 ll cap by turning 

it counter-clockwise by hand. Fill 
the compressor pump with an air 
compressor oil such as SAE-30 
non-detergent (API CG/CD Heavy 
Duty) oil at slow intervals until the oil reaches 
the center of the red circle in the sight glass 
(see 

fi

 gure above). Use SAE-10 during extreme 

winter conditions.

Location of the Air Compressor

The air compressor should always be located 
in a clean, dry, and well ventilated environment. 
The unit should have at  minimum, 12 inches of 
space on each side. The air 

fi

 lter intake should 

be free of any debris or obstructions. Check the 
air 

fi

 lter on a daily basis to be sure it is clean and 

in working order.

Installation & Assembly

WARNING

The air compressor should be turned off and unplugged from the power source before any mainte-
nance is performed as well as the air bled from the tank and the unit allowed time to cool. Personal 
injuries could occur from moving parts, electrical sources, compressed air or hot surfaces. The regu-
lator assembly must be attached before use. Failure to assemble correctly could result in leaks and 
possible injury. If unsure of assembly instructions or you experience dif

fi

 culty in the assembly please 

call your local service department for further instruction.

Grounding Instructions

This product should be grounded. In the event of 
an electrical short circuit, grounding reduces the 
risk of electric shock by providing an escape wire 
for the electric current. This product is equipped 
with a cord having a grounding wire with an ap-
propriate grounding plug. (See the 

fi

 gure below.) 

The plug must be plugged into an outlet that is 
properly installed and grounded in accordance 
with all local codes and ordinances. Check with 
a quali

fi

 ed electrician or service personnel if 

these instructions are not completely understood 
or if in doubt as to whether the tool is properly 
grounded.

Grounded 

Outlet

Grounding Pin

Plug

Содержание 395-226

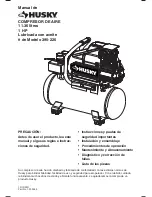
Страница 1: ...tion and operator safety When properly cared for it will give you years of rugged trouble free performance Thank you for buying a Husky product 10 13 2011 Part No 101 3350 CAUTION Before using this product read this manual and follow all its Safety Rules and Operating Instructions Safety Instructions Installation Operation Maintenance Storage Troubleshooting Guide Parts List Español p 13 ...

Страница 2: ...ns 1 Important Safety Instructions Guidelines 1 Specifications 2 Glossary 2 Duty Cycle 2 Parts Features 3 Installation Assembly 4 Operating Procedures 6 Maintenance 7 Storage 7 Troubleshooting Guide 8 Exploded View 9 Parts List 10 Warranty 12 ...

Страница 3: ...e a larger circuit must be used Always use more air hose before utilizing extension cords All exten sion cords used must be 12 gauge with a maximum length of 25 ft The circuit fuse type must be a time delay Low voltage could cause damage to the motor Risk of Moving Parts If the air compressor is in operation all guards and covers should be attached or installed correctly If any guard or cover has ...

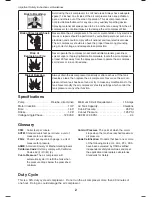
Страница 4: ...se If the tank develops a leak then replace the air compressor Never use the air com pressor after a leak has been found or try to make any modifications to the tank Never modify the air compressorʼs factory settings which control the tank pressure or any other function Specifications Pump Oil lube direct drive Motor Induction 1 HP Bore 1 65 Stroke 1 26 Voltage Single Phase 120 VAC Minimum Circuit...

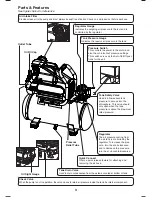
Страница 5: ...itch serves as the Auto On Off posi tions for the unit Tank Drain Valve Used to drain condensation from the air tank Located at bottom of tank Quick Connect Offers a quick release feature for attaching and removing the air hose Regulator The air pressure coming from the air tank is controlled by the regulator To increase the pres sure turn the knob clockwise and to decrease the pressure turn the k...

Страница 6: ...ilated environment The unit should have at minimum 12 inches of space on each side The air filter intake should be free of any debris or obstructions Check the air filter on a daily basis to be sure it is clean and in working order Installation Assembly WARNING The air compressor should be turned off and unplugged from the power source before any mainte nance is performed as well as the air bled f...

Страница 7: ...ug to permit connection to a proper electric circuit Make sure that the product is connected to an outlet having the same configuration as the plug No adapter should be used with this product If the product must be reconnected for use on a different type of electric circuit qualified service personnel should make the reconnection Extension Cords Use only a 3 wire extension cord that has a 3 blade ...

Страница 8: ...ndations in the manual for that particular tool on operating PSI settings Note The air compressor is now ready for use The following inflation and cleaning accessories packaged with this unit should only be oper ated at maximum pressure of 20 30 PSI blow gun tapered nozzle inflation needles blow gun adapter 1 4 7 5 6 3 8 Daily Shut Down Procedures 1 Set the Auto On Off lever to the Off position 2 ...

Страница 9: ...s could occur from moving parts electrical sources compressed air or hot surfaces 1 Turn the unit off and unplug the power cord from the receptacle 2 Allow the compressor time to cool if it has been in operation 3 Open the drain valve to bleed all air from the tank 4 Close the drain valve 5 Remove the oil fill cap on the pump 6 Remove the sight glass with a box end wrench or socket Drain the oil i...

Страница 10: ...tial use of the tool Excessive tank pres sure Move the Auto On Off lever to the Off position If the unit doesnʼt shut off unplug it from the power source and contact a service technician Motor will not start Make sure power cord is plugged in and the switch is on Inspect for the proper size fuse in your circuit box If the fuse was tripped reset it and restart the unit If repeated tripping occurs r...

Страница 11: ...ssor Model 395 226 Exploded View 1 2 3 4 5 6 7 8 9 10 2 11 12 13 14 15 16 17 18 19 20 21 22 23 24 25 26 27 33 36 35 34 37 42 43 44 45 48 47 46 28 40 41 49 50 51 52 53 54 49 40 41 55 56 57 58 59 60 61 62 63 39 40 41 28 38 ...

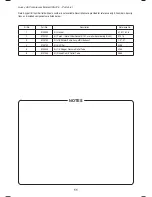
Страница 12: ... Nut M8x1 25 ZDC 6 5MM TALL 10 28 N A 29 N A 30 N A 31 N A 32 N A Ref Kit Part Number Description Qty 33 E105151 Cord Power 16 3 AWG Type SJT 6 Long 1 34 4 Base Air Filter 1 35 4 E101613 Element Intake Filter 1 36 4 Cover Filter HUSKY 1 37 3 Assembly Motor Pump L1B2 w RH Exhaust 1 38 E100809 Fitting Elbow 3 8NPT x 3 8 Compression 1 39 Bolt SHC M8 x 1 25 x 16MM ZDC Plate 8 40 Washer Lock M8 12 41 W...

Страница 13: ...nd included components are listed below Kit No Part No Description Reference No 1 E100959 Kit Gasket 4 7 8 11 16 2 E100251 Kit Piston Note Order Gasket Kit 1 as well when ordering this kit 9 14 15 3 E105154 Kit L1B2 Motor Pump Assy w RH Exhaust 1 27 37 4 E105153 Kit Air Filter 34 36 5 E104308 Kit 1 4 Copper Pressure Relief Tube 42 44 6 E101334 Kit Finned Cu 3 8 Outlet Tube 46 48 NOTES ...

Страница 14: ...this op eratorʼs manual This warranty does not apply to any damage to the MAT Holdings Inc product that is the result of improper maintenance or to any MAT Holdings Inc product that has been altered or modified The warranty does not ex tend to repairs made necessary by normal wear or by the use of parts or accessories which are either INCOMPATIBLE WITH THE MAT HOLD INGS INC product or adversely af...

Страница 15: ...d importantes Instalación y ensamblaje Procedimientos de operación Mantenimiento y Almacenamiento Diagnóstico y corrección de fallas Lista de las piezas Su compresor de aire ha sido diseñado y fabricado de conformidad con las estrictas normas de Husky para brindar fiabilidad facilidad de uso y seguridad para el operador Con el debido cuidado le brindará muchos años de sólido y eficiente funcionami...

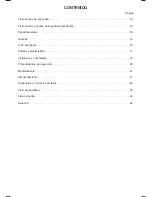
Страница 16: ...ad importantes 15 Especificaciones 16 Glosario 16 Ciclo de trabajo 16 Partes y características 17 Instalación y ensamblaje 18 Procedimientos de operación 20 Mantenimiento 21 Almacenamiento 21 Diagnóstico y corrección de fallas 22 Vista esquemática 23 Lista de partes 24 Garantía 26 ...

Страница 17: ...ad Si es necesario antes de emplear una extensión eléctrica añada una manguera de aire más larga Las extensiones eléctricas deben ser de calibre 12 y tener una longitud máxima de 7 6 metros El fusible del circuito debe ser de acción retardada Un voltaje demasiado bajo puede dañar el motor Riesgo por partes en movimiento Antes de operar el compresor todos los protectores y cubiertas deben estar ins...

Страница 18: ...ización Si el tanque tiene una fuga reemplace el compresor No utilice el compresor si se ha detectado una fuga ni trate de modificar el tanque Nunca modifique los ajustes de fábrica del compresor que controlan la presión del tanque y demás funciones Especificaciones Bomb De impulsión directa lubricada con aceite Inducción del motor 1 HP Diámetro 1 65 Carrera 1 26 Voltaje monofásico 120 VAC Capacid...

Страница 19: ...unidad Válvula de drenado Sirve para drenar la condensación acumulada en el fondo del tanque Se encuentra en la parte inferior del tanque Conector de acoplamiento rápido Permite conectar y desconectar rápidamente la manguera de aire Regulador La presión del aire que sal del tanque es controlada por el regulador Para aumentar la pre sión gire la perilla en dirección de las manecillas para disminu i...

Страница 20: ...ntenimiento al compresor de aire se le debe apagar y desconectar de la fuente de poder además de purgar el aire del tanque y darle suficiente tiempo para enfriarse Existe el riesgo de que las partes móviles la fuente eléctrica el aire comprimido y las superficies calientes provoquen lesiones El ensamble del regulador debe estar instalado antes de usar el compresor Un ensamblaje inadecuado puede se...

Страница 21: ...ija que permiten su conexión a un circuito eléctrico apropiado Asegúrese de que el producto esté conectado a un tomacorriente con la misma configuración que la clavija No se debe usar un adaptador con este equipo Si se debe conectar el equipo a un circuito eléctrico de diferente tipo consiga la ayuda de personal calificado Extensiones eléctricas Sólo utilice una extensión eléctrica de tres alambre...

Страница 22: ...as neumáticas el manual del fabricante debe tener recomendaciones sobre su presión de operación Nota Ahora el compresor de aire está listo para ser usado Los siguientes accesorios de inflado y limpieza los cuales vienen con esta unidad sólo se deben operar a una presión máxima de 20 30 PSI soplete y su adaptador boquilla cónica agujas de inflado 1 4 7 5 6 3 8 Procedimiento diario de apagado 1 Pong...

Страница 23: ... el aire comprimido y las superficies calientes pueden provocar lesiones 1 Apague el compresor y desenchufe el cable de corriente 2 Si el compresor ha estado en operación permita que se enfríe 3 Abra la válvula de drenado para vaciar el aire del tanque 4 Cierre la válvula de drenado 5 Quite el tapón de llenado de aceite que se encuentra en la bomba 6 Quite el visor con una llave de tuercas o de cu...

Страница 24: ... desconéctela del tomacorriente y comuníquese con un técnico de servi cio El motor no arranca Compruebe que el cable de corriente está enchufado y que el interruptor está encendido Compruebe que el fusible de la caja de circuitos sea de la capacidad adecuada Si se ha disparado restablézcalo y rearranque la unidad Si el fusible se dispara con frecuencia revise la válvula de retención o llame a un t...

Страница 25: ...ressor Model 395 226 Parts List 1 2 3 4 5 6 7 8 9 10 2 11 12 13 14 15 16 17 18 19 20 21 22 23 24 25 26 27 33 36 35 34 37 42 43 44 45 48 47 46 28 40 41 49 50 51 52 53 54 49 40 41 55 56 57 58 59 60 61 62 63 39 40 41 28 38 ...

Страница 26: ...3 Tuerca M8x1 25 ZDC 6 5MM TALL 10 28 N A 29 N A 30 N A 31 N A 32 N A de ref de kit de parte Descripción cant 33 E105151 Cable Poder 16 3 tipo AWG SJT 6 de largo 1 34 4 Base Filtro de aire 1 35 4 E101613 Elemento Filtro de succión 1 36 4 Cubierta Filtro HUSKY 1 37 3 Ensamble Motor Bomba L1B2 c Escape RH 1 38 E100809 Conexión Codo 3 8NPT x 3 8 compresión 1 39 Perno SHC M8 x 1 25 x 16MM Placa ZDC 8 ...

Страница 27: ... juego Una de cada una de las piezas está ofrecida Los números de los juegos y las piezas que están incluidos se describen a continuación NOTAS de kit de parte Descripción de referencia 1 E100959 Juego Empaque 4 7 8 16 2 E100251 Juego Pistón Nota ordene el juego de empaque 1 también cuando ordene este juego 9 14 15 3 E105154 Juego Motor Bomba ensamblado L1B2 c Escape RH 1 27 37 4 E105153 Juego Fil...

Страница 28: ...s comerciales o de alquiler o cualquier otro propósito generador de ingresos Esta garantía no cubre ningún producto de MAT Holdings Inc que haya estado sujeto a abuso abandono negligencia o accidente o que se haya utilizado en alguna manera de forma con traria a las instrucciones de funcionamiento según se especifica en este manual del opera dor Esta garantía no aplica a los daños en el producto d...

Страница 29: ...NO SE APLIQUE EN SU CASO Esta garantía le confiere derechos legales es pecíficos y es posible que usted goce de otros derechos los cuales pueden variar de estado a estado Esta garantía se aplica a todos los productos de MAT Holdings Inc fabricados o vendidos por di cha compañía en Estados Unidos y Canadá Para encontrar el concesionario de servicio autor izado más cercano a used llame al 1 888 859 ...

Отзывы: