background image

5107877000

The Hunter Douglas

®

 Lifetime Guarantee is an expression of our desire to provide a thoroughly satisfying 

experience when selecting, purchasing and living with your window fashion products. If you are not thoroughly 
satisfied, simply contact Hunter Douglas at (888) 501-8364 or visit hunterdouglas.com. In support of this policy  
of consumer satisfaction, we offer our Lifetime Limited Warranty as described below.

NOTE

:


In no event shall Hunter Douglas or its licensed fabricators/distributors be liable or responsible for incidental 

or consequential damages or for any other indirect damage, loss, cost or expense. Some states do not allow the exclusion or 
limitation of incidental or consequential damages, so the above exclusion or limitation may not apply to you. This warranty 
gives you specific legal rights, and you may also have other rights which vary from state to state. 

Different warranty periods and terms apply for commercial products and applications.

Hunter Douglas (or its licensed fabricator/distributor) will repair or replace the 

window fashion product or components found to be defective. 

COVERED

BY


A


LIFETIME


LIMITED


WARRANTY

•   Hunter Douglas window fashion products are 

covered for defects in materials, workmanship 
or failure to operate for as long as the original 
retail purchaser owns the product (unless shorter 
periods are provided below).

•   All internal mechanisms.
•   Components and brackets.
•   Fabric delamination.
•   Operational cords for a full 7 years from the  

date of purchase.

•   Repairs and/or replacements will be made with 

like or similar parts or products.

•   Hunter Douglas motorization components are 

covered for 5 years from the date of purchase.

NOT


COVERED

BY


A


LIFETIME


LIMITED


WARRANTY

•   Any conditions caused by normal wear and tear.
•   Abuse, accidents, misuse or alterations to the 

product.

•   Exposure to the elements (sun damage, wind, 

water/moisture) and discoloration or fading  
over time.

•   Failure to follow our instructions with respect  

to measurement, proper installation, cleaning  
or maintenance.

•   Shipping charges, cost of removal and reinstallation.

TO


OBTAIN


WARRANTY


SERVICE

1.  Contact your original dealer (place of purchase) for warranty assistance.
2.   

Visit hunterdouglas.com for additional warranty information, frequently asked questions and access to service locations.

3.   Contact Hunter Douglas at (888) 501-8364 for technical support, certain parts free of charge, for assistance in obtaining

warranty service or for further explanation of our warranty.

4/16

Содержание Silhouette Duolite

Страница 1: ...UltraGlide 2 PowerView Motorization Silhouette Duolite Window Shadings UltraGlide 2 Click and Walk Away and PowerView Motorization Operating Systems Installation Operation Care...

Страница 2: ...llation Brackets 3 Mount the Installation Brackets Inside Mount 4 Mount the Installation Brackets Outside Mount 6 STEP 2 Install the Shading 8 Mount the Headrail 8 Attach the Dust Cover Optional 8 STE...

Страница 3: ...adrail Optional Dust Cover Installation Brackets Limit Stops Remote Roller Shade Bottom Rail Rear Roller Shade Tassel Cord Front Shading Shading Bottom Rail Tassel Manual Control Button Battery Wand P...

Страница 4: ...hment Speed Nuts and Screws Provided Extension brackets come with screws and speed nuts Drywall Anchors Not Provided Use drywall anchors when mounting into drywall 6 x 11 2 Hex Head Screw Provided Spe...

Страница 5: ...es and Window Terminology If the installation brackets are mounted correctly the rest of the installation process follows easily To prepare for this important first step review the mounting types and...

Страница 6: ...ve any removed top tabs for use as shims when needed Review the minimum depth requirements in the table below Center the installation brackets on your marks and mark the location of the screw holes Al...

Страница 7: ...e the top tab from the back cover bracket Snap the prongs on the back cover brackets into the holes on the back of the installation brackets Attach the installation brackets using the screws provided...

Страница 8: ...lation brackets on your marks and mark the location of the screw holes A minimum 11 8 flat vertical height is required to mount the installation brackets Position the top of the installation brackets...

Страница 9: ...al mounting surface with 6 screws long enough for a secure installation IMPORTANT The solid side of the spacer blocks must face toward the mounting surface Additonal Clearance with Extension Brackets...

Страница 10: ...y remove the protective covering from the Palette fabric covered headrail Attach the Dust Cover Optional The dust cover can be used with outside mounts to protect the top of the headrail from exposure...

Страница 11: ...chargeable batteries are not recommended Squeeze the cap latch to release and remove the cap Install the batteries according to the instructions on the battery wand label Replace the cap Align the tab...

Страница 12: ...unt bracket Press the bracket into place Attach the brackets using the screws provided Position the battery wand so the power cable can easily be connected to the socket and snap the wand into the bra...

Страница 13: ...ding make sure it does not impede the operation of the shading Space the wire retainers approximately 15 apart along the power supply cable as shown at far right WARNING Keep cords and small parts out...

Страница 14: ...back cover is used on inside mounts only Install the back cover into the back cover brackets on the rear of the installation brackets as shown On shadings with battery wand s the top of the back cove...

Страница 15: ...to the appropriate page based on your operating system For the UltraGlide 2 Click and Walk Away system see below For the PowerView system see page 14 Shown below are a few examples of possible shading...

Страница 16: ...b against either window jamb immediately press the manual control button to stop the shading See Adjust the Bottom Rail Weight on page 19 Using the PowerView Remote Refer to the illustration on the fo...

Страница 17: ...tion 1 To wake up the remote simply pick it up or press n STOP The last group s selected will be highlighted and active 2 Press all or groups 1 6 to select specific shading s to move Selected group bu...

Страница 18: ...move in slow motion to help you fine tune this point 4 Press and hold STOP for 4 seconds to put the remote in program mode The lights on the remote will flash to indicate it is in program mode 5 With...

Страница 19: ...hading will move slightly one more time to indicate that the travel limits have been reset Resetting Shading Programming This reset erases all shading programming from memory including group assignmen...

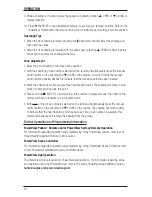
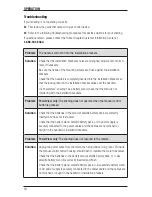
Страница 20: ...the installation brackets Problem PowerView only The shading does not operate when the manual control button is pressed Solution Check that the batteries in the wand or satellite battery pack are corr...

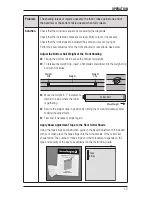
Страница 21: ...il weight To release the weight clip insert a flat blade screwdriver into the weight clip and turn clockwise Move the weight in 1 increments toward the side where the fabric is gathering Secure the we...

Страница 22: ...e limit stop catches the bottom rail and the bottom of the limit stop is slightly above or barely touching the fabric roll In the second illustration the limit stop adjustment is too tight The fabric...

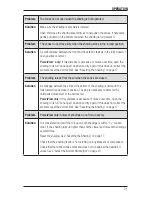
Страница 23: ...the vanes are closed Solution A small gap between the sill and the bottom of the shading is normal in the fully lowered vane closed position The gap is necessary to allow for the unimpeded movement of...

Страница 24: ...mote Control Guide for operation or programming troubleshooting solutions Problem UltraGlide 2 Click and Walk Away Shadings Only The tassel cord and lower cord connector have detached from the upper c...

Страница 25: ...ve it from the brackets Cleaning Procedures Silhouette window shadings are made of 100 polyester which means they are inherently durable and resilient However care must be taken to avoid wrinkling the...

Страница 26: ...Rear Roller Shade The rear roller shade fabric can be cleaned by dusting hand held vacuuming compressed air hair dryer on the cool setting and the dry method of injection extraction A Note About Hardw...

Страница 27: ...ys keep cords out of the reach of children Move cribs playpens and other furniture away from cords Children can climb furniture to get to cords NOTE The warning labels on the bottom rails of corded wi...

Страница 28: ...it different from that to which the receiver is connected Consult the dealer or an experienced radio TV technician for help Any changes or modifications not expressly approved by the party responsible...

Страница 29: ...Notes...

Страница 30: ...Notes...

Страница 31: ......

Страница 32: ...ED WARRANTY Hunter Douglas window fashion products are covered for defects in materials workmanship or failure to operate for as long as the original retail purchaser owns the product unless shorter p...

Отзывы: