background image

INSTALLATION

7


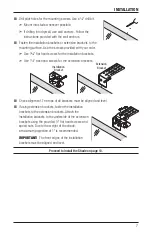
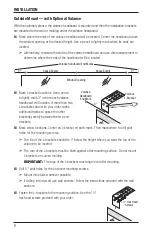
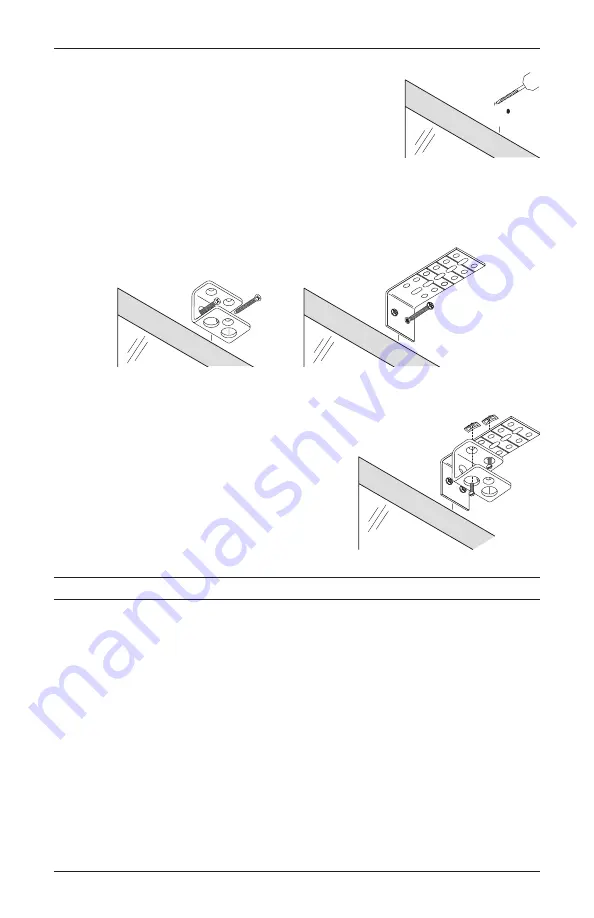
Drill pilot holes for the mounting screws. Use a 

1

/

8

" drill bit.


Mount into studs whenever possible. 


If drilling into drywall, use wall anchors. Follow the 
instructions provided with the wall anchors.


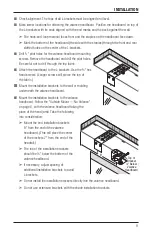
Fasten the installation brackets or extension brackets to the  
mounting surface. Use the screws provided with your order.


Use 1

5

/

8

" flat head screws for the installation brackets.


Use 1

1

/

2

" hex head screws for the extension brackets.


Check alignment. The tops of all brackets must be aligned and level.


If using extension brackets, fasten the installation  
brackets to the extension brackets. Attach the 
installation brackets to the underside of the extension 
brackets using the provided ½" flat head screws and 
speed nuts. Due to the weight of the shade,  
a maximum projection of 1" is recommended.

Important:  

The front edges of the installation  

brackets must be aligned and level.

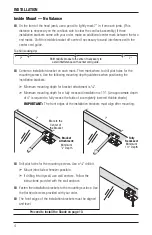
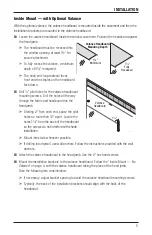
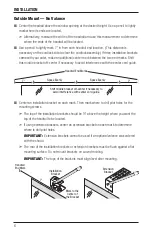
Proceed to Install the Shade on page 10.

Installation

Bracket

Extension

Bracket

Содержание Design Studio

Страница 1: ...Installation Operation Care Roman Shades Straight Pull Cordlock...

Страница 2: ...ponents Provided 2 Tools Needed 2 Fasteners Needed 2 Mounting Types and Window Terminology 3 Installation Inside Mount No Valance 4 Inside Mount with Optional Valance 5 Outside Mount No Valance 6 Outs...

Страница 3: ...lance Straight Pull Cordlock Roman Shade Valance Headboard Valance L Bracket Return Hook and Loop Attachment Valance Fabric Pull Cord Safety Cord Stop Tassel Outside mounts only Returns shown here on...

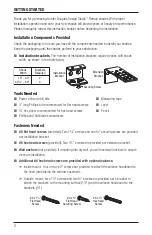
Страница 4: ...commended for hex head screws Pencil Phillips and flat blade screwdrivers Fasteners Needed 6 flat head screws provided Two 15 8 screws and one securing screw are provided per installation bracket 6 he...

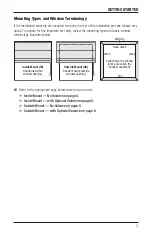
Страница 5: ...w terminology illustrated below Refer to the appropriate page below based on your order Inside Mount No Valance on page 4 Inside Mount with Optional Valance on page 5 Outside Mount No Valance on page...

Страница 6: ...ing depth for a fully recessed installation is 1 An approximate depth of 4 is required to fully recess the folds of a completely lowered Hobble shade Important The front edges of the installation brac...

Страница 7: ...om each end space the pilot holes no more than 12 apart Locate the holes 11 8 from the back of the headboard so the screws do not interfere with shade installation Mount into studs whenever possible I...

Страница 8: ...installation bracket on each mark Then mark where to drill pilot holes for the mounting screws The top of the installation brackets should be above the height where you want the top of the headrail to...

Страница 9: ...brackets Use 11 2 hex head screws for the extension brackets Check alignment The tops of all brackets must be aligned and level If using extension brackets fasten the installation brackets to the ext...

Страница 10: ...r bracket s evenly between the two end brackets Mark screw locations Center an L bracket on each mark Then mark where to drill pilot holes for the mounting screws The top of the L brackets should be 1...

Страница 11: ...Use the hex head screws Longer screws will pierce the top of the fabric Mount the installation brackets to the wall or molding underneath the valance headboard Mount the installation brackets to the...

Страница 12: ...gainst the back of all brackets Check that no lift cords are captured in the bottom of the installation brackets Check that the fabric is smooth and even not pinched across the width of the headrail I...

Страница 13: ...d outside mounts only Press the strip of hook and loop material on the valance returns to the hook and loop material on the ends of the headboard Make adjustments as necessary until you are satisfied...

Страница 14: ...o the installation brackets Solution Check that all brackets are aligned at the same level and even across the front Problem Shade raises unevenly Solution Adjust one or more of the bottom cord stops...

Страница 15: ...lications Problem The battens or folds don t align Solution Side by side shade alignment is guaranteed within when shades are ordered at the same time and in the identical style fabric lining color he...

Страница 16: ...sing the fabric into soft folds across the shade to create a uniform appearance If a shade is left in the raised position with the folds dressed for an extended period the folds may retain their shape...

Страница 17: ...g to reach the cords Be sure the cord cleats are firmly secured Once the cord cleats are attached wrap excess cord around them after each use of the shade Replacement or additional cord cleats may be...

Страница 18: ...cessible cords on the back Accessible cords on the back of Roman shades can be pulled out to form a loop which can STRANGLE a young child Children can climb furniture to access these cords Move cribs...

Страница 19: ......
Страница 20: ...LIMITED WARRANTY Hunter Douglas window fashion products are covered for defects in materials workmanship or failure to operate for as long as the original retail purchaser owns the product unless shor...

Отзывы: