


48/56
V 03/2018
Original
Operati ng Instructi on Manual
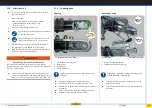
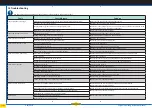
11.9 Lighti ng system
H - 109
1
2
3
4
5
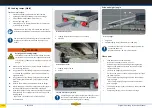
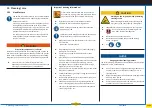
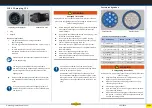
Lights / markings on the trailer
1.
Rear retro-refl ector (red)
2.
Multi functi onal light, left version for: Brake, indicator, rear
fog, number plate light
3.
Multi functi onal light, right version for: Brake, indicator, num-
ber plate light and reversing light
4.
Front retro-refl ector or light (white)
5. Side retro-refl ector (orange)
Replacing bulbs
NOTICE
Incorrect maintenance of the lighti ng system!
The bulbs / lights may stop functi oning as a result of incorrect
maintenance.
►
Do not touch bulbs with your bare fi ngers. Use a
cloth or the bulb packaging - this increases the
life expectancy of the bulb considerably.
►
Switch the lighti ng off prior to carrying out work
on electric systems.
►
Perform work on the electric system only in
areas protected from the environment - protec-
ti on against wetness.
►
Always use original spare parts (bulbs) on the lighti ng
system. Only replace bulbs with those of the same watt
age and the same type.
Check lighti ng
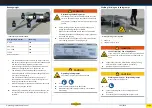
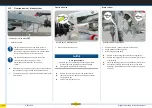
H - 110
1
2
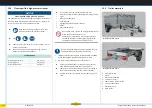
Multi functi onal light (at rear)
1.
Mounti ng bolts (4x)
2.
Lens
►
Check that the lights are fi tt ed, check for damage and
make sure they work.
►
Replace faulty lamps / retro-refl ectors.
►
Have non-functi onal lamps, torn / britt le electric cables
replaced by a specialist workshop.
Exchanging lights
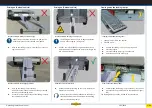
H - 111
3
2
1
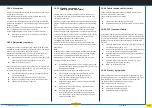
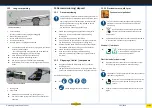
Multi functi onal light, left
1.
Plasti c insert, white
2.
Plasti c insert, silver
3.
Lens
►
Unscrew the fastening screws.
►
Carefully remove the lens.
1
2
3
4
Multi functi onal light, right
2
3
4
5
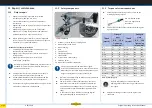
Multi functi onal light, left (without plasti c inserts)
1.
Slot-in cover (plasti c)
2.
Number plate tubular bulb (C5W)
3.
Brake / tail light assembly (PY21W)
4.
Indicator (PY21W)
5. Rear fog light (PY21W)
►
Remove the plasti c inserts.
►
Clean the contacts, if necessary. If necessary, remove any
dirt / water from the housing.
►
Unscrew faulty bulb from the socket.
►
Insert the plasti c inserts.
►
Insert the new bulb into the socket.
Ensure that the bulb is seated securely.
►
Place the lens ti ghtly onto the housing.
►
Insert the fastening screws.
Do not ti ghten the fastening screws too much.
- Risk of lens popping out!