background image

11

2. After verifying the installation, reinstall all the covers.
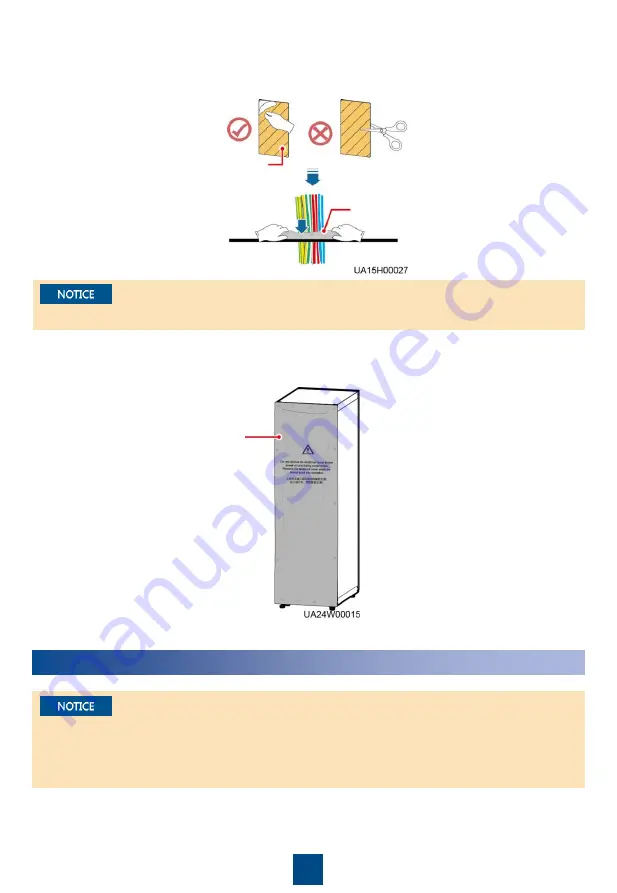
3. (Remove the paper protective film from the sealing putty.) After routing cables and verifying 

cable connections, seal the gap between cables and the cabinet using sealing putty. 

4. Do not remove the dustproof cover before power-on to prevent dust inside the UPS.

Dustproof cover 

Sealing putty

Sealing putty must be used as a whole and the gap can be sealed only from the top. 

Paper 

protective film 

5

Powering On and Starting the UPS

1. Before powering on the UPS, ensure that the UPS has passed all check items in the 

UPS5000 

Commissioning and Acceptance Report 

and Chapter 4.

2. Measure the voltage and frequency of the UPS upstream input switch. The line voltage range is 

138

–485 V AC, and the frequency range is 40–70 Hz.

Содержание UPS5000-E-800K-FM

Страница 1: ...ons H x W x D UPS5000 S 800K SM 1550 kg 2000 mm x 2400 mm x 850 mm UPS5000 S 800K FM 1600 kg UPS5000 S 800K SM UPS5000 S 800K FM 1 Power units 2 Control module 3 Maintenance bypass switch 4 Power distribution module cover 5 Bypass unit 6 Mains input switch 7 Output switch 8 Bypass input switch A UPS in standard configuration has no mains input switch bypass input switch or output switch ...

Страница 2: ...s Channel steel installation Ensure that the distance between the outer surfaces of two pieces of channel steel is 800 mm and secure the channel steel to the floor using expansion bolts Huawei does not provide channel steel or expansion bolts used for securing channel steel The customer should purchase channel steel recommended width 50 mm or more and expansion bolts Unit mm A mounting holes on th...

Страница 3: ...necting plates between the bypass cabinet and its adjacent power cabinet based on the following sequence bottom top and middle connecting plates Channel steel installation M12x60 bolts Floor installation M12x60 expansion bolts 1 Mounting hole on the floor 2 Mounting hole on the channel steel 3 Secure the UPS ...

Страница 4: ...bution subrack from the bypass cabinet and remove the rear covers from the bypass cabinet and its adjacent power cabinet When reinstalling the switch extension rod keep the dowel level as shown in the figure Insert the switch extension rod to the blue mark put washers and tighten the dowel to reinstall the switch extension rod Blue mark 6 Take off No 10 protective plate ...

Страница 5: ...e corresponding ports on the parallel board of the power cabinet The parallel board is located at the rear of the power cabinet adjacent to the bypass cabinet and it can be seen after the rear cover is removed Bypass Cabinet Cable Name Bypass Cabinet Cable Label or Number Port Silk Screen on the Power Cabinet Parallel Board or Cable Number Quantity Bypass module DL37 cable W301_J21 J21 1 W303_J24 ...

Страница 6: ...witch cable maintenance bypass switch A UPS in full configuration has three switch cables mains input switch maintenance bypass switch and bypass input switch The following figure shows how to connect cables to a parallel system in full configuration ...

Страница 7: ...y from the cabinets to prevent scraps from falling inside Cable scraps may ignite and cause personal injury or device damage After cables have been installed clean the cabinets in a timely manner Keep the cabinets and surrounding environment clean and tidy You need to prepare terminals onsite The stripped length of the copper wire should be the same as that of the part of the terminal that covers ...

Страница 8: ... inputs Skip this step if there is only one mains input 4 Connect mains input power cables 3 Connect the ground cable 1 Remove the top cover from the cabinet based on cable routes and dimensions Installing Cables 3 2 Scenario 1 Routing Cables from the Top ...

Страница 9: ... input power cables 7 Connect battery cables 8 Connect the signal cable The figure shows the signal cable routing and is for reference only Connect the cable based on the actual situation 9 Reinstall the extension rod of the maintenance bypass switch ...

Страница 10: ...m cable routing scenario For the cable connection method for the TN C system see the user manual 1 Remove the cable covers from the bottom of the cabinet drill holes in the covers attach grommet strips to the hole edges for protecting cables and reinstall the cable covers 2 Connect power cables and signal cables 1 Check that there is no foreign matter in the cabinet 1 Top of the cabinet 2 Wiring t...

Страница 11: ... on to prevent dust inside the UPS Dustproof cover Sealing putty Sealing putty must be used as a whole and the gap can be sealed only from the top Paper protective film 5 Powering On and Starting the UPS 1 Before powering on the UPS ensure that the UPS has passed all check items in the UPS5000 Commissioning and Acceptance Report and Chapter 4 2 Measure the voltage and frequency of the UPS upstream...

Страница 12: ...et Site and Device Type as required and tap Offline Activation Enter the generated password in the password textbox on the LCD to start the UPS Use the app to start the UPS online Yes No start the UPS offline On the app home screen tap StartUp to access the Set Startup screen If the UPS is powered on for the first time you need to obtain the startup password from the Service Expert app Skip this s...

Страница 13: ... check that the UPS is working in bypass mode To ensure system security change the LCD and WebUI passwords after the first login 1 On the main menu choose Common Functions and tap Inv ON 2 In the displayed login window enter the user name and password and tap 3 In the displayed dialog box tap Yes to start the inverter Starting inverter 5 3 2 Set the language time date network parameters and system...

Страница 14: ...trings are properly connected turn on the battery string input circuit breaker If there are multiple battery strings turn on the circuit breaker for each battery string and then turn on the general circuit breaker between battery strings and the UPS The No battery alarm disappears from the MDU 3 Turn on the UPS downstream output switch to supply power to the loads Optional Setting Parameters for t...

Страница 15: ...China www huawei com Scan here for more documents You can also log in to Huawei technical support website https support huawei com enterprise https support huawei com Support Support E WeChat Scan here for technical support enterprise Scan here for technical support carrier Huawei App Store Huawei App Store ...

Отзывы: