26
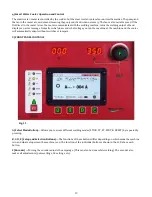
Fig. 44
Fig. 43
The following example shows a setting that could be
used for 3/8” thick material.
Since we set the hot-start value lower than the starting
current value (as seen in
Fig. 41
), there really is no hot-
start. In this case, as soon as you depress the foot pedal,
you have 100 amps minimum amperage.
Now, let’s look at the entire front of the machine (
Fig.
42
).
You can see the machine is in AC mode, with the starting
amps set to 100A (as shown in the LCD display). The
maximum amperage (120A) can be seen in the
Amperage display (red numeric; above LCD). Now, use
encoder
F
(
Fig. 11
) to adjust the amperage up to 400
amps—a suitable setting to weld 3/8” or 1/2”
aluminum.
Your starting current does not always have to be 4
amps! When working with thicker, colder material
(especially aluminum), a higher starting current gives
you better arc ignition and arc stability.
To access pulse mode and the pulse mode settings, press
button
C
(
Fig. 11
) to enter the PULSE ACTIVATION
screen (
Fig. 44
).
Now, press button
D
(
Fig. 11
) to turn pulse-on and
proceed to the PULSE - MAIN SETTINGS menu (
Fig. 45
).
Here, you can adjust the background amps from 10 to
90% by turning encoder
F
(
Fig. 11
). After selecting
your background amps value, press button
C
(
Fig. 11
;
the green arrow in this instance) to access the next
screen where you can select your peak time (
Fig. 46
).
Like the background amps adjustment, you can adjust
the peak time (or pulse-on time; the pulse-on time refers
to the time spent on the higher current) from 10 to 90%
by turning encoder
F
(
Fig. 11
). After selecting your
desired peak time, press button
C
(
Fig. 11
; the green
arrow in this instance) to access the next screen where
you can select your pulse speed/frequency (
Fig. 47
).
Fig. 45
Fig. 46
Fig. 42
Содержание Invertig 313
Страница 6: ...6 Fig 1 ...
Страница 33: ...33 12 WIRING DIAGRAM Invertig 400 AC DC ONLY ...
Страница 34: ...34 13 EXPLODED VIEW INVERTIG 400 AC DC ONLY ...


