22
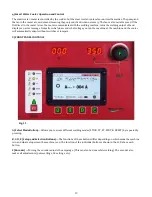
Fig. 23
Fig. 24
Here, you can adjust your pulse speed/frequency from
0.4 to 5.0 PPS by turning encoder
F
(
Fig. 11
). After
selecting your desired pulse speed/frequency, press
button
C
(
Fig. 11
; the green arrow in this instance) to
revert back to the main Stick welding screen (
Fig. 24
).
All other HTP stick welding machines (the Inverarc™
200 TLP and the Invertig™ 221 AC/DC) have the
background amps and the peak time factory fixed at
50% each. After months of research and years of
experience, we found that this setting proves to be an all
-around good setting for most rods and most situations.
For you, a good starting point is to keep your
background amps and peak time values at 50% and
adjust from there.
The pulse symbol on the left side of the screen indicates
that the machine is now in SMAW-P (Pulsed Stick)
mode. To turn the pulse feature off, press button
C
(
Fig.
11
) followed by button
D
(
Fig. 11
).
b) TIG 2T
Use the Select Mode button (
Fig. 11
) to toggle through
the menu until the LED next to 2T illuminates. You are
now in the TIG 2T welding mode.
You typically weld in 2T with a foot pedal or most other
forms of remote control (like slider controls, rotary
controls, pistol grip controls, or a TigButton™). You can
also use a momentary switch; however, 2T is not the
best mode for momentary switch use.
If a remote control is active (for example, you plugged a
foot pedal into the 14-pin remote control receptacle
(
Fig. 2, Y
)), the LCD shows the starting amperage in
the Amperage display (red numeric; above LCD) that
always shows the max (pedal) amperage.
Plug the TIG torch into the negative output receptacle
(
Fig. 2, Z
). All TIG welding uses DCEN, which requires
the ground clamp to be plugged into the positive output
receptacle (
Fig. 2, W
) and the TIG torch into the negative
output receptacle (
Fig. 2, Z
). Use the encoder (
Fig. 11, F
)
to set your maximum (pedal) amperage, which enables
you to use the pedal to control your welding amperage in
real time (while welding).
Fig. 25
shows a maximum welding amperage of 120
amps and a starting amperage of 4 amps. When you
establish an arc, the LCD changes and shows the actual
welding amperage and the arc voltage.
In the top right corner, the LCD also shows DC POLARITY
in blue, which indicates that the machine is in DC mode.
Just below DC POLARITY, you should see the remote
control status symbol. Here, the remote control status
symbol (
Fig. 26
) indicates that a remote control is
plugged in and active. When remote control functions
are disabled, such as in Pipe Mode, the remote control
status symbol blinks, indicating that remote control
functions are off.
On the left-hand side of the LCD, under the TIG 2T
symbol, you see the HF symbol, which indicates that high
frequency arc initiation is turned on. (In
Fig. 25
, you may
also notice the pulse symbol, which indicates that pulse
functions are turned on).
Pressing button
B
(
Fig. 11
, MODE in
Fig. 25
) gives you
the option to activate AC mode.
Fig. 25
Fig. 26
Содержание Invertig 313
Страница 6: ...6 Fig 1 ...
Страница 33: ...33 12 WIRING DIAGRAM Invertig 400 AC DC ONLY ...
Страница 34: ...34 13 EXPLODED VIEW INVERTIG 400 AC DC ONLY ...


