


Maintenance
26
2018-06-19
FM 239 MuW Beta-Typ-Z Rev.01
distributed by
holders (5) out of the attachment.
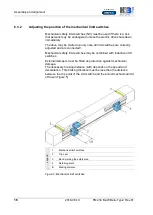
5.
Unscrew both bearing housings (6).
6.
Pull both toothed belt holders out of the basic profile (7) in the
direction of the bearing housings.
7.
Unscrew the top parts of the toothed belt holders (8).
8.
Pull the faulty toothed belt (9) out of the two bearing housings.
9.
Fasten new toothed belt to the old toothed belt using adhesive tape.
(Tooth visible upward.)
10.
Using the old toothed belt, pull the new toothed belt through the
basic profile until it protrudes by approximately the same amount at
both ends of the basic profile.
11.
Push the ends of the new belt into the bottom of the bearing
housings until the ends protrude from the bearing housings at the
top.
12.
Fasten the toothed belt holders to the ends of the toothed belt and
push into the basic profile to the attachment.
13.
Correctly screw both bearing housings onto the basic profile. The
fastening screws must be secured with Loctite 243.
14.
Fasten both toothed belt holders to the attachment using the
tensioning screws, but do not tension. The tensioning screws must
be secured with Loctite 243.
15.
Place the toothed belt under high tension using tensioning screws.
16.
Set the required tension accurately using a belt tensioning
measurement device (see Operating Instructions for the
measurement device).
Only the required tension which is correctly set will guarantee
optimal operation of the unit.
17.
The measuring position and the Hz figure applicable for the toothed
belt are supplied with the replacement toothed belt. Tension the
toothed belt in such a way that the Hz figure given is shown.
18.
Make sure the O-ring seal is positioned correctly in the attachment.
19.
Fit the carriage plate to the two pins on the attachment.
20.
Screw the carriage plate to the attachment underneath. Only use
the original screws.
If you do not use the original screws, make sure the screws are not
too long, otherwise they will sit on the basic profile or the cover
band and damage this part.
Содержание Beta 110-ZSE
Страница 2: ......