background image

1

Introduction

The HP ThinPro operating system reinvents user interface simplicity with a single console interface
for dashboard access to all user and administrative touch points. A default Connection Manager view
integrates traditional connection types with the latest Virtual Desktop Infrastructure (VDI) broker
connections with shared access to settings. Administrators are only one click away from the Easy
Config setup wizard, Control Panel, and System Information layers.

Connectivity support may include access to Windows

®

, Citrix, mainframes, mid-range servers, Unix/

Linux backends, web hosts as well as various VDI brokers such as Citrix XenDesktop, VMware View,
Quest vWorkspace, LeoStream and HP SAM (Session Allocation Manager).

NOTE:

Host access support may vary between different HP Thin Client models using the HP

ThinPro operating system.

Some ThinPro images may look different than those pictured in this guide. Not all features are
present on all models.

Using HP ThinPro

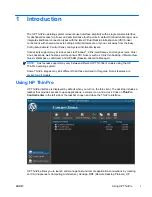
HP ThinPro interface is displayed by default when you turn on the thin client. The desktop includes a
taskbar that provides access to open applications, a volume icon, and a clock. Click on 

ThinPro

Control Center

 in the left side of the taskbar to open and close the ThinPro interface.

HP ThinPro allows you to launch and manage host and remote application connections by creating
an ICA (Independent Computing Architecture), XenApp, RDP (Remote Desktop Protocol), HP

ENWW

Using HP ThinPro

1

Содержание t5565 - Thin Client

Страница 1: ...Administrator s Guide HP ThinPro version 3 2 ...

Страница 2: ...mark of Microsoft Corporation in the U S and other countries The only warranties for HP products and services are set forth in the express warranty statements accompanying such products and services Nothing herein should be construed as constituting an additional warranty HP shall not be liable for technical or editorial errors or omissions contained herein Seventh Edition October 2010 Sixth Editi...

Страница 3: ...ons could result in damage to equipment or loss of information NOTE Text set off in this manner provides important supplemental information This guide provides the network administrator with instructions for configuring the thin client and explains the various configuration utilities ENWW iii ...

Страница 4: ...iv About This Book ENWW ...

Страница 5: ...x ICA 7 Web Browser 9 RDP 9 Add 9 Citrix ICA 11 RDP 13 HP TeemTalk 16 Adding a TeemTalk Connection using the TeemTalk Creation Wizard 16 Adding a TeemTalk Connection Manually 17 Web Browser 18 HP Remote Graphics Software RGS 18 HP Session Allocation Manager SAM 19 XenApp 19 LeoStream 20 vWorkspace 20 VMware View 23 Xdmcp 24 SSH 25 Telnet 26 Custom 27 Copy 27 Delete 27 Edit 27 User View 28 Control ...

Страница 6: ... Manager 38 Setup 38 Date and Time 39 Global Network Settings 39 Language 40 Network Connections 40 Wired Connection 40 Wireless Connection 41 VPN Connection 42 Security 43 HP ThinPro Configuration 43 Setting Connections and Control Panel User Permissions 44 Setting User Desktop and System Options 44 Personalization 44 Boot Logo 44 Desktop Background 45 Screensaver 45 Window Manager 46 Management ...

Страница 7: ... the HP ThinPro Image 50 Manage the HP ThinPro Configuration 52 VNC Shadow 53 Advanced 54 CDA Mode 54 DHCP Option Manager 55 Mousepad 55 X Terminal 55 System Information 56 General 56 Network 57 Net Tools 58 Software Information 58 Index 59 ENWW vii ...

Страница 8: ...viii ENWW ...

Страница 9: ...h as Citrix XenDesktop VMware View Quest vWorkspace LeoStream and HP SAM Session Allocation Manager NOTE Host access support may vary between different HP Thin Client models using the HP ThinPro operating system Some ThinPro images may look different than those pictured in this guide Not all features are present on all models Using HP ThinPro HP ThinPro interface is displayed by default when you t...

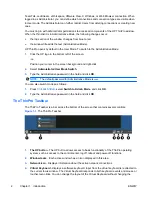
Страница 10: ...ive password in the field and click OK NOTE The default password for Administrative Mode is root You can also switch modes as follows 1 Press Ctrl Alt Shift S select Switch to Admin Mode and click OK 2 Type the Administrative password in the field and click OK The ThinPro Taskbar The ThinPro Taskbar is a bar across the bottom of the screen that contains several controls Figure 1 1 The ThinPro Task...

Страница 11: ... keyboard layout The Virtual Keyboard s layout is active only while its window is open 5 Volume control Displays a sound control dialog that allows you to change the sound volume for the thin client 6 Clock display Displays the time according to the thin client s clock Hovering the cursor over the clock display shows a tooltip containing the current date ENWW Using HP ThinPro 3 ...

Страница 12: ... image up to date with new images service packs or additional packages Easy Config provides a wizard interface to assist you in setting up your ThinPro configuration Both Easy Update and Easy Config are available from the Control Panel Management tab The Easy Tools thin client management suite is documented in the HP Easy Tools Administrator s Guide which can be found at http www hp com support In...

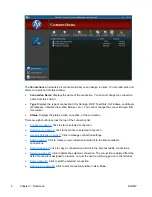
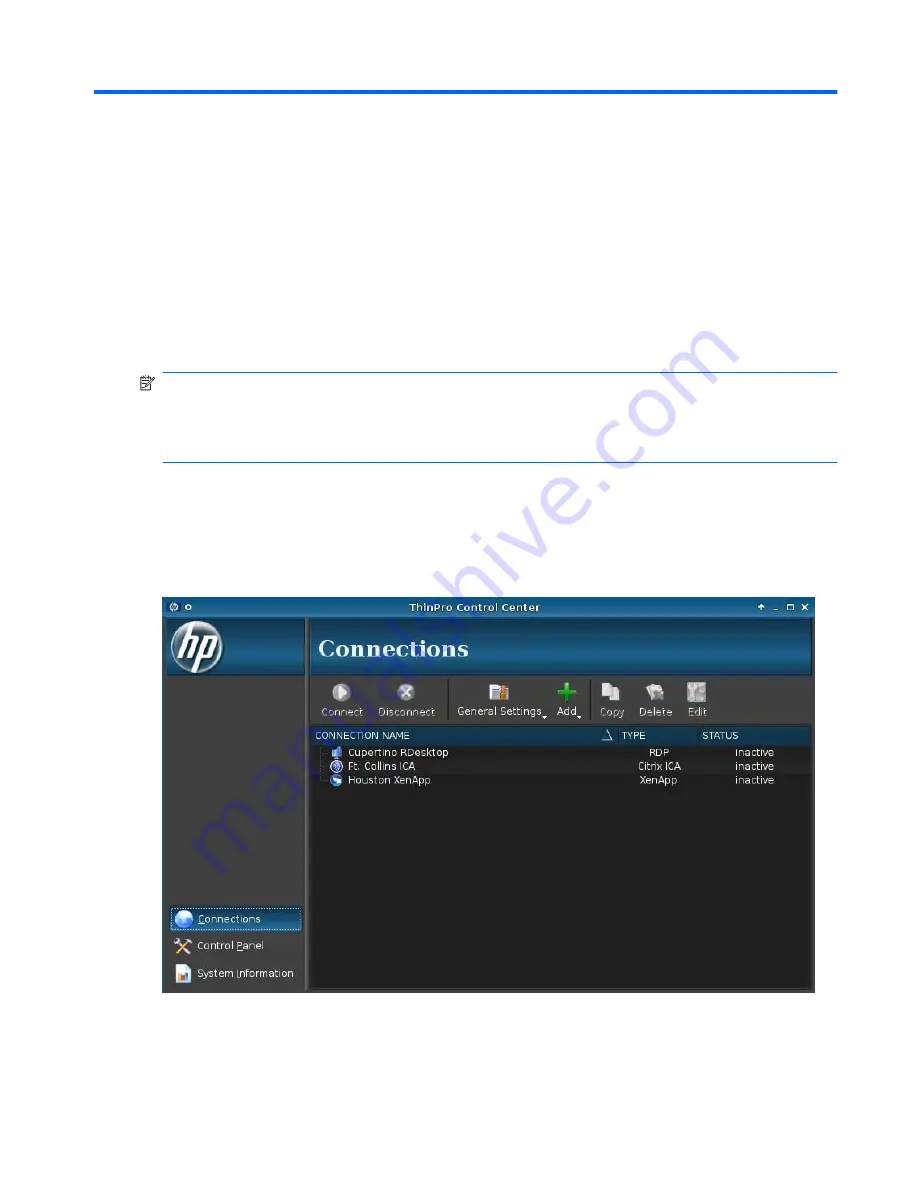
Страница 13: ... the four System Information tabs Connections HP ThinPro allows you to access and manage remote connections such as ICA XenApp RDP TeemTalk LeoStream vWorkspace VMware View X Windows Web Browser etc To access all HP ThinPro functionality you must log in as an Administrator As a User you can run connections and have limited access to HP ThinPro functionality The HP ThinPro display when configured l...

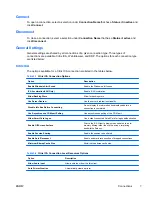
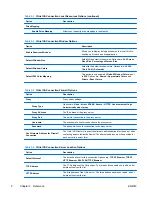
Страница 14: ...e connection list Connect on page 7 Click to start a selected connection Disconnect on page 7 Click to disconnect a selected connection General Settings on page 7 Click to manage connection settings Add on page 9 Click to create a new connection and add it to the list of available connections Copy on page 27 Click to copy a connection and add it to the list of available connections Delete on page ...

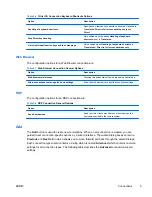
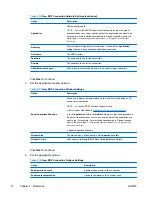
Страница 15: ...on Allow Backing Store Allow for backing store Use Server Redraw Use the server s redraw functionality Disable Info Box Before Connecting Do not display the information box displayed before a connection is completed Use Asynchronous COM port Polling Use asynchronous polling of the COM port Allow Smart Card Logon Use a client connected Smart Card for logon authentication Enable Off Screen Surface D...

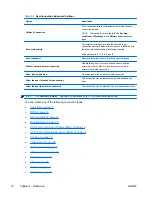
Страница 16: ...e Options are None direct SOCKS Secure HTTPS Use browser settings Automatically detect proxy Proxy Address The IP address of the proxy server Proxy Port The port for connection to the proxy server Username The username to use for connection to the proxy server Password The password to use for connection to the proxy server Use Alternate Address for Firewall Connection The Citrix ICA Client will re...

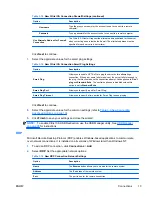
Страница 17: ...starts the web browser options dialog Allow connections to manage their own settings Allow the web browser to control the connection settings RDP The configuration options for an RDP connection are Table 3 8 RDP Connection General Options Option Description Send hostname as Send your thin client s mac address or hostname as the hostname specified to the remote system Add The Add button is used to ...

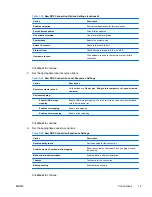
Страница 18: ... network in order to start or if you don t want to wait for network to start the connection Show icon on desktop A desktop icon will be created for this connection Allow the user to launch this connection This connection can be launched by a non administrative user Allow the user to edit this connection This connection can be modified by a non administrator user NOTE The Allow the user options are...

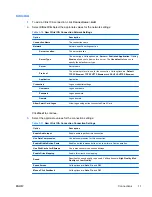
Страница 19: ...tion Credentials Logon credential settings Username Logon username Password Logon password Domain Logon domain Allow Smart Card Logon Allow logon using a client connected Smart Card Click Next to continue 3 Select the approriate values for the connection settings Table 3 11 New Citrix ICA Connection Connection Settings Option Description Enable Audio Input Enable audio input from this connection U...

Страница 20: ...ing Valid options are Default Shared Approximate Colors and Private Exact Colors This option is enabled only when the Window Colors option is set to 256 Click Next to continue 5 Select the approriate values for the application settings Table 3 13 New Citrix ICA Connection Application Settings Option Description Application The Citrix Application Directory The Citrix directory Click Next to continu...

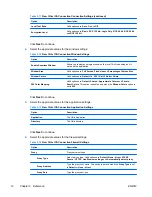
Страница 21: ...e Don t ping and Standard Echo The next two options are disabled unless this option is set to Standard Echo Smart Ping Port Allows you to specify a port for Smart Ping Smart Ping Timeout Allows you to specify a time period for Smart Ping to keep pinging Click Next to continue 8 Select the approriate values for the common settings refer to Table 3 9 New Connection Advanced Settings on page 10 9 Cli...

Страница 22: ...Connection Window Settings Option Description Enable Seamless Windows Allows you to display a single window on the local ThinPro desktop as if it were a native application NOTE To use the RDP Seamless Windows mode a Install server side software http www cendio com seamlessrdp b In the Application field in the Network dialog box type the application to the path of seamlessrdp on your server and the...

Страница 23: ... computer sound Valid options are Do not play Bring to this computer and Leave at remote computer Devices mapping Enable USB storage mapping Enable USB storage mapping The drive letter to be used can be established with the drop down list Enable port mapping Enable port mapping Enable printer mapping Enable printer mapping Click Next to continue 6 Set the appropriate experience options Table 3 20 ...

Страница 24: ...connection using the wizard click Connections Add 2 Select Teemtalk and click Teemtalk creation wizard Set the appropriate connection options Table 3 21 New Teemtalk creation wizard Connection Connection Information Settings Option Description Session Name The name of the session Transport The network transport to use for the connection Valid transports are Tcp Ip Serial SSH2 and SSL Connection Th...

Страница 25: ...ar for this connection Click Next to continue 5 Set the appropriate finalization options Table 3 24 New Teemtalk creation wizard Connection Finalization Settings Option Description Create an icon on the desktop Select this option if you wish to have a desktop icon created for this connection Summary Session Information Displays a summary of the session that is to be created 6 Click Finish to save ...

Страница 26: ...int dialog Enable the print dialog box Click Next to continue 3 Set the appropriate advanced options refer to Table 3 9 New Connection Advanced Settings on page 10 4 Click Finish to save your settings and exit the wizard HP Remote Graphics Software RGS 1 To add an RGS connection click Connections Add 2 Select RGS and set the appropriate configuration options Table 3 27 New HP RGS Connection Settin...

Страница 27: ...HP Session Allocation Manager SAM 1 To add a SAM connection click Connections Add 2 Select SAM and set the appropriate HP SAM Client options Table 3 28 New HP SAM Connection HP SAM Client Settings Option Description Connection Name The connection name Server Hostname The hostname of the server Click Next to continue 3 Set the appropriate advanced options refer to Table 3 9 New Connection Advanced ...

Страница 28: ... New LeoStream Connection Network Settings Option Description Name The connection name Broker The broker for the connection Username The username to be used for the connection Password The password to be used for the connection Domain The domain to be used for the connection Click Next to continue 3 Set the appropriate advanced options refer to Table 3 9 New Connection Advanced Settings on page 10...

Страница 29: ...ord to be used for the connection Domain The domain to be used for the connection Retry attempts The maximum number of retry attempts for the connection Retry interval The interval to wait between retyr attempts Allow Smartcard login Allow a locally connected SmartCard to provide login credentials Click Next to continue 4 Set the appropriate window options Table 3 33 New vWorkspace Connection Wind...

Страница 30: ... appropriate local resource options Table 3 35 New vWorkspace Connection Local Resources Settings Option Description Remote computer sound Valid options are Bring to this computer Do not play and Leave at remote computer Devices Enable USB storage mapping Enable mapping of a locally attached USB device to the remote system Pick a letter from the drop down control Enable port mapping Enable mapping...

Страница 31: ... connection click Connections Add 2 Select VMware View and set the appropriate network options Table 3 37 New VMWare View Connection Network Settings Option Description Name The connection name Server The name of the remote server Username The username to use for the connection Password The pasword to use for the connection Domain The domain to use for the connection Desktop The desktop to use for...

Страница 32: ...ndow and click Connect Type the host name of IP address of the View Connection Server in the field if necessary 3 Type the user name password and domain names in the corresponding fields and click Connect 4 Click the arrow on the right side of the Desktop pool Select Protocols PCoIP 5 Click Connect NOTE To set PCoIP as the default protocol or to disable user protocol selection edit the desktop poo...

Страница 33: ...ou do not set this configuration the default configuration will be used For information on this screen see Display Preferences on page 35 Click Next to continue 3 Set the appropriate advanced options refer to Table 3 9 New Connection Advanced Settings on page 10 4 Click Finish save your settings and close the dialog box SSH Secure shell SSH is the most common way to gain remote command line access...

Страница 34: ...X15 10X20 and 12X24 Click Next to continue 3 Set the appropriate advanced options refer to Table 3 9 New Connection Advanced Settings on page 10 4 Click Finish to save your settings and close the dialog box Telnet Telnet is an older method of gaining remote command line access It is not encrypted 1 To add a Telnet connection click Connections Add 2 Select Telnet and set the appropriate configurati...

Страница 35: ...escription Name The connection name Enter command to run The command to run to make the remote connection Click Next to continue 3 Set the appropriate advanced options refer to Table 3 9 New Connection Advanced Settings on page 10 4 Click Finish to save your settings and close the dialog box Copy To copy a connection click a selection under Connection Name and then click Copy A copy of the connect...

Страница 36: ...User Mode 4 Click User View again when you have completed your changes Control Panel Control Panel utilities are organized under five tabs Peripherals on page 29 Setup on page 38 Personalization on page 44 Management on page 46 Advanced on page 54 All control panel items are availble for use when you are in Administrator Mode in non Administrator mode only the items allowed by the configuration ar...

Страница 37: ...325 Thin Client The thin client supports up to four monitors If you need additional screen real estate Client Aggregation allows up to four thin clients to be combined together controlled by a single keyboard and mouse Because each thin client supports up to four monitors Client Aggregation allows up to four computers and 16 monitors to be controlled by a single keyboard and mouse without the need...

Страница 38: ...the 4x4 grid In moving the mouse pointer off the right side of the thin client A monitors for example the pointer will appear on the left side of the thin client C monitors Likewise keyboard input will be redirected from thin client A to thin client C Following is another arrangement of the thin clients on the 4x4 grid and the resulting arrangement of the monitors 30 Chapter 3 Reference ENWW ...

Страница 39: ...ferred to as the Aggregation Server The other thin clients are referred to as Aggregation Clients When the mouse pointer is on one of the Aggregation Clients the mouse and keyboard inputs from the Aggregation Server thin client are encrypted and sent over the network to the selected Aggregation Client The Aggregation Client decrypts the mouse and keyboard inputs and passes the inputs to the local ...

Страница 40: ...ge 32 Configuring the Aggregation Clients Perform this procedure on each Aggregation Client 1 Double click Client Aggregation 2 Click Client 3 Type the server hostname or IP address of the Aggregation Server in the field 4 Click Apply to apply the changes Configuring the Aggregation Server To configure the Aggregation Server 1 Double click Client Aggregation 2 Click Server 32 Chapter 3 Reference E...

Страница 41: ...purple box that contains its hostname Click and drag the Aggregation Server to the desired location in the 4x4 grid In the following figure the Aggregation Server thin client is positioned in the first row second column of the 4x4 grid ENWW Control Panel 33 ...

Страница 42: ...this same manner position up to two additional Aggregation Clients in the 4x4 grid for a total of up to three Aggregation Clients Placement of the Aggregation Server and the Aggregation Clients in the 4x4 grid can be modified at any time by clicking and dragging a client computer to a new location Once the Aggregation Clients and the Aggregation Server have been configured they automatically attem...

Страница 43: ... application that requires a specific resolution or bit depth in order to function properly the administrator wants to standardize on one display profile even though there are many different monitors across the organization one or more users run applications that require their monitor to be rotated portrait versus landscape mode NOTE The Display Preferences window contents are different based on t...

Страница 44: ...Layout If you have a single keyboard configure it on the Primary tab Configure a second keyboard on the Secondary tab To set your keyboard layout 1 Double click Keyboard Layout 2 Select your keyboard type with the Standard Keyboard list 3 Set the Model Layout and Variant keyboard settings 4 Click Minimize Local Keyboard Shortcuts to minimize the number of keyboard shortcuts mapped to the thin clie...

Страница 45: ...n the thin client itself For more information on this open source program go to the Smart Common Input Method Platform Web site at http sourceforge net apps mediawiki scim index php title Main_Page Double click SCIM Input Method Setup Sound This allows you to specify audio parameters 1 Double click Sound 2 Click Show Switches to display additional settings 3 The individual slider controls can be u...

Страница 46: ... Touch Screen and click Calibrate to calibrate the touch screen NOTE The touch screen can only be calibrated if it has been enabled and the desktop restarted The touch screen will not track correctly on the screen if the display is rotated USB Manager To set USB mounting preferences 1 Double click USB Manager 2 Select one of the following remote protocols Citrix Local RDP RGS VMware View vWorkspac...

Страница 47: ...obal Network Settings 2 Configure the global network on three tabs General The following table lists the options available Table 3 44 Global Network Settings General Option Description Host name The host name of thie thin client Use local host name Use locally defined hostname do not send receive the client host name via DHCP Send host name to DHCP Send the local host name to DHCP This option is o...

Страница 48: ... whose value is English German Spanish French Japanese or Simplified Chinese Network Connections To set Network attributes 1 Double click Network 2 Configure the connections on the Wired Wireless and VPN tabs 3 To import a connection click Import and browse to the connection 4 To export a connection select the connection and click Export 5 Click Close to close the Network Connections dialog box Yo...

Страница 49: ...and click Delete 3 Click Delete to confirm that you want to delete the connection 4 Click Close to close the dialog box Wireless Connection Adding a Wireless Connection To add a wireless connection 1 Click the Wireless tab and then click Add 2 Choose whether or not to Connect automatically 3 Configure the new setting by completing the information on the three tabs Wireless Wireless Security IPv4 S...

Страница 50: ... a VPN connection 1 Click the VPN tab and then click Add 2 Select a VPN connection type and click Create 3 Choose whether or not to Connect automatically 4 Configure the new setting by completing the information on the two tabs VPN IPv4 Settings 5 Click Apply to apply your settings and close the dialog box Editing a VPN Connection To edit a VPN connection 1 Click the VPN tab 2 Select the connectio...

Страница 51: ...rt and then click Export 3 Specify the destination 4 Click Apply to apply your settings and close the dialog box Security This feature allows you to change Administrator and User passwords To change your password 1 Double click Security 2 Select Administrator or User and click Change password 3 Type the new password in the New password and Confirmation fields and click OK 4 If you wish to force a ...

Страница 52: ...inPro Configuration 2 Click Desktop in the left panel and select desktop options by selecting or clearing check boxes 3 Click System in the left panel and set asset information and enable or disable the WakeOnLAN mode by selecting or clearing check boxes NOTE This option is not available on all models 4 Click Apply then click OK to close the dialog box Personalization These utilities allow you to ...

Страница 53: ...nsaver 1 Double click Screensaver 2 Select the Screensaver settings a Select Enable screensaver or clear the selection if you do not want a screensaver b Select the number of minutes of inactivity after which to activate the screensaver Type the number in the field or use the up or down arrow keys to select a number c Select Require password on resume if desired d Select the Mode blank logo e If y...

Страница 54: ...s snapping Wrap workspaces Opaque move and resize Double click action 3 Click Close to save your settings and close the dialog box Management These utilities are management tools that can help you manage a thin client network The following utilities are available on the Management tab AD DDNS Manager on page 47 Altiris Configuration on page 47 Easy Config on page 48 Easy Update on page 48 Factory ...

Страница 55: ...te this information automatically 4 Click Information to see the following information AD Server Credentials Time Synchronization AD Machine Status Click OK when done 5 Click OK to save your changes and close the dialog box Altiris Configuration NOTE This feature is neither present nor supported on the HP ThinPro image for the HP t5325 Thin Client Altiris is disabled by default It can be activated...

Страница 56: ...tion Restore the factory settings Restore the factory image To access these functions 1 Double click Factory Reset 2 Click the button that will accomplish the task you desire HP Automatic Update To configure HP Automatic Update 1 Double click HP Automatic Update 2 Click Enable HP Automatic Update on system startup if you wish to have this system updated on restarts 3 If the previous option is enab...

Страница 57: ...avoid missing important security upgrades While Easy Update allows the simple installation of full ThinPro images service packs and packages Synaptic is a pure package manager While it is more complicated than Easy Update it handles inter package dependencies layered repositories and package removal NOTE Changes are not applied instantly you must first mark all changes and then apply them To insta...

Страница 58: ...er and then click Next NOTE The image path must exist on the FTP server before you can make the copy ThinState produces an error if the image path does not exist on the FTP server The image file name is set by default with the HP ThinPro host name 5 Type the FTP server information in the fields and choose whether or not to Compress the image NOTE The HP ThinPro image file is a simple disk dump The...

Страница 59: ...inPro image file this is normally a link with a dd gz file extension 4 select Open Link in HP ThinState 5 Verify the values displayed and click Finish to launch the deployment of the image Restoration is complete Capture HP ThinPro Image to a Bootable USB Flash Drive A bootable USB flash drive with an HP ThinPro image allows you to restore the image or duplicate it on different thin clients NOTE B...

Страница 60: ...on of HP ThinPro HP ThinPro allows you to Save the HP ThinPro Configuration on an FTP Server on page 52 Restore an HP ThinPro Configuration From a Remote Server on page 52 Capture an HP ThinPro Configuration to a USB Drive on page 53 Restore an HP ThinPro Configuration From a USB Key on page 53 Save the HP ThinPro Configuration on an FTP Server 1 Double click ThinState 2 Select the HP ThinPro conf...

Страница 61: ...e 10 Click Finish The HP ThinPro configuration capture is complete Remove the USB key Restore an HP ThinPro Configuration From a USB Key 1 Attach a USB key containing the profile you want to copy to the thin client 2 Double click ThinState 3 Select the HP ThinPro configuration and then click Next 4 Select restore a configuration and then click Next 5 Click on a USB key and then click Next 6 Select...

Страница 62: ...OTE You will need to restart the thin client for the changes to take effect Advanced These utilities allow you to enable CDA mode open a text utility and access the root directory The following utilities are available on the Advanced tab CDA Mode on page 54 DHCP Option Manager on page 55 Mousepad on page 55 X Terminal on page 55 CDA Mode This utility allows you to enable Citrix Desktop Appliance C...

Страница 63: ...de itself can be changed in case you have a conflict in your DHCP server over a particular code number By clicking on the information icon next to each option you can learn more about how that option is used both on the thin client and on the DHCP server The drop down list in the lower left corner allows you to change the DHCP tags that are displayed You can select Show Custom Options Show Common ...

Страница 64: ...l on page 56 Network on page 57 Net Tools on page 58 Software Information on page 58 General The General tab displays the following information BIOS Basic Input Output System and OS operating system Serial Number BIOS Version BIOS Release Date 56 Chapter 3 Reference ENWW ...

Страница 65: ...ory Free Used Installed Network The Network tab displays the following information Interface Name State Type IP Address Network Mask MAC Media Access Control Address DHCP Server Address Interface Statistics Network Default Gateway DNS Settings Hostname Default Domain Nameservers ENWW System Information 57 ...

Страница 66: ... the diagnostic parameters 4 Click Start Process 5 To save the diagnostic archive click Diagnostic name the file and specify a location Click Save to save the archive and close the dialog box 6 To clear the diagnostic log click Clear Log Software Information The Software Information tab displays the name and version of the main software installed 58 Chapter 3 Reference ENWW ...

Страница 67: ... SAM 19 SSH 25 TeemTalk 16 Telnet 26 VMware View 23 vWorkspace 20 Web Browser 18 Xdmcp 24 XenApp 19 connections add 9 27 configuring 5 delete 27 edit 27 list of 9 network 40 user view 28 VPN 42 wired 40 wireless 41 control panel Active Directory manager 47 AD DDNS Manager 47 advanced utilities 54 Agent Configure Manager 48 Altiris configuration 47 boot logo 44 CDA mode 54 client aggregation 29 dat...

Страница 68: ...itors multiple setup 31 mouse 37 Mousepad 55 Multicast 47 N net tools system information 58 network 39 network connections VPN connection 42 wired connection 40 wireless connection 41 network system information 57 O options Citrix ICA 11 Custom 27 ICA 11 LeoStream 20 RDP 13 RGS 18 SAM 19 SSH 25 TeemTalk 16 Telnet 26 VMware View 23 vWorkspace 20 Web Browser 18 Xdmcp 24 XenApp 19 P peripherals utili...

Страница 69: ...n on FTP server 52 time and date 39 touch screen 38 U updates Synaptic Package Manager 49 USB Manager 38 mounting preferences 38 user interface HP ThinPro 1 log in as 2 user view connections 28 V VMware View adding connection 23 options 23 VNC Shadow 53 VPN connection adding 42 deleting 43 editing 42 exporting 43 importing 43 VPN connection configuring 42 vWorkspace adding connection 20 options 20...

Отзывы: