background image


Removal and replacement procedures  47 

6. 

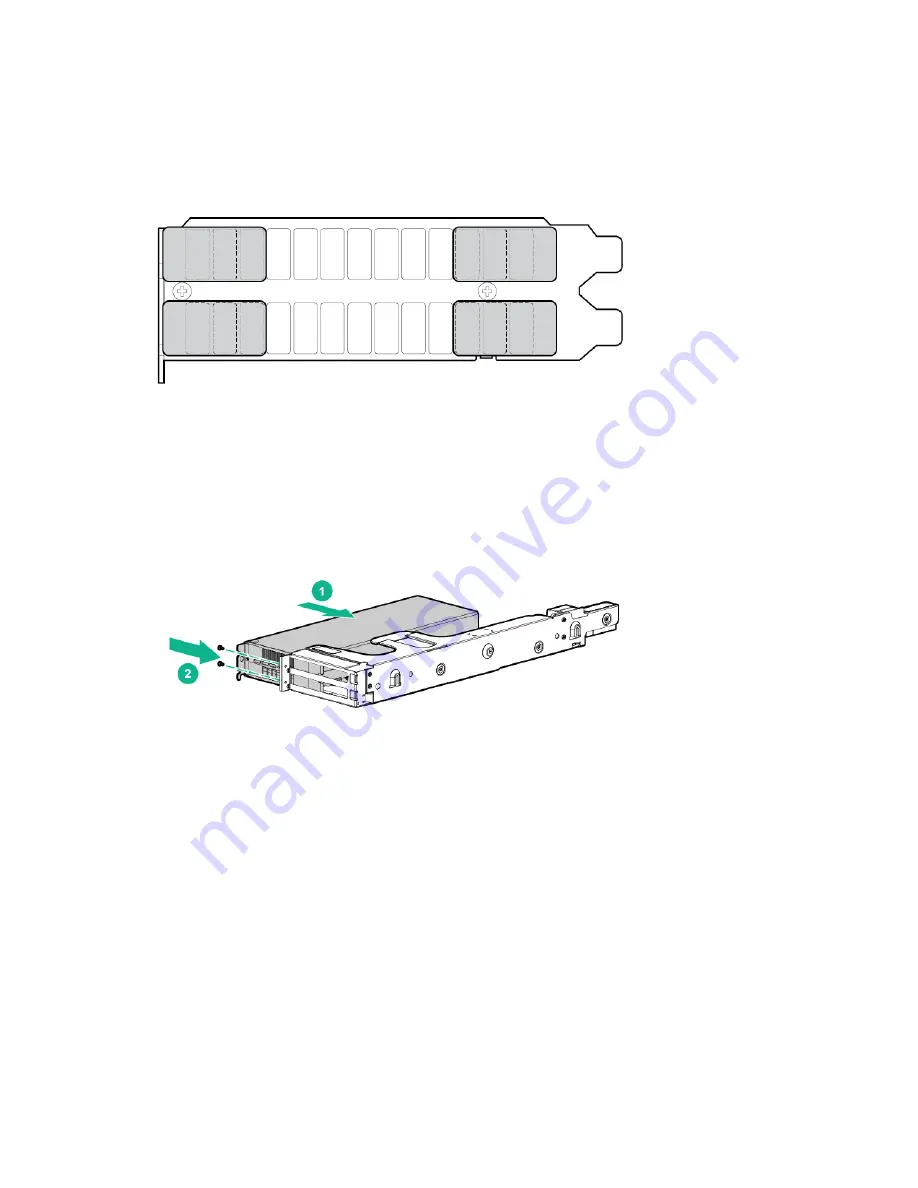
Verify that the air flow impedance control labels cover the three openings on each end of the I/O 

plate.   


7. 

Install the new graphics card into the card cage. 


8. 

Install the expansion blade PCIe card cage. 

9. 

Install the retaining block. 

10. 

Install the graphics expansion control cable. 

11. 

Connect the power cable to the expander power board and the PCI graphics option. 

12. 

Install the foam gasket. 

13. 

Install the expansion module front bezel. 

14. 

Install the access panel ("

Access panel (graphics server blade)

" on page 

31

). 

15. 

Install the graphics server blade. 

16. 

Power up the graphics server blade. 

17. 

Download and install the latest drivers from the following websites: 

o


Hewlett Packard Enterprise website (

http://www.hpe.com/info/hpesc

)   

Содержание ProLiant WS460c Gen9

Страница 1: ...ools specifications and requirements for hardware components and software This guide is for an experienced service technician Hewlett Packard Enterprise assumes you are qualified in the servicing of computer equipment trained in recognizing hazards in products and are familiar with weight and stability precautions Part Number 798315 002R December 2015 Edition 3 ...

Страница 2: ...herein Links to third party websites take you outside the Hewlett Packard Enterprise website Hewlett Packard Enterprise has no control over and is not responsible for information outside the Hewlett Packard Enterprise website Microsoft and Windows are either registered trademarks or trademarks of Microsoft Corporation in the United States and or other countries Linux is the registered trademark of...

Страница 3: ...ss panel graphics server blade 31 Expansion blade access panel 31 Expansion blade PCIe card cage 31 Drive blank 32 Drive 33 Enclosure connector cover 33 Mezzanine assembly 34 Mezzanine board options 35 Mezzanine options 35 PCIe mezzanine pass through 37 PCIe mezzanine pass through brackets 37 MXM graphics mezzanine module 39 MXM graphics mezzanine heatsink 40 PCIe graphics card options 42 Removing...

Страница 4: ...rver blade with video and USB devices 81 Accessing a server blade with local KVM 81 Accessing local media devices 82 Troubleshooting 84 Troubleshooting resources 84 Component identification 85 Front panel components graphics server blade 85 Front panel components graphics server blade with expansion blade 86 Front panel LEDs and buttons graphics server blade 87 Front panel LEDs and buttons graphic...

Страница 5: ...terprise Support Center and a technician will help you over the telephone Hewlett Packard Enterprise specifies in the materials shipped with a replacement CSR part whether a defective part must be returned to Hewlett Packard Enterprise In cases where it is required to return the defective part to Hewlett Packard Enterprise you must ship the defective part back to Hewlett Packard Enterprise within ...

Страница 6: ...fourni Si vous ne retournez pas la pièce défectueuse Hewlett Packard Enterprise se réserve le droit de vous facturer les coûts de remplacement Dans le cas d une pièce CSR Hewlett Packard Enterprise supporte l ensemble des frais d expédition et de retour et détermine la société de courses ou le transporteur à utiliser Pour plus d informations sur le programme CSR de Hewlett Packard Enterprise conta...

Страница 7: ...hpe com support selfrepair Servizio di garanzia per i soli componenti La garanzia limitata Hewlett Packard Enterprise può includere un servizio di garanzia per i soli componenti Nei termini di garanzia del servizio per i soli componenti Hewlett Packard Enterprise fornirà gratuitamente le parti di ricambio Per il servizio di garanzia per i soli componenti è obbligatoria la formula CSR che prevede l...

Страница 8: ...rfahren zwingend vorgegeben Wenn Sie den Austausch dieser Teile von Hewlett Packard Enterprise vornehmen lassen werden Ihnen die Anfahrt und Arbeitskosten für diesen Service berechnet Reparaciones del propio cliente Los productos de Hewlett Packard Enterprise incluyen muchos componentes que el propio usuario puede reemplazar Customer Self Repair CSR para minimizar el tiempo de reparación y ofrecer...

Страница 9: ...e estos componentes tendrá que hacerse cargo de los gastos de desplazamiento y de mano de obra de dicho servicio Customer Self Repair Veel onderdelen in Hewlett Packard Enterprise producten zijn door de klant zelf te repareren waardoor de reparatieduur tot een minimum beperkt kan blijven en de flexibiliteit in het vervangen van defecte onderdelen groter is Deze onderdelen worden CSR onderdelen Cus...

Страница 10: ...nóstico a Hewlett Packard Enterprise ou fornecedores parceiros da Hewlett Packard Enterprise concluir que o reparo pode ser efetuado pelo uso de uma peça CSR a Hewlett Packard Enterprise enviará a peça diretamente ao cliente Há duas categorias de peças CSR Obrigatória Peças cujo reparo feito pelo cliente é obrigatório Se desejar que a Hewlett Packard Enterprise substitua essas peças serão cobradas...

Страница 11: ... o programa norte americano visite o site da Hewlett Packard Enterprise http www hpe com support selfrepair Serviço de garantia apenas para peças A garantia limitada da Hewlett Packard Enterprise pode incluir um serviço de garantia apenas para peças Segundo os termos do serviço de garantia apenas para peças a Hewlett Packard Enterprise fornece as peças de reposição sem cobrar nenhuma taxa No caso ...

Страница 12: ...Customer self repair 12 ...

Страница 13: ...Customer self repair 13 ...

Страница 14: ...Customer self repair 14 ...

Страница 15: ...777683 001 Mandatory1 3 DIMM baffles a DIMM baffle right 777685 001 Mandatory1 b DIMM baffle left 777684 001 Mandatory1 4 Front panel drive cage assembly 777682 001 Mandatory1 5 Heatsink blank 670027 001 Mandatory1 6 Serial label pull tab 777690 001 Mandatory1 7 Mezzanine assembly 784960 001 Mandatory1 8 Processors a 1 60 GHz Intel Xeon E5 2603 v3 762441 001 Optional2 b 1 90 GHz Intel Xeon E5 2609...

Страница 16: ...on E5 2698 v3 780760 002 Optional2 v 2 30 GHz Intel Xeon E5 2699 v3 780761 001 Optional2 9 Heatsink a Processor 1 heatsink standard 777687 001 Optional2 b Processor 2 heatsink standard 777686 001 Optional2 c Processor 1 heatsink wide 777689 001 Optional2 d Processor 2 heatsink wide 777688 001 Optional2 10 Drives a 146 GB hard drive SAS SFF 15 000 rpm 6G 653950 001 Mandatory1 b 300 GB hard drive SA...

Страница 17: ...32 GB 4Rx4 PC4 2133L 774174 001 Mandatory1 12 Storage controller a HPE Smart Array H244br Host Bus Adapter 749999 001 Mandatory1 b HPE Smart Array P244br Controller 749800 001 Mandatory1 13 Drive backplane 744412 001 Optional2 14 System board with base pan 744409 001 Optional2 15 Trusted Platform Module 505836 001 No3 16 Mezzanine options a HPE FlexFabric 20Gb 2 port 630M Adapter 701528 001 Mandat...

Страница 18: ... black 801810 001 Mandatory1 23 Cables a HPE c Class Blade SUV Cable 416003 001 Mandatory1 b SATA cable 784961 001 Mandatory1 Not shown Do not mix processors with different speeds or cache sizes 1 Mandatory Parts for which customer self repair is mandatory If you request Hewlett Packard Enterprise to replace these parts you will be charged for the travel and labor costs of this service 2 Optional ...

Страница 19: ... cuya reparación por parte del usuario es obligatoria Si solicita a Hewlett Packard Enterprise que realice la sustitución de estos componentes tendrá que hacerse cargo de los gastos de desplazamiento y de mano de obra de dicho servicio 2 Opcional Componentes cuya reparación por parte del usuario es opcional Estos componentes también están diseñados para que puedan ser reparados por el usuario Sin ...

Страница 20: ...xpansion blade components Hewlett Packard Enterprise continually improves and changes product parts For complete and current supported parts information see the Hewlett Packard Enterprise PartSurfer website http www hpe com info partssurfer ...

Страница 21: ... Quadro 5000 graphics card 736758 001 Mandatory1 c NVIDIA Quadro 6000 graphics card 736859 001 Mandatory1 d NVIDIA GRID K1 PCIe GPU 736759 001 Mandatory1 e NVIDIA GRID K2 PCIe GPU 732635 001 Mandatory1 f NVIDIA Quadro M5000 GPU 826220 001 Mandatory1 g NVIDIA Quadro M6000 GPU 813432 001 Mandatory1 5 Expansion blade power board 792950 001 Optional2 6 Graphics expansion control cables a Graphics expa...

Страница 22: ...r il cliente Hewlett Packard Enterprise richiede l intervento di un tecnico autorizzato per la sostituzione della parte Queste parti sono contrassegnate con No nel catalogo parti illustrato 1 Zwingend Teile für die das Customer Self Repair Verfahren zwingend vorgegeben ist Wenn Sie den Austausch dieser Teile von Hewlett Packard Enterprisevornehmen lassen werden Ihnen die Anfahrt und Arbeitskosten ...

Страница 23: ...o feito pelo cliente é opcional Essas peças também são projetadas para o reparo feito pelo cliente No entanto se desejar que a Hewlett Packard Enterprise as substitua pode haver ou não a cobrança de taxa adicional dependendo do tipo de serviço de garantia destinado ao produto 3 Não Algumas peças da Hewlett Packard Enterprise não são projetadas para o reparo feito pelo cliente A fim de cumprir a ga...

Страница 24: ...arrive at static free workstations Place parts on a grounded surface before removing them from their containers Avoid touching pins leads or circuitry Always be properly grounded when touching a static sensitive component or assembly Server blade warnings and cautions WARNING To reduce the risk of shock or injury from high current electrical energy do not remove the graphics server blade access pa...

Страница 25: ...duce the risk of injury from a hot component allow the surface to cool before touching 217 7 kg 480 0 lb This symbol indicates that the component exceeds the recommended weight for one individual to handle safely WARNING To reduce the risk of personal injury or damage to the equipment observe local occupational health and safety requirements and guidelines for manual material handling These symbol...

Страница 26: ...by mode Use the Onboard Administrator CLI to execute one of the following commands o poweroff server bay number This command initiates a controlled shutdown of applications and the OS before the graphics server blade enters standby mode o poweroff server bay number force This form of the command forces the graphics server blade to enter standby mode without properly exiting applications and the OS...

Страница 27: ...ent damage to electrical components properly ground the graphics server blade before beginning any installation procedure Improper grounding can cause ESD Remove the foam gasket 1 Power down the graphics server blade on page 25 2 Remove the graphics server blade Remove the graphics blade on page 26 3 Place the graphics server blade on a flat level work surface 4 Remove the expansion blade access p...

Страница 28: ... graphics server blade on a flat level work surface 4 Remove the expansion blade access panel Expansion blade access panel on page 31 5 Remove the expansion module front bezel on page 29 6 Remove the foam gasket on page 27 7 Disconnect the power cable from the expander power board and the PCI graphics option 8 Remove the graphics expansion control cable 9 Remove the retaining block on page 29 10 R...

Страница 29: ...Remove the expansion blade access panel Expansion blade access panel on page 31 5 Remove the expansion blade front bezel Remove the retaining block 1 Power down the graphics server blade on page 25 2 Remove the graphics server blade Remove the graphics blade on page 26 3 Place the graphics server blade on a flat level work surface 4 Remove the expansion blade access panel Expansion blade access pa...

Страница 30: ...emove the graphics blade on page 26 3 Place the graphics server blade on a flat level work surface 4 Remove the expansion blade access panel Expansion blade access panel on page 31 5 Remove the foam gasket on page 27 6 Disconnect the power cable from the expander power board and the PCI graphics option 7 Remove the graphics expansion control cable 8 Remove the expansion module from the host server...

Страница 31: ...to place Expansion blade access panel To remove the component 1 Power down the graphics server blade on page 25 2 Remove the graphics server blade Remove the graphics blade on page 26 3 Place the graphics server blade on a flat level work surface 4 Remove the access panel To replace the component reverse the removal procedure Expansion blade PCIe card cage To remove the component 1 Power down the ...

Страница 32: ... 9 Remove the retaining block on page 29 10 Remove the expansion blade PCIe card cage To replace the component reverse the removal procedure Drive blank Remove the component as indicated CAUTION To prevent improper cooling and thermal damage do not operate the server unless all bays are populated with either a component or a blank To replace the blank slide the blank into the bay until it locks in...

Страница 33: ...up all data on the drive 3 Remove the drive To replace the drive slide the drive into the bay until it is fully seated and then close the latch handle to lock the drive in the bay Enclosure connector cover To remove the component 1 Place the graphics server blade on a flat level work surface 2 Remove the enclosure connector cover To replace the component reverse the removal procedure ...

Страница 34: ...e on page 26 4 Place the graphics server blade on a flat level work surface 5 Remove the access panel Access panel graphics server blade on page 31 6 Remove the mezzanine assembly To replace the component 1 Align the mezzanine assembly with the guide pins on the system board and then install the mezzanine assembly on the system board 2 Press down firmly on the mezzanine assembly handles and then c...

Страница 35: ... mezzanine connectors see System board components on page 91 For information about the mezzanine connectors see Mezzanine connector definitions on page 92 This graphics server blade supports multiple mezzanine options For more information see the product QuickSpecs on the Hewlett Packard Enterprise website http www hpe com info qs Mezzanine options To remove the component 1 Power down the graphics...

Страница 36: ... pins on the mezzanine assembly 2 Install the mezzanine card in the mezzanine assembly and then tighten the mezzanine card screws to secure the card to the mezzanine assembly 3 Align the mezzanine assembly with the guide pins on the system board and then install the mezzanine assembly on the system board ...

Страница 37: ... PCI graphics option 8 Remove the graphics expansion control cable 9 Remove the retaining block on page 29 10 Remove the expansion blade PCIe card cage on page 28 11 Remove the expansion blade from the host side on page 30 12 Remove the mezzanine assembly Mezzanine assembly on page 34 13 Remove the PCIe mezzanine pass through board Mezzanine options on page 35 To replace the component reverse the ...

Страница 38: ...ove the foam gasket on page 27 7 Disconnect the power cable from the expander power board and the PCI graphics option 8 Remove the graphics expansion control cable 9 Remove the retaining block on page 29 10 Remove the expansion blade PCIe card cage on page 28 11 Remove the expansion blade from the host side on page 30 12 Remove the mezzanine assembly Mezzanine assembly on page 34 13 Remove the PCI...

Страница 39: ...dure is not impacted by the difference in appearance of the hardware To remove the component 1 Power down the graphics server blade on page 25 2 Remove the graphics server blade Remove the graphics blade on page 26 3 Place the graphics server blade on a flat level work surface 4 Remove the access panel Access panel graphics server blade on page 31 5 Remove the mezzanine assembly Mezzanine assembly...

Страница 40: ...ponents shown in this procedure might look slightly different than your product The procedure is not impacted by the difference in appearance of the hardware To remove the component 1 Power down the graphics server blade on page 25 2 Remove the graphics server blade Remove the graphics blade on page 26 3 Place the graphics server blade on a flat level work surface 4 Remove the access panel Access ...

Страница 41: ...cedures 41 6 Remove the mezzanine GPU module from the mezzanine assembly Mezzanine options on page 35 7 Remove the screws to release the MXM board from the mezzanine GPU module 8 Remove the MXM board from the mezzanine GPU module ...

Страница 42: ... a complete list of supported options see the product QuickSpecs on the Hewlett Packard Enterprise website http www hpe com info qs Removing the PCIe graphics card options To remove the graphics cards from the graphics expansion module 1 Power down the graphics server blade on page 25 2 Remove the graphics server blade Remove the graphics blade on page 26 3 Remove the expansion blade access panel ...

Страница 43: ...ront bezel Remove the expansion module front bezel on page 29 6 Remove the foam gasket on page 27 7 Disconnect the power cable from the expander power board and the PCI graphics option 8 Remove the graphics expansion control cable 9 Remove the retaining block on page 29 10 Remove the expansion blade PCIe card cage on page 28 11 Remove the graphics card from the card cage IMPORTANT For NVIDIA GRID ...

Страница 44: ...rom the PCI card cage Make note of the screw types and location for each screw removed Retain for later use To replace the component 1 Remove the screws and washers from the graphics card Make note of the screw type and location and retain the screws for use later in this procedure The washers are no longer needed ...

Страница 45: ...m flat head screws through the plate hole alignment to the baseplate Do not apply any torque Slightly tighten only by hand If the screws lack Nylok coating or are used add Loctite 242 Threadlocker 3 5 threads from the tip 4 Install the M2 5x6 mm wafer head screws removed earlier through the heat spreader plate tab and process control board hole alignment to the baseplate Torque both screws to 4 0 ...

Страница 46: ...rol the air flow into the GRID card and balance the air flow to adjacent blades Using the card in the expansion blade without implementing this measure might potentially result in unexpected host shutdown of the host blade and or nearby blades in the same enclosure These labels are replaceable with any commonly available tape or label as long as the tape or label covers the hole as shown and has c...

Страница 47: ...all the graphics expansion control cable 11 Connect the power cable to the expander power board and the PCI graphics option 12 Install the foam gasket 13 Install the expansion module front bezel 14 Install the access panel Access panel graphics server blade on page 31 15 Install the graphics server blade 16 Power up the graphics server blade 17 Download and install the latest drivers from the foll...

Страница 48: ...e access panel on page 31 5 Remove the foam gasket on page 27 6 Disconnect the power cable from the expander power board and the PCI graphics option 7 Disconnect the graphics expansion control cable from the mezzanine card on the host server Press down on the host server mezzanine card while disconnecting the cable If two graphics expansion control cables are installed use this procedure to discon...

Страница 49: ...Power down the graphics server blade on page 25 2 Remove the graphics server blade Remove the graphics blade on page 26 3 Place the graphics server blade on a flat level work surface 4 Remove the access panel Access panel graphics server blade on page 31 5 Remove the mezzanine assembly Mezzanine assembly on page 34 6 Use the FlexibleLOM handle to remove the FlexibleLOM from the system board To rep...

Страница 50: ... blade on page 25 3 Remove the graphics server blade Remove the graphics blade on page 26 4 Place the graphics server blade on a flat level work surface 5 Remove the access panel Access panel graphics server blade on page 31 6 Prepare the storage controller for removal 7 Remove the storage controller To replace the component reverse the removal procedure ...

Страница 51: ... blank Retain the heatsink blank for future use To replace the component reverse the removal procedure CAUTION To avoid damage to the system board processor socket and screws do not overtighten the heatsink screws DIMM baffles To remove the component The server contains two DIMM baffle 1 Power down the graphics server blade on page 25 2 Remove the graphics server blade Remove the graphics blade on...

Страница 52: ...Battery installed on the baffle Use the blue pull tab to disconnect the Smart Storage Battery cable from the system board 7 Remove one or more DIMM baffles o DIMM baffle right side o DIMM baffle left side 8 Remove the Smart Storage Battery from the DIMM baffle if installed HPE Smart Storage Battery on page 53 ...

Страница 53: ...he mezzanine assembly Mezzanine assembly on page 34 6 Remove the FlexibleLOM FlexibleLOM on page 49 7 Remove the storage controller Storage controller on page 50 8 Disconnect the direct connect SATA cable if installed Direct connect SATA cabling on page 80 9 Remove the internal USB drive if installed To locate the internal USB connector see System board components on page 91 10 Remove all DIMM baf...

Страница 54: ...phics server blade on a flat level work surface 4 Remove the access panel Access panel graphics server blade on page 31 5 Remove all drives Drive on page 33 6 Remove all drive blanks Drive blank on page 32 7 Do one of the following o Remove the storage controller Storage controller on page 50 o Disconnect the direct connect SATA cable Direct connect SATA cabling on page 80 8 Remove the internal US...

Страница 55: ...rver blade on page 31 5 Remove all drives Drive on page 33 6 Remove all drive blanks Drive blank on page 32 CAUTION Remove all drives and drive blanks before removing the drive backplane 7 Do one of the following o Remove the storage controller Storage controller on page 50 o Disconnect the direct connect SATA cable Direct connect SATA cabling on page 80 8 Remove the internal USB drive if installe...

Страница 56: ...r an alkaline battery pack A risk of fire and burns exists if the battery pack is not properly handled To reduce the risk of personal injury Do not attempt to recharge the battery Do not expose the battery to temperatures higher than 60 C 140 F Do not disassemble crush puncture short external contacts or dispose of in fire or water Replace only with the spare designated for this product To remove ...

Страница 57: ...onents to cool before touching them To remove the component 1 Power down the graphics server blade on page 25 2 Remove the graphics server blade Remove the graphics blade on page 26 3 Place the graphics server blade on a flat level work surface 4 Remove the access panel Access panel graphics server blade on page 31 5 Do one of the following o Remove the storage controller Storage controller on pag...

Страница 58: ...atsink To replace the component 1 Clean the old thermal grease from the heatsink with the alcohol swab Allow the alcohol to evaporate before continuing 2 Apply all the grease to the top of the processor in the following pattern to ensure even distribution ...

Страница 59: ...n the heatsink screws 4 Align and install the heatsink Alternate tightening the screws until the heatsink is seated properly 5 Install the storage controller or connect the direct connect SATA cable Direct connect SATA cabling on page 80 6 Install all DIMM baffles DIMM baffles on page 51 7 Install the internal USB drive 8 Install the access panel 9 Install the graphics server blade Processor ...

Страница 60: ... the HPE ProLiant WS460c Gen9 Graphics Server Blade User Guide on the Hewlett Packard Enterprise website http www hpe com support WS460cGen9 docs For more information about graphics server blade memory see the Hewlett Packard Enterprise website http www hpe com info memory To remove the component 1 Update the system ROM Locate and download the latest ROM version from the Hewlett Packard Enterprise...

Страница 61: ...N THE PINS ON THE SYSTEM BOARD ARE VERY FRAGILE AND EASILY DAMAGED To avoid damage to the system board do not touch the processor or the processor socket contacts 11 Remove the processor from the processor retaining bracket To replace the component CAUTION To avoid damage to the system board processor socket and screws do not overtighten the heatsink screws ...

Страница 62: ...ARE VERY FRAGILE AND EASILY DAMAGED To avoid damage to the system board do not touch the processor or the processor socket contacts CAUTION Do not press down on the processor Pressing down on the processor may cause damage to the processor socket and the system board Press only in the area indicated on the processor retaining bracket 2 Close the processor retaining bracket When the processor is in...

Страница 63: ...etaining bracket 4 Align and install the heatsink Alternate tightening the screws until the heatsink is seated properly 5 Install all DIMM baffles DIMM baffles on page 51 6 Install the internal USB drive 7 Install the storage controller or connect the direct connect SATA cable Direct connect SATA cabling on page 80 8 Install the access panel 9 Install the graphics server blade System board ...

Страница 64: ...Do one of the following o Remove the storage controller Storage controller on page 50 o Disconnect the direct connect SATA cable Direct connect SATA cabling on page 80 10 Remove the internal USB drive if installed To locate the internal USB connector see System board components on page 91 11 Remove the microSD card if installed To locate the microSD card see System board components on page 91 12 R...

Страница 65: ... board and install the enclosure connector covers on the damaged system board To replace the system board 1 Place the new graphics server blade system board with base pan on a flat level surface IMPORTANT Install all components in the same configuration prior to removing the system board 2 If the graphics server blade had only one processor installed install the heatsink blank in processor socket ...

Страница 66: ...d in the processor retaining bracket by visually inspecting the processor installation guides on either side of the processor THE PINS ON THE SYSTEM BOARD ARE VERY FRAGILE AND EASILY DAMAGED CAUTION Do not press down on the processor Pressing down on the processor may cause damage to the processor socket and the system board Press only in the area indicated on the processor retaining bracket ...

Страница 67: ... on the front of the socket 7 Press and hold the processor retaining bracket in place and then close each processor locking lever Press only in the area indicated on the processor retaining bracket 8 Install the processor socket cover onto the processor socket of the failed system board 9 Clean the old thermal grease from the heatsink with the alcohol swab Allow the alcohol to evaporate before con...

Страница 68: ...onnel This value should always match the serial number located on the chassis 4 Press the Enter key to clear the warning 5 Enter the serial number and press the Enter key 6 Select Product ID The following warning appears Warning The Product ID should ONLY be modified by qualified service personnel This value should always match the Product ID located on the chassis 7 Enter the product ID and press...

Страница 69: ...board in place turn the base pan on its side and remove the two system board screws from the bottom of the base pan 13 Place the graphics server blade on a flat level surface 14 Slide the system board approximately 1 27 cm 0 50 inches towards the rear of the server and lift the system board from the base pan 15 Remove the three T 10 screws from the outside of the base pan and then remove the serve...

Страница 70: ... the server blade release lever assembly To replace the server blade release lever 1 Install the server blade release lever assembly and then install the T 10 screws from the outside of the base pan 2 Install the server blade release lever bracket and then install the T 10 screw from the inside of the base pan ...

Страница 71: ...stall all components in the same configuration prior to removing the system board 6 Install the front panel drive cage assembly Front panel drive cage assembly on page 54 7 Install the heatsink blank Heatsink blank on page 51 8 Install the storage controller or connect the direct connect SATA cable Direct connect SATA cabling on page 80 9 Install all DIMM baffles DIMM baffles on page 51 10 Install...

Страница 72: ...TPM security rivet Upon locating a broken or disfigured rivet on an installed TPM administrators should consider the system compromised and take appropriate measures to ensure the integrity of the system data If you suspect a TPM board failure leave the TPM installed and remove the system board System board on page 63 Contact a Hewlett Packard Enterprise authorized service provider for a replaceme...

Страница 73: ...ng Access a high performance and secure Integrated Remote Console to the server from anywhere in the world if you have a network connection to the server Use the shared NET Integrated Remote Console to collaborate with up to four server administrators Remotely mount high performance Virtual Media devices to the graphics server blade Securely and remotely control the power state of the managed grap...

Страница 74: ...ation see the Hewlett Packard Enterprise website http www hpe com info privacy The Active Health System in conjunction with the system monitoring provided by Agentless Management or SNMP Pass thru provides continuous monitoring of hardware and configuration changes system status and service alerts for various server components The Agentless Management Service is available in the SPP which can be d...

Страница 75: ...age 76 HPE UEFI System Utilities The HPE UEFI System Utilities is embedded in the system ROM The UEFI System Utilities enable you to perform a wide range of configuration activities including Configuring system devices and installed options Enabling and disabling system features Displaying system information Selecting the primary boot controller Configuring memory options Selecting a language Laun...

Страница 76: ... the server serial number and product ID After you replace the system board you must re enter the graphics server blade serial number and the product ID 1 During the graphics server blade startup sequence press the F9 key to access UEFI System Utilities 2 Select the System Configuration BIOS Platform Configuration RBSU Advanced Options Advanced System ROM Options Serial Number and then press the E...

Страница 77: ...er your device for remote support to enable enhanced delivery of your Hewlett Packard Enterprise warranty HP Care Pack Service or Hewlett Packard Enterprise contractual support agreement Insight Remote Support supplements your monitoring continuously to ensure maximum system availability by providing intelligent event diagnosis and automatic secure submission of hardware event notifications to Hew...

Страница 78: ...es so that the user can change the default operation of the USB ports For more information see the UEFI System Utilities User Guide for ProLiant Gen9 Servers on the Hewlett Packard Enterprise website http www hpe com info ProLiantUEFI docs External USB functionality Hewlett Packard Enterprise provides external USB support to enable local connection of USB devices for graphics server blade administ...

Страница 79: ... known as the Health Driver is loaded When the operating system is functioning properly the system periodically resets the timer However when the operating system fails the timer expires and restarts the server ASR increases server availability by restarting the server within a specified time after a system hang At the same time the SIM console notifies you by sending a message to a designated pag...

Страница 80: ... on the product and installed options For more information about product features specifications options configurations and compatibility see the product QuickSpecs on the Hewlett Packard Enterprise website http www hpe com info qs HPE Smart Storage Battery cabling Direct connect SATA cabling ...

Страница 81: ...rations are possible This section offers two possible configurations For more information see USB support on page 77 The USB connectors on the SUV cable do not support devices that require greater than a 500mA power source Accessing a server blade with local KVM For this configuration a USB hub is not necessary To connect additional devices use a USB hub CAUTION Before disconnecting the SUV cable ...

Страница 82: ... ROM drive to the graphics server blade The USB connectors on the SUV cable do not support devices that require greater than a 500mA power source The USB hub provides additional connections and the power required to support USB keys or external drives that require more than 500mA at 5V 1 Open the serial label pull tab and connect the c Class Blade SUV cable to the graphics server blade 2 Connect t...

Страница 83: ...Cabling 83 o USB mouse Item Description 1 Monitor 2 USB CD DVD ROM drive 3 USB keyboard 4 USB hub 5 USB mouse 6 c Class Blade SUV Cable ...

Страница 84: ... Gen9_TSG_es German http www hpe com support Gen9_TSG_de Japanese http www hpe com support Gen9_TSG_ja Simplified Chinese http www hpe com support Gen9_TSG_zh_cn The HPE ProLiant Gen9 Troubleshooting Guide Volume II Error Messages provides a list of error messages and information to assist with interpreting and resolving error messages on ProLiant servers and server blades To view the guide select...

Страница 85: ...tion 1 Serial label pull tab 2 HPE c Class Blade SUV connector behind the serial label pull tab 3 Drive bay 2 4 Drive bay 1 5 Server blade release lever 6 Server blade release button The SUV connector and the c Class Blade SUV Cable are used for some graphics server blade configuration and diagnostic procedures ...

Страница 86: ... Description 1 Serial label pull tab 2 c Class Blade SUV connector behind the serial label pull tab 3 Drive bay 2 4 Drive bay 1 5 Server blade release lever 6 Server blade release button The SUV connector and the c Class SUV Cable are used for some server blade configuration and diagnostic procedures ...

Страница 87: ...er present 3 UID button LED Solid blue Activated Flashing blue 1 Hz cycle per sec Remote management or firmware upgrade in progress 4 Hz cycle per sec iLO manual reboot sequence initiated 8 Hz cycle per sec iLO manual reboot sequence in progress Off Deactivated 4 NIC activity LED Solid green Link to network Flashing green 1 Hz cycle per sec Network active Off No network activity When all four LEDs...

Страница 88: ... power Off and the Health Status LED bar is flashing green The Power On Standby button service is being initialized 3 UID LED Solid Blue Identified Flashing Blue Active remote management Off No active remote management 4 FlexibleLOM LED Green Network linked Flashing Green Network activity Off No link or activity 5 Expansion Health status LED bar Solid Green Normal System is powered on Flashing Gre...

Страница 89: ...es Power supply 9 flashes For more information see Front panel LEDs and buttons Front panel LEDs and buttons graphics server blade on page 87 Serial label pull tab information The serial label pull tab is located on the front panel of the graphics server blade To locate the serial label pull tab see Front panel components The serial label pull tab provides the following information Product serial ...

Страница 90: ...ore of the logical drives to fail Off Removing the drive does not cause a logical drive to fail 4 Drive status Solid green The drive is a member of one or more logical drives Flashing green The drive is rebuilding or performing a RAID migration strip size migration capacity expansion or logical drive extension or is erasing Flashing amber green The drive is a member of one or more logical drives a...

Страница 91: ...ctor 9 MicroSD card slot 10 FlexibleLOM connectors 2 11 Drive backplane 12 Internal USB connector 13 HPE Smart Storage Battery connector 14 Direct connect SATA connector 15 System maintenance switch 16 TPM connector The symbols correspond to the symbols located on the interconnect bays System maintenance switch Position Default Function S1 Off Off iLO security is enabled On iLO security is disable...

Страница 92: ... is prepared to erase all system configuration settings from both CMOS and NVRAM CAUTION Clearing CMOS and or NVRAM deletes configuration information Be sure to properly configure the server or data loss could occur Mezzanine connector definitions Item PCIe Mezzanine connector 1 x16 Type A mezzanine card only Mezzanine connector 2 x16 Type A or B mezzanine card When installing a mezzanine option o...

Страница 93: ...ermine DIMM characteristics use the label attached to the DIMM and the following illustration and table Item Description Definition 1 Capacity 8 GB 16 GB 32 GB 2 Rank 1R Single rank 2R Dual rank 4R Quad rank 3 Data width x4 4 bit x8 8 bit 4 Memory generation DDR4 5 Maximum memory speed 2133 MT s 6 CAS latency P 15 ...

Страница 94: ...nnectors CAUTION Before disconnecting the SUV cable from the connector always squeeze the release buttons on the sides of the connector Failure to do so can result in damage to the equipment Item Connector Description 1 Serial For trained personnel to connect a null modem serial cable and perform advanced diagnostic procedures 2 USB For connecting up to two USB devices 3 Video For connecting a vid...

Страница 95: ... per 1 000 ft up to 3048 m 10 000 ft applies No direct sunlight is allowed The maximum permissible rate of change is 10 C hr 18 F hr The type and number of options installed may reduce the upper temperature and humidity limits Operating with a fan fault or above 30 C 86 F may reduce system performance Storage maximum humidity of 95 is based on a maximum temperature of 45 C 113 F Maximum storage al...

Страница 96: ...ed Micro Devices ASR Automatic Server Recovery CSR Customer Self Repair FLB FlexibleLOM for blade servers FLR FlexibleLOM for rack servers GPU graphics processing unit HBA host bus adapter HPE SIM HPE Systems Insight Manager HPE SSA HPE Smart Storage Administrator iLO Integrated Lights Out iLO 4 Integrated Lights Out 4 ...

Страница 97: ...mory module NAND Not AND NVRAM nonvolatile memory PCIe Peripheral Component Interconnect Express POST Power On Self Test RBSU ROM Based Setup Utility RDIMM registered dual in line memory module SAS serial attached SCSI SATA serial ATA SD Secure Digital SFF small form factor SPP Service Pack for ProLiant SSD solid state drive ...

Страница 98: ...Acronyms and abbreviations 98 SUV serial USB video TPM Trusted Platform Module UEFI Unified Extensible Firmware Interface UID unit identification USB universal serial bus ...

Страница 99: ...tion send any errors suggestions or comments to Documentation Feedback mailto docsfeedback hpe com When submitting your feedback include the document title part number edition and publication date located on the front cover of the document For online help content include the product name product version help edition and publication date located on the legal notices page ...

Страница 100: ...guidelines 92 DIMM slot locations 90 91 DIMMs 53 90 91 documentation 98 documentation feedback 98 drive 33 drive air baffle 32 drive backplane 55 drive bay numbering 88 drive blank 32 drive cabling 80 drive cage backplane 55 drive LEDs 89 drive numbering 88 drive removing 33 drives 89 drives determining status of 89 drives hot plug 33 E electrical 24 electrostatic discharge 24 embedded diagnostics...

Страница 101: ...K2 I O Plate 43 installing NVIDIA Quadro 5000 42 installing NVIDIA Quadro 6000 42 Integrated Lights Out iLO 73 75 Integrated Management Log IML 75 Intelligent Provisioning 75 76 internal cables 80 internal USB connector 77 90 internal USB functionality 78 L LED health 86 LED power button 86 LED system power 86 LEDs 89 LEDs drive 89 LEDs front panel 89 LEDs hard drive 89 LEDs NIC 86 LEDs power faul...

Страница 102: ...ecifications 94 Service Pack for ProLiant 76 77 software 74 solid state drive removing 33 specifications 94 specifications environmental 94 specifications server blade 94 SPP 76 static electricity 24 supported servers 83 supported targets 83 SUV cable 93 SUV connector 81 82 93 symbols on equipment 25 system board battery 56 90 system board components 90 system board replacement 63 system component...

Отзывы: