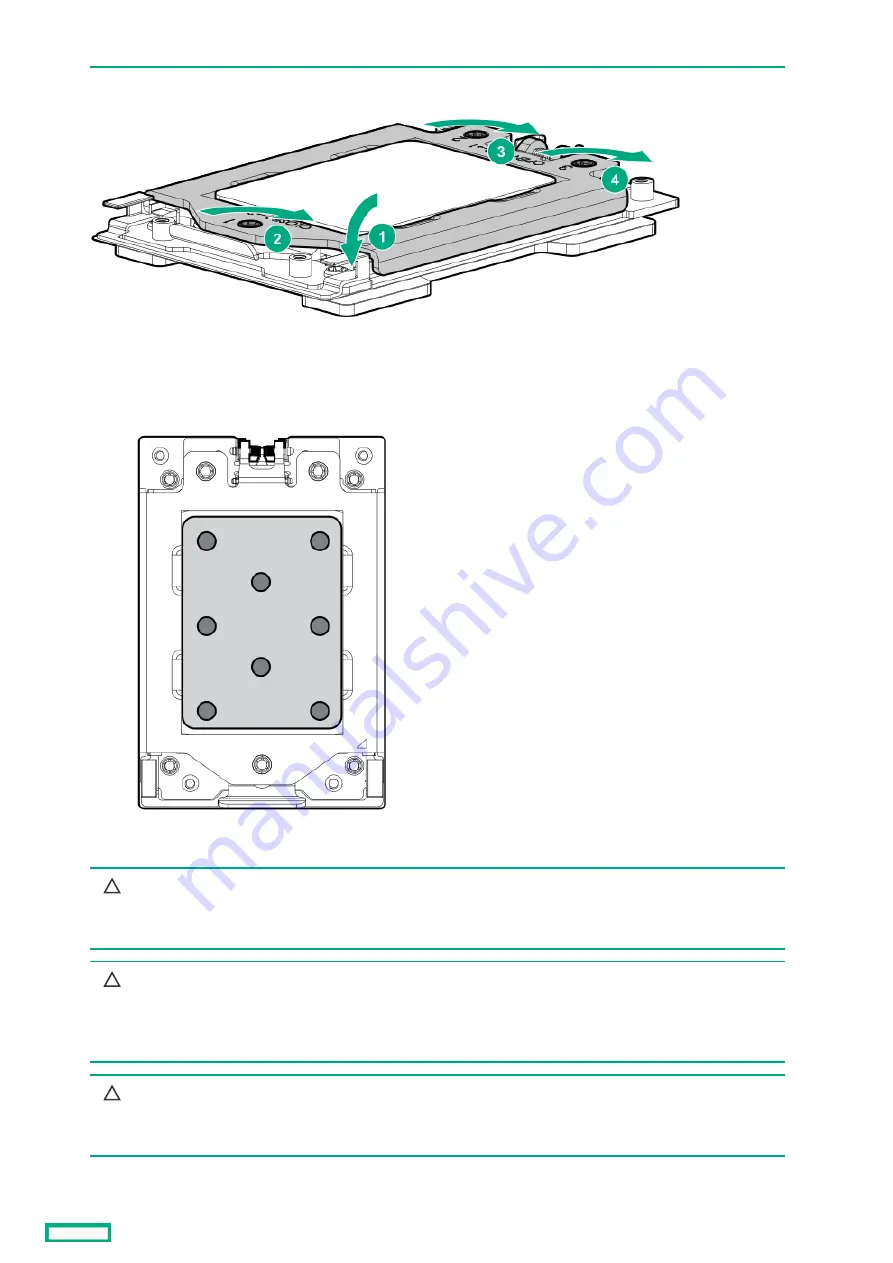
Do not overtighten the screws as this might damage the system board or the processor socket.
13. Apply new thermal grease to the processor in the pattern shown in the following image. Use the full contents of the thermal grease
syringe.
14. Install the heatsink.
CAUTION:
CAUTION:
To prevent mechanical damage or depositing oil on your hands or other contaminant to the heatsink contact
surface, hold the heatsink only by the edge of its base plate. Do not touch the heatsink fins.
CAUTION:
CAUTION:
To prevent thermal failure or component damage, do not move the heatsink once the bottom of its base plate
touches the top of the processor. Excessive heatsink movement can cause the thermal grease to smear and become
uneven. Voids in the compound can adversely impact the transfer of heat away from the processor.
CAUTION:
CAUTION:
Heatsink screws must be tightened and loosened in alternating sequence as shown on the heatsink label. Do not
overtighten the screws as this might damage the system board or the processor socket.
a. Position the heatsink on top of the processor, ensuring that it is properly seated before securing the screws.
b. Use a T-20 screwdriver to tighten the captive screws in the sequence specified on the heatsink label until fully seated.
Removing and replacing a processor
112
Содержание HPE ProLiant DL365 Gen10 Plus Server
Страница 7: ...Illustrated parts catalog Illustrated parts catalog 7 ...
Страница 18: ...Processor spare parts Processor spare parts 18 ...
Страница 24: ...Network adapter spare parts Network adapter spare parts 24 ...
Страница 43: ...Customer self repair 43 ...
Страница 44: ...Customer self repair 44 ...
Страница 45: ...Customer self repair 45 ...
Страница 46: ...Customer self repair 46 ...
Страница 47: ...Removal and replacement procedures Removal and replacement procedures 47 ...
Страница 61: ...Removing and replacing the bezel Removing and replacing the bezel 61 ...
Страница 63: ...To replace the component reverse the removal procedure Removing and replacing the cable management arm 63 ...
Страница 65: ...To replace the component reverse the removal procedure Removing and replacing the easy install rails 65 ...
Страница 67: ...7 Secure the cables Removing and replacing the ball bearing rails 67 ...
Страница 68: ...To replace the component reverse the removal procedure Removing and replacing the ball bearing rails 68 ...
Страница 69: ...Removing the hard drive blank Remove the component as indicated Removing the hard drive blank 69 ...
Страница 75: ...To replace the component reverse the removal procedure Removing and replacing a hot plug AC power supply 75 ...
Страница 83: ...Full height To replace the component reverse the removal procedure Removing and replacing a PCIe blank 83 ...
Страница 87: ...To replace the component reverse the removal procedure Removing and replacing an expansion board 87 ...
Страница 99: ...To replace the component reverse the removal procedure Removing and replacing a GPU in the secondary riser 99 ...
Страница 104: ...provider Removing and replacing the system battery 104 ...
Страница 124: ...Troubleshooting Troubleshooting 124 ...
Страница 126: ...Diagnostic tools Diagnostic tools 126 ...
Страница 138: ...Component identification Component identification 138 ...
Страница 154: ...Device numbers 8 SFF device bay numbering 8 SFF 2 SFF device bay numbering Device numbers 154 ...
Страница 155: ...Drives Drives 155 ...
Страница 157: ...HPE Basic Drive LED definitions 157 ...
Страница 160: ...Fan bay numbering Fan bay numbering 160 ...
Страница 161: ...Cabling Cabling 161 ...
Страница 179: ...Support and other resources Support and other resources 179 ...


